AVFoundation概述
译文,原文链接:AVFoundation Programming Guide .(不完全一致。内容结构有调整,增加了一些类的定义源码)
AVFoundation 是一个媒体框架,它提供的接口:
可以精确地处理基于时间的音视频媒体数据,比如媒体文件的查找、创建、编辑、二次编码。
可以从设备获取输入流并在实时捕获和播放期间操作视频。
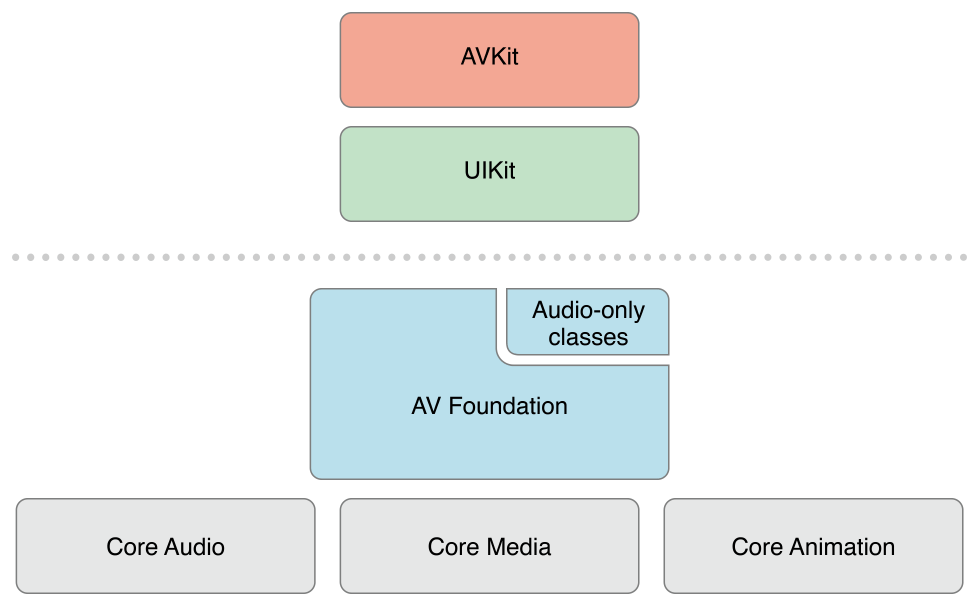
iOS 上的架构:
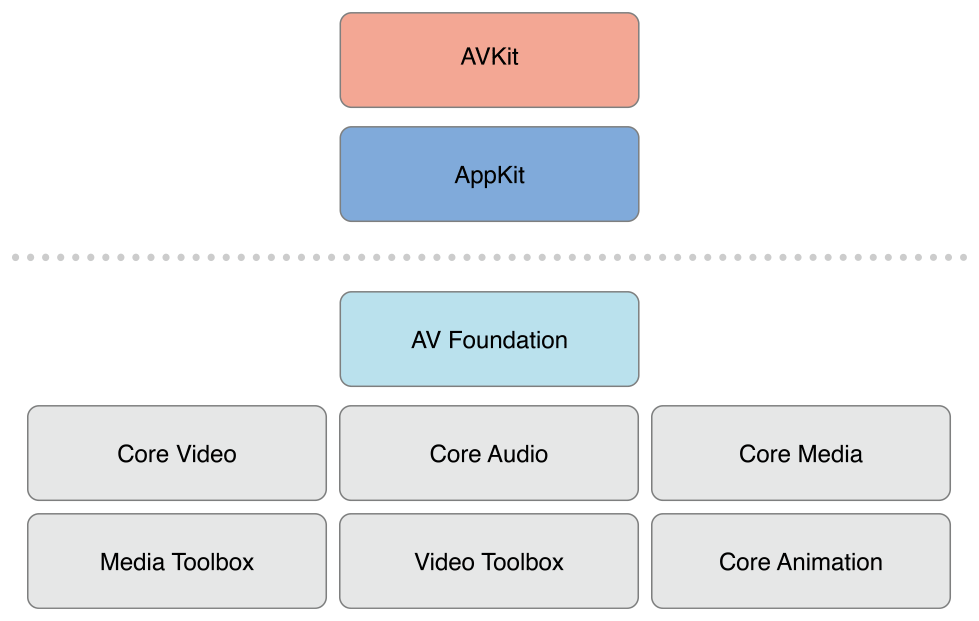
OS X 上相应的媒体架构:
AVFoundation 框架包含视频API 和音频API 两方面。较早的与音频相关的类提供了处理音频的简单方法:
播放声音文件,可以使用 AVAudioPlayer。
录制音频,可以使用 AVAudioRecorder。
使用 AVAudioSession 配置应用程序的音频行为。
在完成具体的开发任务时,你应该尽可能的选择更高层次的抽象框架。
如果只需要播放视频,可以使用 AVKit 框架
如果需要在 iOS 设备上录制视频,而且并不关心更具体的录制参数,可以使用 UIKit 中 UIImagePickerController 类。
需要注意的是,在 AVFoundation 框架中使用的一些原始数据结构 (包括时间相关的数据结构和存储描述媒体数据的底层对象),都在 Core Media 框架中声明。
一、使用Assets 概述
Asset 资产;财产;有价值的人(或事物);有用的人(或事物);
AVFoundation 框架中表示媒体的主要类 — AVAsset。 AVAsset 表示基于时间的视听数据,比如电影文件或视频流。AVAsset 的结构决定了 AV Foundation 框架大部分的工作方式。
AVAsset 实例是一个或多个媒体数据(音频和视频轨道)的集合的聚合表示。它提供有关整个集合的信息,例如其标题、持续时间、自然呈现大小等。
AVAsset 是一个抽象类,可以使用它的子类来:
从 URL 创建一个 asset 对象
根据已有的媒体资源合成出一个新的媒体资源。
AVAsset 不依赖于特定的数据格式。
AVAsset 中的每条独立的媒体数据都有一个统一类的型,称为轨道(track)。
在一个典型的简单情况下,一个轨道代表音频分量,另一个轨道代表视频分量;
然而,在复杂的合成中,可能有多个重叠的音频和视频轨道。
拥有一个电影资产后,可以从中提取静止图像、将其转码为另一种格式或修剪内容。
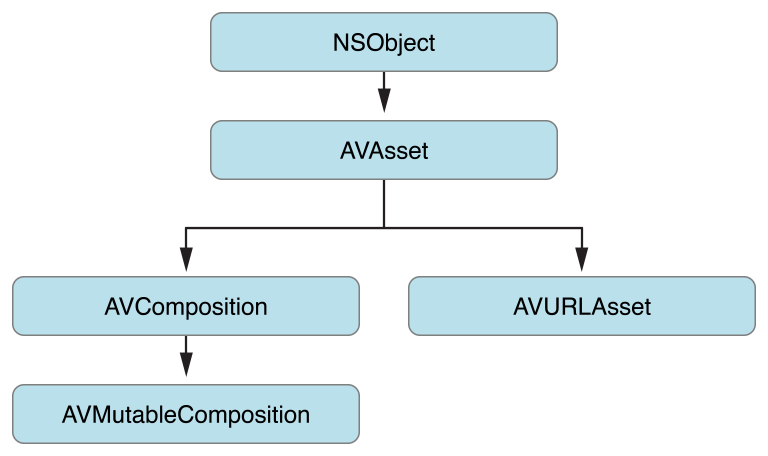
1.1 资产与轨道(AVAsset与AVAssetTrack) 1.1.1 AVAsset类结构 AVAsset 是 AV Foundation 框架的核心关键类,它提供了对视听数据(如电影、视频流)的格式无关的抽象 。
类之间的关系如下图所示。大部分情况下,使用的都是这些类的子类:
使用 AVComposition 子类创建新的 asset
使用 AVURLAsset 子类根据一个指定的 URL(包括来自MPMedia、AssetLibrary框架的asset(iPod库/相册))创建 asset
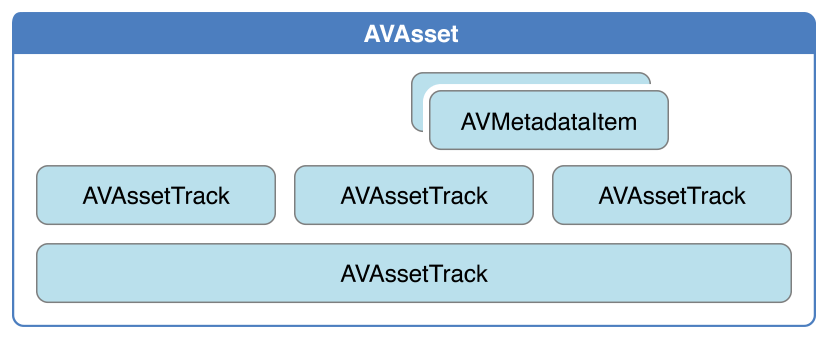
一个 asset 包含:
一组 track,每个 track 都有特定媒体类型,包括但不限于 audio,video,text,closed captions 以及 subtitles。
整个资源的信息,比如时长和标题。
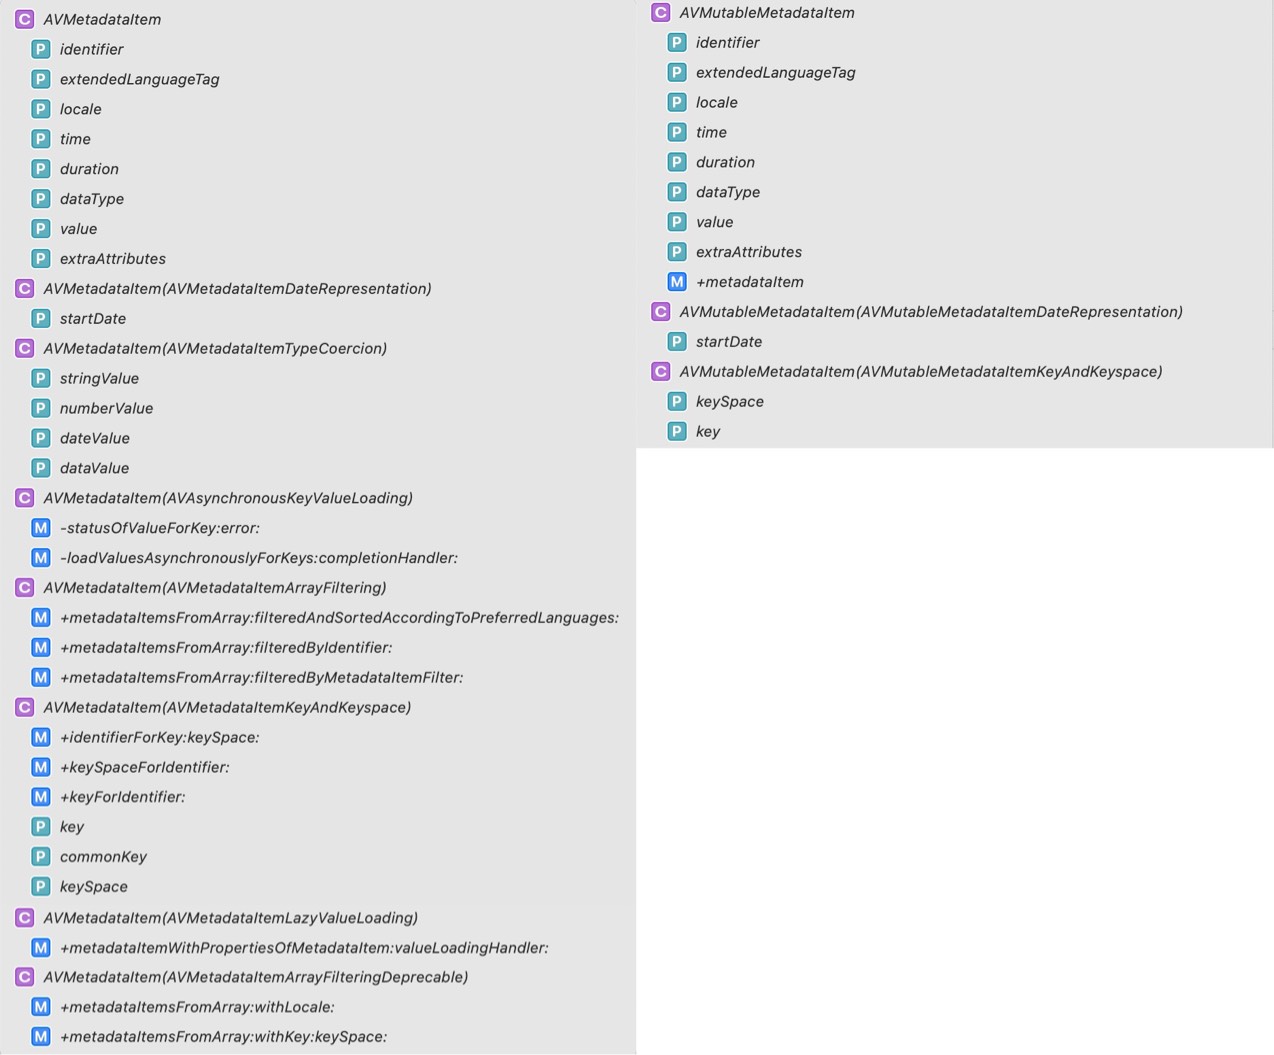
Asset 对象也可能包含元数据 (metadata),metadata 由 AVMetadataItem 类表示。
1
2
3
4
5
6
7
8
9
10
11
12
13
14
15
16
17
18
19
20
21
22
23
24
25
26
27
28
29
30
31
32
33
34
35
36
37
38
39
40
41
42
43
44
45
46
47
48
49
50
51
52
53
54
55
56
57
58
59
60
61
62
63
64
65
66
67
68
69
70
71
72
73
74
75
76
77
78
79
80
81
@interface AVAsset : NSObject <NSCopying , AVAsynchronousKeyValueLoading >+ (instancetype )assetWithURL:(NSURL *)URL; @property (nonatomic , readonly ) CMTime duration;@property (nonatomic , readonly ) float preferredRate;@property (nonatomic , readonly ) float preferredVolume;@property (nonatomic , readonly ) CGAffineTransform preferredTransform;@property (nonatomic , readonly ) CGSize naturalSize API_DEPRECATED("Use the naturalSize and preferredTransform, as appropriate, of the receiver's video tracks. See -tracksWithMediaType:" ;@property (nonatomic , readonly ) AVDisplayCriteria *preferredDisplayCriteria;@property (nonatomic , readonly ) CMTime minimumTimeOffsetFromLive;@end @interface AVAsset (AVAssetAsynchronousLoading )@property (nonatomic , readonly ) BOOL providesPreciseDurationAndTiming;- (void )cancelLoading; @end @interface AVAsset (AVAssetReferenceRestrictions )@property (nonatomic , readonly ) AVAssetReferenceRestrictions referenceRestrictions;@end @interface AVAsset (AVAssetTrackInspection )@property (nonatomic , readonly ) NSArray <AVAssetTrack *> *tracks;- (AVAssetTrack *)trackWithTrackID:(CMPersistentTrackID )trackID; - (void )loadTrackWithTrackID:(CMPersistentTrackID )trackID completionHandler:(void (^)(AVAssetTrack *_result, NSError *))completionHandler; - (NSArray <AVAssetTrack *> *)tracksWithMediaType:(AVMediaType )mediaType; - (void )loadTracksWithMediaType:(AVMediaType )mediaType completionHandler:(void (^)(NSArray <AVAssetTrack *> *, NSError *))completionHandler; - (NSArray <AVAssetTrack *> *)tracksWithMediaCharacteristic:(AVMediaCharacteristic )mediaCharacteristic; - (void )loadTracksWithMediaCharacteristic:(AVMediaCharacteristic )mediaCharacteristic completionHandler:(void (^)(NSArray <AVAssetTrack *> *, NSError *))completionHandler; @property (nonatomic , readonly ) NSArray <AVAssetTrackGroup *> *trackGroups;@end @interface AVAsset (AVAssetMetadataReading )@property (nonatomic , readonly ) AVMetadataItem *creationDate;@property (nonatomic , readonly ) NSString *lyrics;@property (nonatomic , readonly ) NSArray <AVMetadataItem *> *commonMetadata;@property (nonatomic , readonly ) NSArray <AVMetadataItem *> *metadata;@property (nonatomic , readonly ) NSArray <AVMetadataFormat > *availableMetadataFormats;- (NSArray <AVMetadataItem *> *)metadataForFormat:(AVMetadataFormat )format; - (void )loadMetadataForFormat:(AVMetadataFormat )format completionHandler:(void (^)(NSArray <AVMetadataItem *> *, NSError *))completionHandler; @end @interface AVAsset (AVAssetChapterInspection )@property (readonly ) NSArray <NSLocale *> *availableChapterLocales;- (NSArray <AVTimedMetadataGroup *> *)chapterMetadataGroupsWithTitleLocale:(NSLocale *)locale containingItemsWithCommonKeys:(NSArray <AVMetadataKey > *)commonKeys; - (void )loadChapterMetadataGroupsWithTitleLocale:(NSLocale *)locale containingItemsWithCommonKeys:(NSArray <AVMetadataKey > *)commonKeys completionHandler:(void (^)(NSArray <AVTimedMetadataGroup *> *, NSError *))completionHandler; - (NSArray <AVTimedMetadataGroup *> *)chapterMetadataGroupsBestMatchingPreferredLanguages:(NSArray <NSString *> *)preferredLanguages; - (void )loadChapterMetadataGroupsBestMatchingPreferredLanguages:(NSArray <NSString *> *)preferredLanguages completionHandler:(void (^)(NSArray <AVTimedMetadataGroup *> *, NSError *))completionHandler; @end @interface AVAsset (AVAssetMediaSelection )@property (nonatomic , readonly ) NSArray <AVMediaCharacteristic > *availableMediaCharacteristicsWithMediaSelectionOptions;- (AVMediaSelectionGroup *)mediaSelectionGroupForMediaCharacteristic:(AVMediaCharacteristic )mediaCharacteristic; - (void )loadMediaSelectionGroupForMediaCharacteristic:(AVMediaCharacteristic )mediaCharacteristic completionHandler:(void (^)(AVMediaSelectionGroup *_result, NSError *))completionHandler; @property (nonatomic , readonly ) AVMediaSelection *preferredMediaSelection;@property (nonatomic , readonly ) NSArray <AVMediaSelection *> *allMediaSelections;@end @interface AVAsset (AVAssetProtectedContent )@property (nonatomic , readonly ) BOOL hasProtectedContent;@end @interface AVAsset (AVAssetFragments )@property (nonatomic , readonly ) BOOL canContainFragments;@property (nonatomic , readonly ) BOOL containsFragments;@property (nonatomic , readonly ) CMTime overallDurationHint;@end @interface AVAsset (AVAssetUsability )@property (nonatomic , readonly ) BOOL playable;@property (nonatomic , readonly ) BOOL exportable;@property (nonatomic , readonly ) BOOL readable;@property (nonatomic , readonly ) BOOL composable;@property (nonatomic , readonly ) BOOL compatibleWithSavedPhotosAlbum;@property (nonatomic , readonly ) BOOL compatibleWithAirPlayVideo;@end
1.1.2 轨道(Track) 如下图所示,一个 track 由 AVAssetTrack 类表示。简单场景下,一个 track 代表 audio component,另一个 track 代表 video component;复杂场景下,可能有多个 audio 和 video 重叠的 track。
一个 track 包含多个属性:
1
2
3
4
5
6
7
8
9
10
11
12
13
14
15
16
17
18
19
20
21
22
23
24
25
26
27
28
29
30
31
32
33
34
35
36
37
38
39
40
41
42
43
44
45
46
47
48
49
50
51
52
@interface AVAssetTrack : NSObject @property (nonatomic , readonly , weak ) AVAsset *asset;@property (nonatomic , readonly ) CMPersistentTrackID trackID;@end @interface AVAssetTrack (AVAssetTrackBasicPropertiesAndCharacteristics )@property (nonatomic , readonly ) AVMediaType mediaType; @property (nonatomic , readonly ) NSArray *formatDescriptions;@property (nonatomic , readonly ) BOOL playable;@property (nonatomic , readonly ) BOOL decodable;@property (nonatomic , readonly ) BOOL enabled;@property (nonatomic , readonly ) BOOL selfContained;@property (nonatomic , readonly ) long long totalSampleDataLength;- (BOOL )hasMediaCharacteristic:(AVMediaCharacteristic )mediaCharacteristic; @end @interface AVAssetTrack (AVAssetTrackTemporalProperties )@property (nonatomic , readonly ) CMTimeRange timeRange;@end @interface AVAssetTrack (AVAssetTrackLanguageProperties ) @interface AVAssetTrack (AVAssetTrackPropertiesForVisualCharacteristic ) @interface AVAssetTrack (AVAssetTrackPropertiesForAudibleCharacteristic )@interface AVAssetTrack (AVAssetTrackPropertiesForFrameBasedCharacteristic )@interface AVAssetTrack (AVAssetTrackSegments )@interface AVAssetTrack (AVAssetTrackMetadataReading )@interface AVAssetTrack (AVAssetTrackTrackAssociations )@interface AVAssetTrack (AVAssetTrackSampleCursorProvision )
1.2 创建AVURLAsset 1.2.1 类源码 1 2 3 4 5 6 7 8 9 10 11 12 13 14 15 16 17 18 19 20 21 22 23 24 25 @interface AVURLAsset : AVAsset + (NSArray <AVFileType > *)audiovisualTypes; + (NSArray <NSString *> *)audiovisualMIMETypes; + (BOOL )isPlayableExtendedMIMEType: (NSString *)extendedMIMEType; + (instancetype )URLAssetWithURL:(NSURL *)URL options:(NSDictionary <NSString *, id > *)options; - (instancetype )initWithURL:(NSURL *)URL options:(NSDictionary <NSString *, id > *)options NS_DESIGNATED_INITIALIZER ; @property (nonatomic , readonly , copy ) NSURL *URL;@end @interface AVURLAsset (AVURLAssetURLHandling )@property (nonatomic , readonly ) AVAssetResourceLoader *resourceLoader;@end @interface AVURLAsset (AVURLAssetCache )@property (nonatomic , readonly ) AVAssetCache *assetCache;@end @interface AVURLAsset (AVAssetCompositionUtility )- (AVAssetTrack *)compatibleTrackForCompositionTrack:(AVCompositionTrack *)compositionTrack; - (void )findCompatibleTrackForCompositionTrack:(AVCompositionTrack *)compositionTrack completionHandler:(void (^)(AVAssetTrack *_result, NSError *))completionHandler API_AVAILABLE(macos(12.0 ), ios(15.0 ), tvos(15.0 ), watchos(8.0 )); @end @interface AVURLAsset (AVAssetVariantInspection )@property (nonatomic , readonly ) NSArray <AVAssetVariant *> *variants;@end
1.2.2 创建一个AVURLAsset对象 AVURLAsset代表任何一个能用URL识别的资源的asset。最简单的是从一个file创建asset。
1 2 NSURL *url = <#"标识视听资产(如电影文件)的URL" #>;AVURLAsset *anAsset = [[AVURLAsset alloc] initWithURL:url options:nil ];
初始化的第二个参数options是一个字典。
字典中唯一使用的key是AVURLAssetPreferPreciseDurationAndTimingKey。对应的值是一个布尔值(包含在 NSValue对象中),这个布尔值指出了这个asset是否应该提供准确的duration,以及支持随机读取指定时间的内容。
获得一个asset 精确的的持续时间duration可能需要大量的处理开销。使用一个近似的持续时间通常是更划算的选择,并且对于播放已经足够。因此:
如果只是播放asset,options传递nil,或者字典里对应的值是NO(包含在NSValue对象中)
如果要将asset添加到composition,需要精确的随机存取,传递一个字典,对应值是YES(包含在NSValue对象中)
1 2 NSDictionary *dict = @{AVURLAssetPreferPreciseDurationAndTimingKey : @YES}; AVURLAsset *asset = [[AVURLAsset alloc] initWithURL:fileUrl options:dict];
1.2.3 访问用户的asset(iPod库+相册) 要访问由 iPod 库、相册中的资产,需要获取对应资产的 URL。
访问 iPod 库,需要创建一个 MPMediaQuery 实例来查找想要的项目,然后使用 MPMediaItemPropertyAssetURL 获取其 URL。
访问照片应用程序管理的资产,使用 ALAssetsLibrary —— iOS9.0之后这个库失效,使用PHPhotoLibrary库
下面的是获取用户相册中第一个视频的示例代码:
1 2 3 4 5 6 7 8 9 10 11 12 13 14 15 16 17 18 19 20 21 22 23 24 25 26 ALAssetsLibrary *library = [[ALAssetsLibrary alloc] init]; [library enumerateGroupsWithTypes:ALAssetsGroupSavedPhotos usingBlock:^(ALAssetsGroup *group, BOOL *stop) { [group setAssetsFilter:[ALAssetsFilter allVideos]]; [group enumerateAssetsAtIndexes:[NSIndexSet indexSetWithIndex:0 ] options:0 usingBlock:^(ALAsset *alAsset, NSUInteger index, BOOL *innerStop) { if (alAsset) { ALAssetRepresentation *representation = [alAsset defaultRepresentation]; NSURL *url = [representation url]; AVAsset *avAsset = [AVURLAsset URLAssetWithURL:url options:nil ]; } }]; } failureBlock: ^(NSError *error) { NSLog (@"No groups" ); }];
1.3 使用Asset 注意:初始化asset或track并不一定意味着它已准备好使用。 可能需要一些时间去计算项目的持续时间(duration)(例如,MP3 文件可能不包含摘要信息)。计算时不要阻塞当前线程,可以使用 AVAsynchronousKeyValueLoading 协议来请求值,完成处理后通过定义的block回调结果(AVAsset 和 AVAssetTrack 符合 AVAsynchronousKeyValueLoading 协议)。
可以使用 statusOfValueForKey:error: 判断是否为属性加载了值。asset首次加载时,其大部分或全部属性的值为 AVKeyValueStatusUnknown。
可以使用 loadValuesAsynchronouslyForKeys:completionHandler: 为一个或多个属性加载值。在完成处理程序中,可以根据属性的状态采取任何适当的操作。注意:加载是可能会失败的,比如基于网络的 URL 不可访问,或者加载被取消。
1 2 3 4 5 6 7 8 9 10 11 12 13 14 15 16 17 18 19 20 NSURL *url = <#A URL that identifies an audiovisual asset such as a movie file#>;AVURLAsset *anAsset = [[AVURLAsset alloc] initWithURL:url options:nil ];NSArray *keys = @[@"duration" ]; [asset loadValuesAsynchronouslyForKeys:keys completionHandler:^() { NSError *error = nil ; AVKeyValueStatus tracksStatus = [asset statusOfValueForKey:@"duration" error:&error]; switch (tracksStatus) { case AVKeyValueStatusLoaded : [self updateUserInterfaceForDuration]; break ; case AVKeyValueStatusFailed : [self reportError:error forAsset:asset]; break ; case AVKeyValueStatusCancelled : break ; } }];
1.4 视频中获取静态图像(AssetImageGenerator) 从视频中获取静态图片 (比如某个时间点的视频预览缩略图),可以使用 AVAssetImageGenerator。
使用asset初始化一个图像生成器对象。注意即使asset在初始化时没有视觉轨道,初始化也可能成功,所以如果有必要,应该使用 trackWithMediaCharacteristic: 提前判断一下asset是否用于可视化的track。
1 2 3 4 5 6 AVAsset anAsset = <#Get an asset#>; if ([[anAsset tracksWithMediaType:AVMediaTypeVideo ] count] > 0 ) { AVAssetImageGenerator *imageGenerator = [AVAssetImageGenerator assetImageGeneratorWithAsset:anAsset]; }
可以配置图像生成器的几个方面,比如:
使用 maximumSize 属性设置图片的最大尺寸
使用 apertureMode 属性设置图片的光栅模式
根据给定的时间点生成单张或者一系列的图片
注意:生成过程中必须确保 imagegenerator 的强引用。
1.4.1 生成单个图像 使用 copyCGImageAtTime:actualTime:error: 在指定时间生成单个图像。AVFoundation可能无法精确的根据你指定的时间生成图像,所以可以将一个指向 CMTime 的指针作为第二个参数传递,该指针在返回时包含实际生成图像的时间。
1 2 3 4 5 6 7 8 9 10 11 12 13 14 15 16 17 18 19 AVAsset *myAsset = <#An asset#>];AVAssetImageGenerator *imageGenerator = [[AVAssetImageGenerator alloc] initWithAsset:myAsset];Float64 durationSeconds = CMTimeGetSeconds ([myAsset duration]); CMTime midpoint = CMTimeMakeWithSeconds (durationSeconds/2.0 , 600 );NSError *error;CMTime actualTime;CGImageRef halfWayImage = [imageGenerator copyCGImageAtTime:midpoint actualTime:&actualTime error:&error];if (halfWayImage != NULL ) { NSString *actualTimeString = (NSString *)CMTimeCopyDescription (NULL , actualTime); NSString *requestedTimeString = (NSString *)CMTimeCopyDescription (NULL , midpoint); NSLog (@"Got halfWayImage: Asked for %@, got %@" , requestedTimeString, actualTimeString); CGImageRelease (halfWayImage); }
1.4.2 生成一系列图像 使用 generateCGImagesAsynchronouslyForTimes:completionHandler: 生成一系列图像。
第一个参数是一个 NSValue 对象数组,每个对象都包含一个 CMTime 结构体对象,指定你希望的生成图像的时间。
第二个参数是一个block,用作为生成的每个图像调用的回调。block的参数中提供了一个结果常量,表示图像创建是成功、失败、被取消等结果,在 block 中,应当检查图片生成的结果。另外,根据不同情况,可能包含以下的参数:
生成的图片
请求生成图片的时间和实际生成图片的时间
生成失败的原因
在完成创建图像之前,保持一个对图像生成器的强引用。
1 2 3 4 5 6 7 8 9 10 11 12 13 14 15 16 17 18 19 20 21 22 23 24 25 26 27 28 29 30 31 32 33 AVAsset *myAsset = <#An asset#>];self .imageGenerator = [AVAssetImageGenerator assetImageGeneratorWithAsset:myAsset];Float64 durationSeconds = CMTimeGetSeconds ([myAsset duration]); CMTime firstThird = CMTimeMakeWithSeconds (durationSeconds/3.0 , 600 );CMTime secondThird = CMTimeMakeWithSeconds (durationSeconds*2.0 /3.0 , 600 );CMTime end = CMTimeMakeWithSeconds (durationSeconds, 600 );NSArray *times = @[NSValue valueWithCMTime:kCMTimeZero], [NSValue valueWithCMTime:firstThird], [NSValue valueWithCMTime:secondThird], [NSValue valueWithCMTime:end]]; [imageGenerator generateCGImagesAsynchronouslyForTimes:times completionHandler:^(CMTime requestedTime, CGImageRef image, CMTime actualTime, AVAssetImageGeneratorResult result, NSError *error) { NSString *requestedTimeString = (NSString *) CFBridgingRelease (CMTimeCopyDescription (NULL , requestedTime)); NSString *actualTimeString = (NSString *) CFBridgingRelease (CMTimeCopyDescription (NULL , actualTime)); NSLog (@"Requested: %@; actual %@" , requestedTimeString, actualTimeString); if (result == AVAssetImageGeneratorSucceeded ) { } if (result == AVAssetImageGeneratorFailed ) { NSLog (@"Failed with error: %@" , [error localizedDescription]); } if (result == AVAssetImageGeneratorCancelled ) { NSLog (@"Canceled" ); } }];
调用图像生成器的 cancelAllCGImageGeneration ,来取消图像序列的生成。
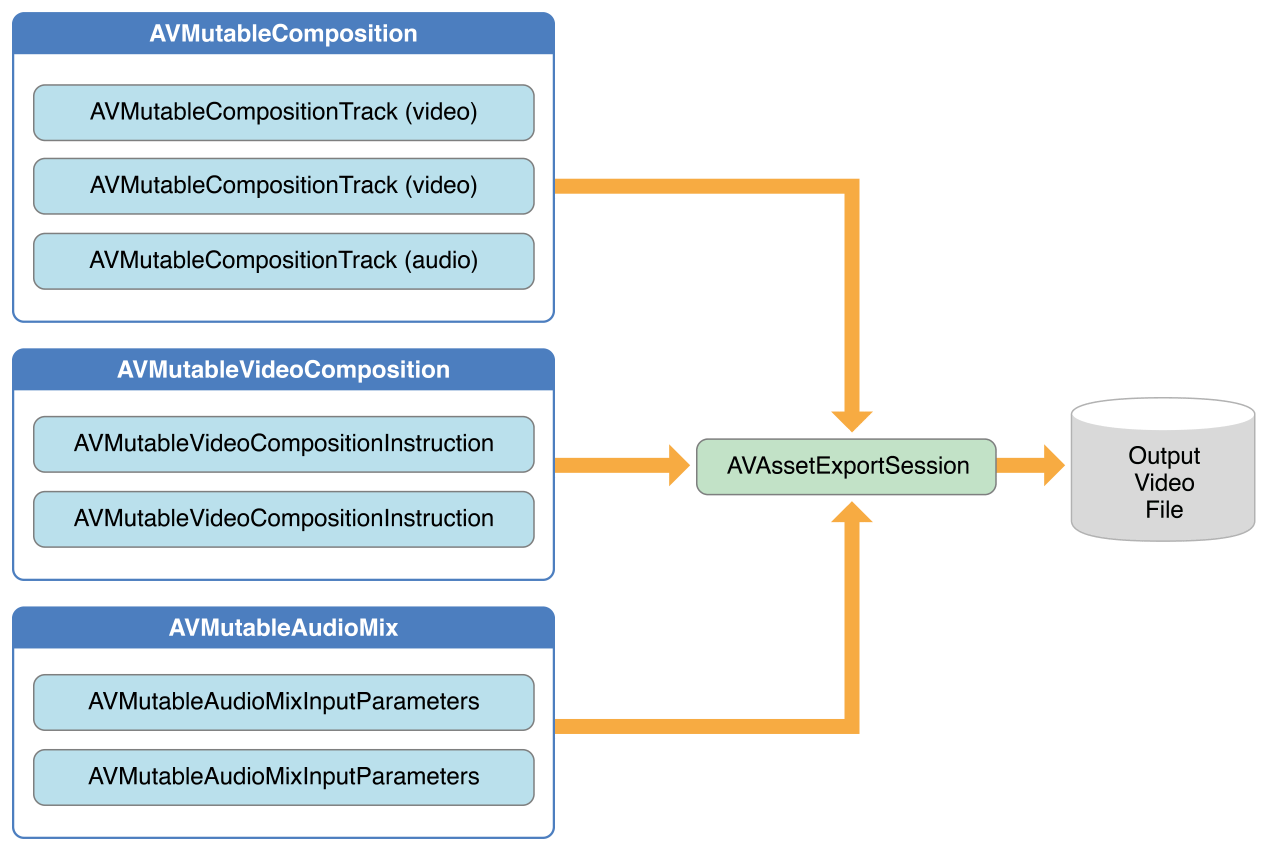
1.5 视频的剪辑和转码(AVAssetExportSession) AVAssetExportSession 对象可以剪辑视频或者对视频进行格式转换。流程图如下:
导出会话(export session)是管理asset异步导出的控制器对象。
使用要导出的asset、指示导出选项的导出预设(export preset)的名称来初始化会话。
使用 exportPresetsCompatibleWithAsset: 检查是否可以使用给定预设导出asset
然后配置 export session 指定导出的 URL 、文件格式、其他信息 (比如是否因为网络使用而对元数据进行优化)。
指定输出URL:该URL必须是文件URL
文件类型:AVAssetExportSession 可以从 URL 的路径扩展名推断输出文件类型;但是,通常您直接使用 outputFileType 设置它。
其它可选的设置,例如元数据、时间范围、输出文件长度的限制、导出的文件是否应针对网络使用输出优化、视频合成等。
1 2 3 4 5 6 7 8 9 10 11 12 13 14 15 AVAsset *anAsset = <#Get an asset#>;NSArray *compatiblePresets = [AVAssetExportSession exportPresetsCompatibleWithAsset:anAsset];if ([compatiblePresets containsObject:AVAssetExportPresetLowQuality ]) { AVAssetExportSession *exportSession = [[AVAssetExportSession alloc] initWithAsset:anAsset presetName:AVAssetExportPresetLowQuality ]; exportSession.outputURL = <#A file URL#>; exportSession.outputFileType = AVFileTypeQuickTimeMovie ; CMTime start = CMTimeMakeWithSeconds (1.0 , 600 ); CMTime duration = CMTimeMakeWithSeconds (3.0 , 600 ); CMTimeRange range = CMTimeRangeMake (start, duration); exportSession.timeRange = range; }
使用 exportAsynchronouslyWithCompletionHandler: 方法导出文件。导出操作完成时会调用complete handler。在该代码块中,需要根据 status 属性判断导出是否成功。
1 2 3 4 5 6 7 8 9 10 11 12 13 [exportSession exportAsynchronouslyWithCompletionHandler:^{ switch ([exportSession status]) { case AVAssetExportSessionStatusFailed : NSLog (@"Export failed: %@" , [[exportSession error] localizedDescription]); break ; case AVAssetExportSessionStatusCancelled : NSLog (@"Export canceled" ); break ; default : break ; } }];
可以通过向会话发送 cancelExport 消息来取消导出。
导出到一个已存在的文件或者导出到应用程序沙盒目录外将会导致导出失败。其他可能导致失败的情况包括:
导出过程中接收到电话呼叫
程序进入后台, 有其他程序开始使用播放功能
在这些情况下,要告知用户导出失败,并允许用户重新开始导出。
二、播放Assets AVFoundation 允许以更精确的方式管理asset的播放。为了支持这一点,它将asset的呈现状态(presentation state)与asset本身分开。这就能让开发者在同一时刻以不同分辨率呈现同一资源的两个不同片段。
使用 AVPlayer 对象来控制asset的播放。
使用播放器项目(player item)对象管理asset的呈现状态(AVPlayerItem 实例)
使用播放器项目轨道(player item track)对象管理asset中每个轨道的呈现状态 (AVPlayerItemTrack实例)
比如,使用 player item 和 player item tracks 可以:
设置资源的可视部分在播放时的尺寸
播放时,设置audio 的混音参数、视频合成设置,或者禁用asset中的某些部分
使用 player 对象可以播放 player items 对象,或者直接指定将其输出 (output) 到 Core Animation layer 之上。还可以使用播放队列(player queue ) 来顺序播放多个 player items 对象。
使用 AVPlayerLayer 对象来显示视频。
2.1 核心类概述 2.1.1 播放器AVPlayer 播放器(player)是一个控制器对象,用于管理资源的播放,例如开始和停止播放,以及寻找特定时间。
使用 AVPlayer 实例来播放单个资源。
使用 AVQueuePlayer 对象按顺序播放多个项目(AVQueuePlayer 是 AVPlayer 的子类)。在 OS X 上,您可以选择使用 AVKit 框架的 AVPlayerView 类在视图中播放内容。
播放器可提供有关播放状态的信息,因此,如果需要,可以将用户界面与播放器的状态同步。
通常,将播放器的输出定向到专门的核心动画层(AVPlayerLayer 或 AVSynchronizedLayer 的实例)。要了解有关图层的更多信息,请参阅核心动画编程指南。
多个播放器层:您可以从单个 AVPlayer 实例创建多个 AVPlayerLayer 对象,但只有最近创建的layer才会在屏幕上显示视频内容。
1 2 3 4 5 6 7 8 9 10 @interface AVPlayer : NSObject - (instancetype )initWithURL:(NSURL *)URL; - (instancetype )initWithPlayerItem:(nullable AVPlayerItem *)item; @property (nonatomic , readonly ) AVPlayerStatus status;@property (nonatomic , readonly , nullable ) NSError *error;@property (nonatomic , readonly , nullable ) AVPlayerItem *currentItem;@property float volume; @property (getter =isMuted) BOOL muted; @end
2.1.2 AVPlayerItem
播放资源时,需要向 AVPlayer 对象提供一个 AVPlayerItem 实例,而不是直接提供asset。
player item会管理与其关联的asset的呈现状态。
player item包含了播放器项目轨道(AVPlayerItemTrack 的实例),它们对应于asset中的轨道。
1 2 3 4 5 6 7 8 9 10 11 @interface AVPlayerItem : NSObject - (instancetype )initWithURL:(NSURL *)URL; - (instancetype )initWithAsset:(AVAsset *)asset; @property (readonly ) AVPlayerItemStatus status;@property (readonly , nullable ) NSError *error;@property (nonatomic , readonly ) AVAsset *asset;@property (readonly ) NSArray <AVPlayerItemTrack *> *tracks;@property (readonly ) CMTime duration;@property (readonly ) CGSize presentationSize;@end
不仅可以使用现有asset初始化player item,也可以直接从 URL 初始化,以便你可以在特定位置播放资源(AVPlayerItem会为资源创建和配置一个asset)。
然而,与 AVAsset 一样,简单地初始化一个player item并不一定意味着它已经可以立即播放。你可以使用KVO观察player item的status属性 来确定它是否以及何时准备好播放。
2.1.3 AVPlayerLayer 1 2 3 4 5 6 7 8 9 10 11 12 13 14 @interface AVPlayerLayer : CALayer @private AVPlayerLayerInternal *_playerLayer; } + (AVPlayerLayer *)playerLayerWithPlayer:(nullable AVPlayer *)player; @property (nonatomic , retain , nullable ) AVPlayer *player;@property (copy ) AVLayerVideoGravity videoGravity;@property (nonatomic , readonly , getter =isReadyForDisplay) BOOL readyForDisplay;@property (nonatomic , readonly ) CGRect videoRect;@property (nonatomic , copy , nullable ) NSDictionary <NSString *, id > *pixelBufferAttributes;@end
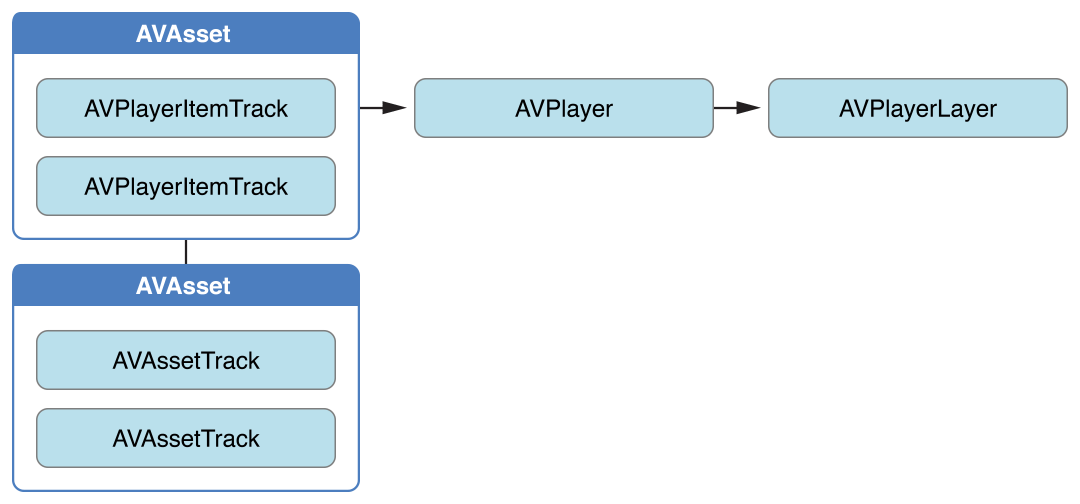
2.1.4 类关系梳理 1 2 3 4 @interface AVPlayerItemTrack : NSObject @property (nonatomic , readonly , nullable ) AVAssetTrack *assetTrack;@end
按照类关联关系:AVPlayer → AVPlayerItem → AVPlayerItemTrack → AVAssetTrack
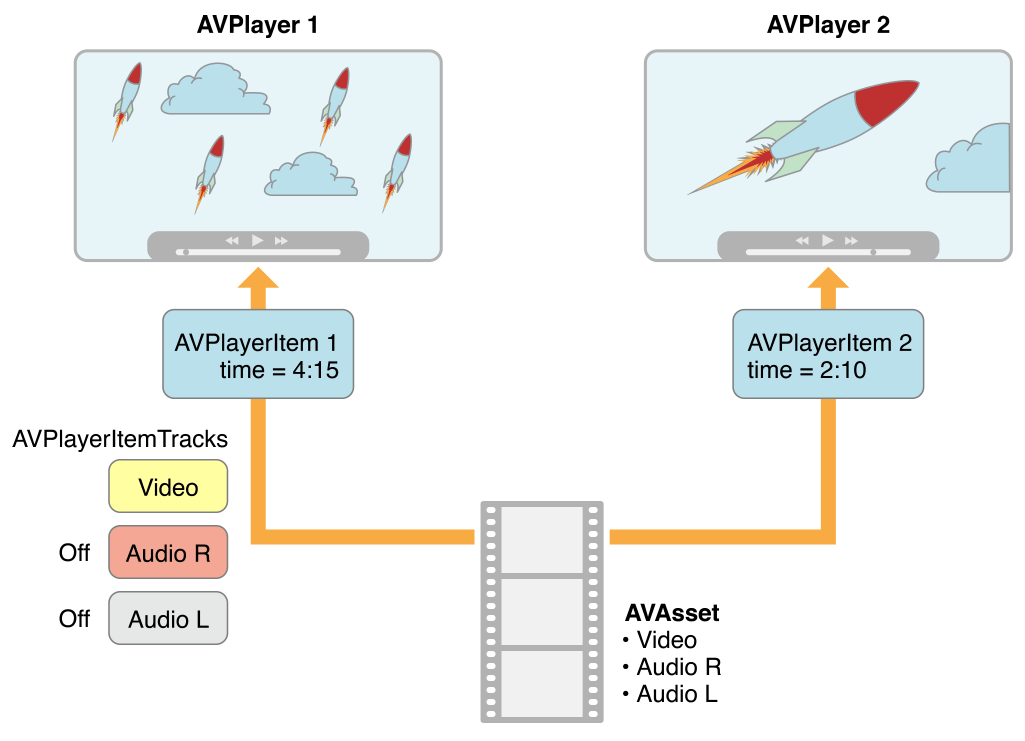
这种抽象意味着可以同时使用不同的播放器播放一个给定的资源,每个播放器以不同的方式呈现。比如下图 ,不同的播放器使用不同的设置播放同一个相同的资产。可以使用项目轨道,在播放期间禁用特定轨道(例如屏蔽声音)。
2.2 处理不同类型的资源 2.2.1 两种类型资源 asset播放的方式取决于其类型。从广义上讲,有两种主要类型:
基于文件的资源 file-based assets ,你可以随机访问(例如从本地文件、媒体库、相册)
基于流的资源 stream-based assets(HTTP 实时流格式)
2.2.2 播放基于文件的资源 步骤:
使用 AVURLAsset 创建 AVAsset
使用asset创建 AVPlayerItem 的实例
将 AVPlayerItem实例 与 AVPlayer 实例相关联
等待,直到player item的status属性表明已经可以播放(通过KVO观察属性变化)。
示例代码如下:
1 2 3 4 5 6 7 8 9 10 11 12 13 14 15 16 17 18 19 20 21 22 23 24 25 26 27 static const NSString *ItemStatusContext;{ NSURL *fileURL = [[NSBundle mainBundle] URLForResource:@"VideoFileName" withExtension:@"extension" ]; AVAsset *asset = [AVAsset assetWithURL:fileURL]; AVPlayerItem *playerItem = [AVPlayerItem playerItemWithAsset:asset]; [playerItem addObserver:self forKeyPath:@"status" options:0 context:&ItemStatusContext]; _player = [AVPlayer playerWithPlayerItem:playerItem]; } - (void )observeValueForKeyPath:(NSString *)keyPath ofObject:(id )object change:(NSDictionary *)change context:(void *)context { if (context == &ItemStatusContext) { return ; } [super observeValueForKeyPath:keyPath ofObject:object change:change context:context]; return ; }
2.2.3 播放 HTTP 实时流 使用 URL 初始化 AVPlayerItem 的实例。(不能直接创建 AVAsset 实例来表示 HTTP 实时流中的媒体)
1 2 3 4 5 6 7 NSURL *url = [NSURL URLWithString:@"<#Live stream URL#>]; // You may find a test stream at <http://devimages.apple.com/iphone/samples/bipbop/bipbopall.m3u8>. self.playerItem = [AVPlayerItem playerItemWithURL:url]; // 观察player item的status属性 [playerItem addObserver:self forKeyPath:@" status" options:0 context:&ItemStatusContext]; self.player = [AVPlayer playerWithPlayerItem:playerItem];
将 AVPlayerItem实例 与 AVPlayer 实例相关联,准备播放。当准备好播放时,player item会创建 AVAsset 和 AVAssetTrack 实例,可以使用它们来检查实时流的内容。
要获取流媒体项目的持续时间,可以观察player item的duration属性。当项目准备好播放时,此属性将更新为流的正确值。
如果只是想播放直播,可以如以下代码,直接使用 URL 创建创建播放器player:
1 2 3 self .player = [AVPlayer playerWithURL:<#Live stream URL#>];[player addObserver:self forKeyPath:@"status" options:0 context:&PlayerStatusContext];
补充:与AVAsset和AVPlayerItem一样,初始化了播放器并不意味着它已准备好播放。你应该监听播放器的status属性,当它准备好播放时,其值会更改为 AVPlayerStatusReadyToPlay。您还可以观察 currentItem 属性以访问为流创建的播放器项目。
2.2.4 URL类型的判断 如果不知道自己的 URL 类型,可以按照以下步骤操作:
尝试使用 URL 初始化 AVURLAsset,然后加载它的tracks属性。如果tracks加载成功,就可以为资源创建一个AVPlayerItem实例。
如果第一步失败,则直接从 URL 创建一个 AVPlayerItem,监听其status属性来确定它是否可以播放。
上面任一分支成功,最后都会得到一个player item,然后将其与播放器player关联。
2.3 播放一个项目 AVPlayer 2.3.1 概述 调用播放器的play方法,即可开始播放
1 2 3 - (IBAction )play:sender { [player play]; }
除了简单的播放之外,还可以管理播放的各个方面,例如:
设置播放头的速率和位置 (播放头playhead为显示当前播放位置的那一条与时间轴垂直的线 )
监控播放器的播放状态(比如设置用户界面与资源的呈现状态同步)。
2.3.2 更改播放速度 设置播放器的 rate 属性来更改播放速度。
1 2 aPlayer.rate = 0.5 ; aPlayer.rate = 2.0 ;
值 1.0 表示“以当前项目的自然速度播放”。
值 0.0 与暂停播放相同——也可以直接调用 pause 方法暂停。
当项目支持反向播放时,可以使用赋值 rate 负数来设置反向播放速度。
playerItem 的几个属性,用来确定支持的反向播放类型:
canPlayReverse(是否支持 -1.0 的速度值)
canPlaySlowReverse(是否支持介于 0.0 到 -1.0 之间的速度)
canPlayFastReverse(是否支持小于 -1.0 的速度值)
2.3.3 寻找—重新定位播放头 要将播放头移动到特定时间,可以使用以下两种方式:
1 2 3 4 5 6 7 CMTime fiveSecondsIn = CMTimeMake (5 , 1 );[player seekToTime:fiveSecondsIn]; CMTime FiveSecondsIn = CMTimeMake (5 , 1 );[player seekToTime:fiveSecondsIn toleranceBefore:kCMTimeZero toleranceAfter:kCMTimeZero];
注意:使用零容差可能需要框架解码大量数据。仅当你正在编写需要精确控制的复杂媒体编辑APP时才应使用。
播放后,播放器的头部被设置到项目的末尾,进一步调用 play 无效。要将播放头放回项目的开头,您可以注册以接收来自项目的 AVPlayerItemDidPlayToEndTimeNotification 通知。在通知的回调方法中,您使用参数 kCMTimeZero 调用 seekToTime:。
1 2 3 4 5 6 7 8 9 10 [[NSNotificationCenter defaultCenter] addObserver:self selector:@selector (playerItemDidReachEnd:) name:AVPlayerItemDidPlayToEndTimeNotification object:<#The player item#>]; - (void )playerItemDidReachEnd:(NSNotification *)notification { [player seekToTime:kCMTimeZero]; }
2.4 播放多个项目 AVQueuePlayer 使用 AVQueuePlayer 对象按顺序播放多个项目。 AVQueuePlayer 类是 AVPlayer 的子类。使用一个盛放player Item的数组初始化队列播放器。
1 2 3 4 5 6 7 NSArray *items = <#An array of player items#>;AVQueuePlayer *queuePlayer = [[AVQueuePlayer alloc] initWithItems:items];[queuePlayer paly]; [queuePlayer advanceToNextItem];
可以使用 insertItem:afterItem:、removeItem: 和 removeAllItems 修改队列。添加新项目时,应使用 canInsertItem:afterItem: 检查是否可以将其插入队列。
1 2 3 4 5 AVPlayerItem *anItem = <#Get a player item#>;if ([queuePlayer canInsertItem:anItem afterItem:nil ]) { [queuePlayer insertItem:anItem afterItem:nil ]; }
2.5 播放监听 2.5.1 使用场景 可以监听播放器player的呈现状态和正在播放的播放器项目player item的许多方面。当一些不受开发者直接控制的状态更改时,这将特别有用。例如:
如果用户使用多任务切换到不同的应用程序,AVPlayer的 rate 属性值将下降到 0.0。
如果正在播放远程媒体,AVPlayerItem 的 loadedTimeRanges 和 seekableTimeRanges 属性将随着更多数据可用而改变。
当为 HTTP 直播流创建 AVPlayerItem 时,AVPlayer的 currentItem 属性会发生变化。
播放 HTTP 直播流时,AVPlayerItem 的 tracks 属性可能会发生变化。(比如如果流为内容提供了不同的编码,当播放器切换到不同的编码,tracks会发生变化。)
如果由于某种原因播放失败,AVPlayer 或 AVPlayerItem 的 status 属性可能会更改。
可以使用KVO来监听这些属性值的变化。注意:需要在主线程上注册、注销KVO通知。
2.5.2 监听status的变化 当播放器或播放器项目的 status 发生变化时,会发出一个KVO改变通知。如果对象由于某种原因无法播放(例如,如果媒体服务被重置),则 status 将根据需要更改为 AVPlayerStatusFailed 或 AVPlayerItemStatusFailed。在这种情况下,对象的 error 属性将被赋值为一个NSError对象,描述了错误原因。
AV Foundation 没有指定发送通知的线程。如果要通知更新用户界面,则必须确保是在主线程上进行操作。
1 2 3 4 5 6 7 8 9 10 11 12 13 14 15 16 17 - (void )observeValueForKeyPath:(NSString *)keyPath ofObject:(id )object change:(NSDictionary *)change context:(void *)context { if (context == <#Player status context#>) { AVPlayer *thePlayer = (AVPlayer *)object; if ([thePlayer status] == AVPlayerStatusFailed ) { NSError *error = [<#The AVPlayer object#> error]; return ; } } [super observeValueForKeyPath:keyPath ofObject:object change:change context:context]; return ; }
2.5.3 监听可视化内容的就绪状态 监听 AVPlayerLayer 对象的 readyForDisplay 属性,以便在图层具有用户可见内容时收到通知。特别是,当你只需要在有可视化内容时,才要将播放器图层 player layer 插入到图层树layer tree中的情况。
2.5.4 监听播放时间 使用场景:根据已播放时间或剩余时间来更新用户界面,或执行一些其他用户界面同步。
跟踪 AVPlayer 对象中播放头位置的变化,可以使用下面的两个方法:
1 2 3 4 5 6 7 8 9 - (id )addPeriodicTimeObserverForInterval:(CMTime )interval queue:(nullable dispatch_queue_t )queue usingBlock:(void (^)(CMTime time))block; - (id )addBoundaryTimeObserverForTimes:(NSArray <NSValue *> *)times queue:(nullable dispatch_queue_t )queue usingBlock:(void (^)(void ))block;
注意:
这两种方法都返回一个作为 observer 的不透明对象。必须对其保持强引用。
必须平衡上面这两个方法与 removeTimeObserver: 的调用。
使用上面两个方法,AV Foundation 不保证在每个间隔、边界通过时都会调用block。如果先前调用的block执行尚未完成,就不会调用block。因此,您必须确保您在block中执行的工作不会对系统造成过多的负担。
1 2 3 4 5 6 7 8 9 10 11 12 Float64 durationSeconds = CMTimeGetSeconds ([<#An asset#> duration]); CMTime firstThird = CMTimeMakeWithSeconds (durationSeconds/3.0 , 1 );CMTime secondThird = CMTimeMakeWithSeconds (durationSeconds*2.0 /3.0 , 1 );NSArray *times = @[[NSValue valueWithCMTime:firstThird], [NSValue valueWithCMTime:secondThird]]; self .playerObserver = [<#A player#> addBoundaryTimeObserverForTimes:times queue:NULL usingBlock:^{ NSString *timeDescription = (NSString *) CFBridgingRelease (CMTimeCopyDescription (NULL , [self .player currentTime])); NSLog (@"Passed a boundary at %@" , timeDescription); }];
2.5.5 监听播放结束 可以注册AVPlayerItemDidPlayToEndTimeNotification通知来监听 player item 的播放结束.
1 2 3 4 [[NSNotificationCenter defaultCenter] addObserver:<#The observer, typically self #> selector:@selector (<#The selector name#>) name:AVPlayerItemDidPlayToEndTimeNotification object:<#A player item#>];
2.6 示例:使用 AVPlayerLayer 播放视频文件 这个简短的代码示例说明了如何使用 AVPlayer 对象来播放视频文件。它展示了如何:
使用 AVPlayerLayer 图层去配置一个view
创建一个 AVPlayer 对象
为 file-based asset 创建一个 AVPlayerItem 对象,并使用KVO观察其status值
监听资源是否准备好播放,同步改变播放按钮的可用状态。
播放item,然后将播放头恢复到开头位置。
提示: 为了展示核心代码, 这份示例省略了某些内容, 比如内存管理和通知的移除等. 使用 AV Foundation 之前, 你最好已经拥有 Cocoa 框架的使用经验.
step1: 定义 Player View 要播放一个 asset 的可视部分, 你需要一个包含AVPlayerLayer对象的 view, 用来接收AVPlayer对象的输出. 可以简单的定义一个 UIView 的子类来实现这一功能:
1 2 3 4 5 6 7 8 9 10 11 12 13 14 15 16 17 18 #import <UIKit/UIKit.h> #import <AVFoundation/AVFoundation.h> @interface PlayerView : UIView @property (nonatomic ) AVPlayer *player;@end @implementation PlayerView + (Class)layerClass { return [AVPlayerLayer class ]; } - (AVPlayer *)player { return [(AVPlayerLayer *)[self layer] player]; } - (void )setPlayer:(AVPlayer *)player { [(AVPlayerLayer *)[self layer] setPlayer:player]; } @end
step2: 配置 View Controller 假设你有一个简单的视图控制器,声明如下:
1 2 3 4 5 6 7 8 9 10 11 @class PlayerView ;@interface PlayerViewController : UIViewController @property (nonatomic ) AVPlayer *player;@property (nonatomic ) AVPlayerItem *playerItem;@property (nonatomic , weak ) IBOutlet PlayerView *playerView;@property (nonatomic , weak ) IBOutlet UIButton *playButton;- (IBAction )loadAssetFromFile:sender; - (IBAction )play:sender; - (void )syncUI; @end
syncUI 方法将按钮的状态与播放器的状态同步:
1 2 3 4 5 6 7 8 9 - (void )syncUI { if ((self .player.currentItem != nil ) && ([self .player.currentItem status] == AVPlayerItemStatusReadyToPlay )) { self .playButton.enabled = YES ; } else { self .playButton.enabled = NO ; } }
可以在 viewDidLoad 方法中就调用 syncUI 以确保在首次显示视图时用户界面一致。
1 2 3 4 - (void )viewDidLoad { [super viewDidLoad]; [self syncUI]; }
step3: 创建 Asset、PlayerItem、Player 使用AVURLAsset根据 URL 创建 asset.(下面的代码假设项目中包含了一个视频资源)
1 2 3 4 5 6 7 8 9 10 11 12 13 - (IBAction )loadAssetFromFile:sender { NSURL *fileURL = [[NSBundle mainBundle] URLForResource:<#@"VideoFileName" #> withExtension:<#@"extension" #>]; AVURLAsset *asset = [AVURLAsset URLAssetWithURL:fileURL options:nil ]; NSString *tracksKey = @"tracks" ; [asset loadValuesAsynchronouslyForKeys:@[tracksKey] completionHandler: ^{ }]; }
在 completion block 中创建 AVPlayerItem,并将其设置为 player view 的 player。
1 2 3 4 5 6 7 8 9 10 11 12 13 14 15 16 17 18 19 20 21 22 23 24 25 26 27 28 29 static const NSString *ItemStatusContext;dispatch_async (dispatch_get_main_queue(), ^{ NSError *error; AVKeyValueStatus status = [asset statusOfValueForKey:tracksKey error:&error]; if (status == AVKeyValueStatusLoaded ) { self .playerItem = [AVPlayerItem playerItemWithAsset:asset]; [self .playerItem addObserver:self forKeyPath:@"status" options:NSKeyValueObservingOptionInitial context:&ItemStatusContext]; [[NSNotificationCenter defaultCenter] addObserver:self selector:@selector (playerItemDidReachEnd:) name:AVPlayerItemDidPlayToEndTimeNotification object:self .playerItem]; self .player = [AVPlayer playerWithPlayerItem:self .playerItem]; [self .playerView setPlayer:self .player]; } else { NSLog (@"The asset's tracks were not loaded:\n%@" , [error localizedDescription]); } });
step4: 响应 PlayerItem 的 status 改变 1 2 3 4 5 6 7 8 9 10 11 12 13 14 15 - (void )observeValueForKeyPath:(NSString *)keyPath ofObject:(id )object change:(NSDictionary *)change context:(void *)context { if (context == &ItemStatusContext) { dispatch_async (dispatch_get_main_queue(), ^{ [self syncUI]; }); return ; } [super observeValueForKeyPath:keyPath ofObject:object change:change context:context]; return ; }
step5: 播放 Item 1 2 3 - (IBAction )play:sender { [player play]; }
item 只被播放一次,播放结束后,播放点会被设置为 item 的结束点,这样下一次调用 play 方法将会失效。要将播放点设置到 item 的起始处,参考如下代码:
1 2 3 4 5 6 7 8 9 10 [[NSNotificationCenter defaultCenter] addObserver:self selector:@selector (playerItemDidReachEnd:) name:AVPlayerItemDidPlayToEndTimeNotification object:[self .player currentItem]]; - (void )playerItemDidReachEnd:(NSNotification *)notification { [self .player seekToTime:kCMTimeZero]; }
三、编辑 Assets AVFoundation 框架为音视频编辑提供了功能丰富的类集。
这些 API 的核心称为合成/组合 (compositions)。composition 是一个或多个媒体资源的 track 的集合。
从现有媒体片段
使用 compositions(组合) 从现有的媒体片段(通常是一个或多个视频和音频轨道)创建新的asset。
使用可变的 composition 来添加和删除轨道,并调整它们的时间顺序。
可以设置音轨的相对音量和渐变效果;并设置视频轨道的透明度和透明度渐变。
composition 是保存在内存中的一系列媒体片段的集合。可以通过 export session 将 composition 导出到文件中。
从样本缓冲区或静止图像
使用资产写入器(asset writer)从样本缓冲区或静止图像等媒体创建asset。
3.1 Asset合成(AVMutableComposition) 核心类概述 AVMutableComposition 类提供了插入和删除 track,以及管理其时间顺序的的接口。
1 2 3 4 5 6 7 8 9 10 11 12 13 14 15 16 17 18 19 20 21 22 23 24 25 26 27 28 29 30 31 32 33 34 35 36 37 38 @interface AVMutableComposition : AVComposition @property (nonatomic , readonly ) NSArray <AVMutableCompositionTrack *> *tracks;@property (nonatomic ) CGSize naturalSize;+ (instancetype )composition; + (instancetype )compositionWithURLAssetInitializationOptions:(NSDictionary <NSString *, id > *)URLAssetInitializationOptions; @end @interface AVMutableComposition (AVMutableCompositionCompositionLevelEditing )- (BOOL )insertTimeRange:(CMTimeRange )timeRange ofAsset:(AVAsset *)asset atTime:(CMTime )startTime error:(NSError **)outError; - (void )insertEmptyTimeRange:(CMTimeRange )timeRange; - (void )removeTimeRange:(CMTimeRange )timeRange; - (void )scaleTimeRange:(CMTimeRange )timeRange toDuration:(CMTime )duration; @end @interface AVMutableComposition (AVMutableCompositionTrackLevelEditing )- (AVMutableCompositionTrack *)addMutableTrackWithMediaType:(AVMediaType )mediaType preferredTrackID:(CMPersistentTrackID )preferredTrackID; - (void )removeTrack:(AVCompositionTrack *)track; - (AVMutableCompositionTrack *)mutableTrackCompatibleWithTrack:(AVAssetTrack *)track; @end @interface AVMutableComposition (AVMutableCompositionTrackInspection )- (AVMutableCompositionTrack *)trackWithTrackID:(CMPersistentTrackID )trackID; - (void )loadTrackWithTrackID:(CMPersistentTrackID )trackID completionHandler:(void (^)(AVMutableCompositionTrack *, NSError *))completionHandler; - (NSArray <AVMutableCompositionTrack *> *)tracksWithMediaType:(AVMediaType )mediaType; - (void )loadTracksWithMediaType:(AVMediaType )mediaType completionHandler:(void (^)(NSArray <AVMutableCompositionTrack *> *, NSError *))completionHandler; - (NSArray <AVMutableCompositionTrack *> *)tracksWithMediaCharacteristic:(AVMediaCharacteristic )mediaCharacteristic; - (void )loadTracksWithMediaCharacteristic:(AVMediaCharacteristic )mediaCharacteristic completionHandler:(void (^)(NSArray <AVMutableCompositionTrack *> *, NSError *))completionHandler; @end
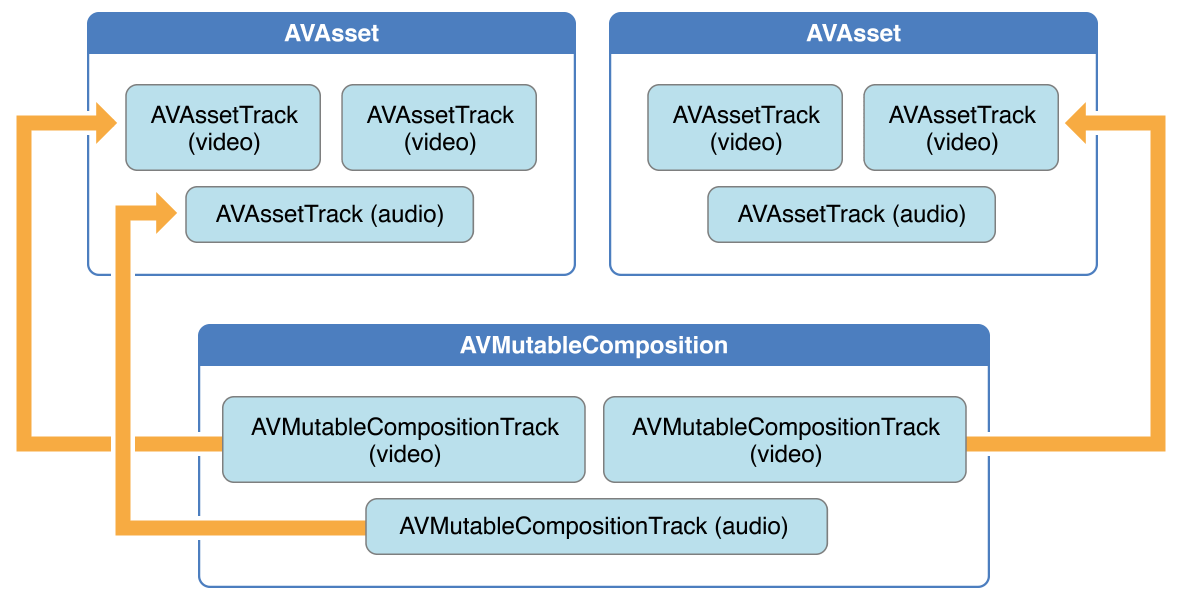
下图展示了如何通过已存在的 assets 组合成为一个 composition。
3.1.1 创建AVMutableComposition 先使用 AVMutableComposition 类创建一个自定义的 Composition。
3.1.2 添加AVMutableCompositionTrack 然后如果要向组合中添加媒体数据,那么需要先使用 AVMutableCompositionTrack 类在自定义的 Composition 中添加一个或多个 composition tracks。
下面是一个通过 video track 和 audio track 创建 composition 的例子:
1 2 3 4 5 6 7 AVMutableComposition *mutableComposition = [AVMutableComposition composition];AVMutableCompositionTrack *mutableCompositionVideoTrack = [mutableComposition addMutableTrackWithMediaType:AVMediaTypeVideo preferredTrackID:kCMPersistentTrackID_Invalid];AVMutableCompositionTrack *mutableCompositionAudioTrack = [mutableComposition addMutableTrackWithMediaType:AVMediaTypeAudio preferredTrackID:kCMPersistentTrackID_Invalid];
3.1.3 向composition track中添加AVAssetTrack 1. 添加媒体数据 当配置好一个包含一个或多个track的composition时,就可以开始将媒体数据添加到合适的track中。
首先,需要访问媒体数据所在的AVAsset对象。将具有相同媒体类型的多个 track 添加到同一个 mutable composition track 中。
下面的例子说明了如何将两个不同的 video asset tracks 顺序添加到一个 composition track 中:
1 2 3 4 5 6 7 8 9 10 11 12 13 AVAsset *videoAsset = <#AVAsset with at least one video track#>;AVAsset *anotherVideoAsset = <#another AVAsset with at least one video track#>; AVAssetTrack *videoAssetTrack = [[videoAsset tracksWithMediaType:AVMediaTypeVideo ] objectAtIndex:0 ];AVAssetTrack *anotherVideoAssetTrack = [[anotherVideoAsset tracksWithMediaType:AVMediaTypeVideo ] objectAtIndex:0 ];[mutableCompositionVideoTrack insertTimeRange:CMTimeRangeMake (kCMTimeZero,videoAssetTrack.timeRange.duration) ofTrack:videoAssetTrack atTime:kCMTimeZero error:nil ]; [mutableCompositionVideoTrack insertTimeRange:CMTimeRangeMake (kCMTimeZero,anotherVideoAssetTrack.timeRange.duration) ofTrack:anotherVideoAssetTrack atTime:videoAssetTrack.timeRange.duration error:nil ];
2. 检索兼容的 Composition Tracks 如果可能的情况下,每种媒体类型都应当只有一个对之对应的 composition track,这样会降低资源的使用。当串行呈现媒体数据时,应当将相同类型的媒体数据放到同一个 composition track 中。
可以通过查询一个 mutable composition,找出是否有与 asset track 对应的 composition track.
1 2 3 4 AVMutableCompositionTrack *compatibleCompositionTrack = [mutableComposition mutableTrackCompatibleWithTrack:<#the AVAssetTrack you want to insert#>]; if (compatibleCompositionTrack) { }
注意: 在同一个 composition track 添加多个视频段,可能会导致视频段之间进行切换时掉帧,嵌入式设备尤其明显。如何为 composition track 选择合适数量的视频段取决于 App 的设计以及其目标设备。
3.1.4 小结 如果你需要顺序合并多个 asset 到一个文件中,上面的内容就已经够用了。但是如果要对合成中的 track 执行任何自定义的音视频处理操作,那么你需要分别进行音频混合、视频组合。
3.2 音频混合(AVMutableAudioMix) 3.2.1 核心类概述 如下图(performs audio mixing)中所示,使用 AVMutableAudioMix 类可以对 composition 中的 audio track 进行自定义操作。你还可以指定 audio track 的最大音量或者为其设置渐变效果。
1 2 3 4 5 6 7 8 9 10 11 12 13 14 15 16 17 18 19 20 21 22 23 24 25 26 @interface AVAudioMix : NSObject @property (nonatomic , readonly , copy ) NSArray <AVAudioMixInputParameters *> *inputParameters;@end @interface AVMutableAudioMix : AVAudioMix + (instancetype )audioMix; @property (nonatomic , copy ) NSArray <AVAudioMixInputParameters *> *inputParameters;@end @interface AVAudioMixInputParameters : NSObject <NSCopying , NSMutableCopying >@property (nonatomic , readonly ) CMPersistentTrackID trackID;@property (nonatomic , readonly , copy ) AVAudioTimePitchAlgorithm audioTimePitchAlgorithm;@property (nonatomic , readonly , retain ) MTAudioProcessingTapRef audioTapProcessor;- (BOOL )getVolumeRampForTime:(CMTime )time startVolume:(float *)startVolume endVolume:(float *)endVolume timeRange:(CMTimeRange *)timeRange; @end @interface AVMutableAudioMixInputParameters : AVAudioMixInputParameters + (instancetype )audioMixInputParametersWithTrack:(AVAssetTrack *)track; + (instancetype )audioMixInputParameters; @property (nonatomic ) CMPersistentTrackID trackID;@property (nonatomic , copy ) AVAudioTimePitchAlgorithm audioTimePitchAlgorithm;@property (nonatomic , retain ) MTAudioProcessingTapRef audioTapProcessor;- (void )setVolumeRampFromStartVolume:(float )startVolume toEndVolume:(float )endVolume timeRange:(CMTimeRange )timeRange; - (void )setVolume:(float )volume atTime:(CMTime )time; @end
3.2.2 示例: 自定义音频处理 — 音量渐变 使用一个AVMutableAudioMix对象就可以为 composition 中的每一个 audio tracks 单独执行自定义的音频处理操作。
下面的例子展示了如何给一个 audio track 设置音量渐变让声音有一个缓慢淡出结束的效果:
1 2 3 4 5 6 7 8 AVMutableAudioMix *mutableAudioMix = [AVMutableAudioMix audioMix];AVMutableAudioMixInputParameters *mixParameters = [AVMutableAudioMixInputParameters audioMixInputParametersWithTrack:mutableCompositionAudioTrack];[mixParameters setVolumeRampFromStartVolume:1. f toEndVolume:0. f timeRange:CMTimeRangeMake (kCMTimeZero, mutableComposition.duration)]; mutableAudioMix.inputParameters = @[mixParameters];
AVMutableAudioMixInputParameters 类的接口将 audio mix 与 composition 中特定的 track 关联起来
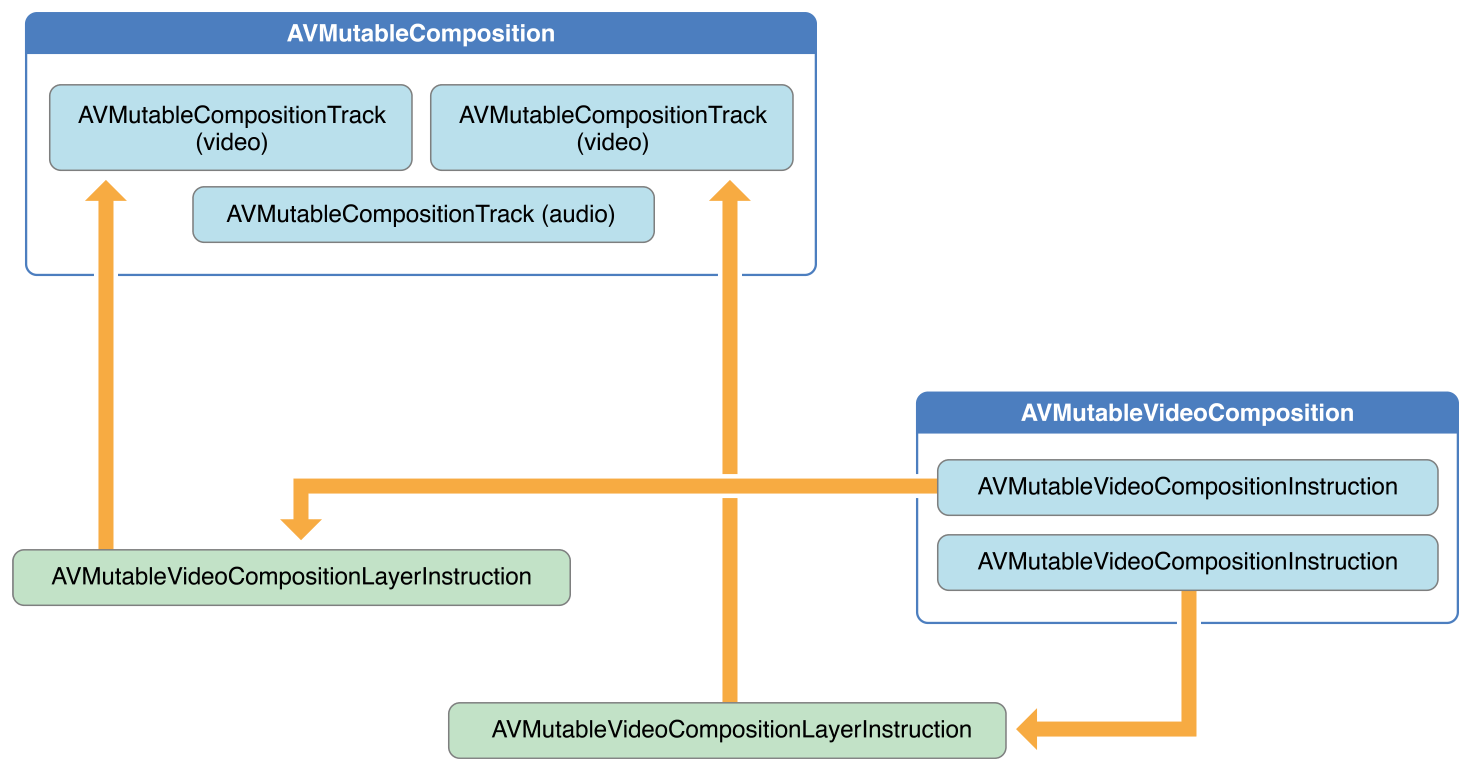
3.3 视频合成(AVMutableVideoComposition) 3.3.1 核心类概述 1. 类图 如下图所示,使用 AVMutableVideoComposition 类可以直接处理合成中的视频 track。
从一个 video composition 输出视频时,可以指定输出的尺寸、缩放比例、帧率。
AVMutableVideoCompositionInstruction (视频合成指令),可以修改视频背景色、设置 layer 的 instructions。
AVMutableVideoCompositionLayerInstruction (视频合成图层指令) 可以对合成中的 video track 实现transform、渐变transform、透明度、透明度渐变等效果。
Video composition类还允许通过 animationTool 属性在视频中应用 Core Animation 框架的一些效果。
2. 视频合成类 1 2 3 4 5 6 7 8 9 10 11 12 13 14 15 16 17 18 19 20 21 22 23 24 25 26 27 28 29 30 31 32 33 34 35 36 37 38 39 40 41 42 43 44 45 46 47 48 @interface AVVideoComposition : NSObject <NSCopying , NSMutableCopying > + (AVVideoComposition *)videoCompositionWithPropertiesOfAsset:(AVAsset *)asset; @property (nonatomic , readonly ) Class<AVVideoCompositing > customVideoCompositorClass;@property (nonatomic , readonly ) CMTime frameDuration;@property (nonatomic , readonly ) CMPersistentTrackID sourceTrackIDForFrameTiming;@property (nonatomic , readonly ) CGSize renderSize;@property (nonatomic , readonly ) float renderScale;@property (nonatomic , readonly , copy ) NSArray <id <AVVideoCompositionInstruction >> *instructions;@property (nonatomic , readonly , retain ) AVVideoCompositionCoreAnimationTool *animationTool;@property (nonatomic , readonly ) NSArray <NSNumber *> *sourceSampleDataTrackIDs;@end @interface AVVideoComposition (AVVideoCompositionColorimetery )@property (nonatomic , readonly ) NSString *colorPrimaries;@property (nonatomic , readonly ) NSString *colorYCbCrMatrix;@property (nonatomic , readonly ) NSString *colorTransferFunction;@end @interface AVVideoComposition (AVVideoCompositionFiltering )+ (AVVideoComposition *)videoCompositionWithAsset:(AVAsset *)asset applyingCIFiltersWithHandler:(void (^)(AVAsynchronousCIImageFilteringRequest *request))applier; @end @interface AVMutableVideoComposition : AVVideoComposition + (AVMutableVideoComposition *)videoComposition; + (AVMutableVideoComposition *)videoCompositionWithPropertiesOfAsset:(AVAsset *)asset; + (AVMutableVideoComposition *)videoCompositionWithPropertiesOfAsset:(AVAsset *)asset prototypeInstruction:(AVVideoCompositionInstruction *)prototypeInstruction; @end @interface AVMutableVideoComposition (AVMutableVideoCompositionColorimetery )@property (nonatomic , copy ) NSString *colorPrimaries;@property (nonatomic , copy ) NSString *colorYCbCrMatrix;@property (nonatomic , copy , nullable ) NSString *colorTransferFunction;@end @interface AVMutableVideoComposition (AVMutableVideoCompositionFiltering )+ (AVMutableVideoComposition *)videoCompositionWithAsset:(AVAsset *)asset applyingCIFiltersWithHandler:(void (^)(AVAsynchronousCIImageFilteringRequest *request))applier; @end
3. 视频合成指令类 1 2 3 4 5 6 7 8 9 10 11 12 13 14 15 16 17 18 19 20 21 22 23 24 25 26 27 28 29 @interface AVMutableVideoCompositionInstruction : AVVideoCompositionInstruction + (instancetype )videoCompositionInstruction; @property (nonatomic , assign ) CMTimeRange timeRange;@property (nonatomic , retain , nullable )CGColorRef backgroundColor;@property (nonatomic , copy ) NSArray <AVVideoCompositionLayerInstruction *> *layerInstructions;@property (nonatomic , assign ) BOOL enablePostProcessing;@property (nonatomic , copy ) NSArray <NSNumber *> *requiredSourceSampleDataTrackIDs;@end @interface AVVideoCompositionLayerInstruction : NSObject <NSSecureCoding , NSCopying , NSMutableCopying >@property (nonatomic , readonly , assign ) CMPersistentTrackID trackID;- (BOOL )getTransformRampForTime:(CMTime )time startTransform:(CGAffineTransform *)startTransform endTransform:(CGAffineTransform *)endTransform timeRange:(CMTimeRange *)timeRange; - (BOOL )getOpacityRampForTime:(CMTime )time startOpacity:(float *)startOpacity endOpacity:(float *)endOpacity timeRange:(CMTimeRange *)timeRange; - (BOOL )getCropRectangleRampForTime:(CMTime )time startCropRectangle:(CGRect *)startCropRectangle endCropRectangle:(CGRect *)endCropRectangle timeRange:(CMTimeRange *)timeRange; @end @interface AVMutableVideoCompositionLayerInstruction : AVVideoCompositionLayerInstruction + (instancetype )videoCompositionLayerInstructionWithAssetTrack:(AVAssetTrack *)track; + (instancetype )videoCompositionLayerInstruction; @property (nonatomic , assign ) CMPersistentTrackID trackID;- (void )setTransformRampFromStartTransform:(CGAffineTransform )startTransform toEndTransform:(CGAffineTransform )endTransform timeRange:(CMTimeRange )timeRange; - (void )setTransform:(CGAffineTransform )transform atTime:(CMTime )time; - (void )setOpacityRampFromStartOpacity:(float )startOpacity toEndOpacity:(float )endOpacity timeRange:(CMTimeRange )timeRange; - (void )setOpacity:(float )opacity atTime:(CMTime )time; - (void )setCropRectangleRampFromStartCropRectangle:(CGRect )startCropRectangle toEndCropRectangle:(CGRect )endCropRectangle timeRange:(CMTimeRange )timeRange; - (void )setCropRectangle:(CGRect )cropRectangle atTime:(CMTime )time; @end
4. 核心动画工具 1 2 3 4 5 @interface AVVideoCompositionCoreAnimationTool : NSObject + (instancetype )videoCompositionCoreAnimationToolWithAdditionalLayer:(CALayer *)layer asTrackID:(CMPersistentTrackID )trackID; + (instancetype )videoCompositionCoreAnimationToolWithPostProcessingAsVideoLayer:(CALayer *)videoLayer inLayer:(CALayer *)animationLayer; + (instancetype )videoCompositionCoreAnimationToolWithPostProcessingAsVideoLayers:(NSArray <CALayer *> *)videoLayers inLayer:(CALayer *)animationLayer; @end
3.3.2 示例: 自定义视频处理 与音频混合一样,可以使用 AVMutableVideoComposition 对象可以对 composition 中的 video tracks 执行所有自定义处理操作。比如指定尺寸、缩放比例、以及帧率。
1. 设置 Composition 的背景色 Video compositions 必须包含一个 AVVideoCompositionInstruction 对象的数组,其中至少包含一个 video composition instruction。
使用 AVMutableVideoCompositionInstruction 可以创建自定义的视频合成指令(video composition instructions)。使用视频合成指令,来修改composition的背景颜色、指定是否需要后期处理、设置图层的指令等。
1 2 3 AVMutableVideoCompositionInstruction *mutableVideoCompositionInstruction = [AVMutableVideoCompositionInstruction videoCompositionInstruction];mutableVideoCompositionInstruction.timeRange = CMTimeRangeMake (kCMTimeZero, mutableComposition.duration); mutableVideoCompositionInstruction.backgroundColor = [[UIColor redColor] CGColor ];
2. 设置 track 切换时的透明度渐变 AVMutableVideoCompositionLayerInstruction 可以用来设置 video track 的 transforms、transforms 渐变、opacity、opacity 渐变。
AVMutableVideoCompositionInstruction 的属性 layerInstructions 中指令的顺序,决定了在该合成指令的持续时间内,应如何对来自源 track 的视频帧进行分层和合成。
下面的代码片段展示了如何在第二个视频出现之前为第一个视频增加一个透明度淡出效果:
1 2 3 4 5 6 7 8 9 10 11 12 13 14 15 16 17 18 19 20 21 22 23 24 25 26 27 28 AVAsset *firstVideoAssetTrack = <#AVAssetTrack representing the first video segment played in the composition#>;AVAsset *secondVideoAssetTrack = <#AVAssetTrack representing the second video segment played in the composition#>;AVMutableVideoCompositionInstruction *firstVideoCompositionInstruction = [AVMutableVideoCompositionInstruction videoCompositionInstruction];firstVideoCompositionInstruction.timeRange = CMTimeRangeMake (kCMTimeZero, firstVideoAssetTrack.timeRange.duration); AVMutableVideoCompositionLayerInstruction *firstVideoLayerInstruction = [AVMutableVideoCompositionLayerInstruction videoCompositionLayerInstructionWithAssetTrack: mutableCompositionVideoTrack];[firstVideoLayerInstruction setOpacityRampFromStartOpacity:1. f toEndOpacity:0. f timeRange: CMTimeRangeMake (kCMTimeZero, firstVideoAssetTrack.timeRange.duration)]; AVMutableVideoCompositionInstruction *secondVideoCompositionInstruction = [AVMutableVideoCompositionInstruction videoCompositionInstruction];secondVideoCompositionInstruction.timeRange = CMTimeRangeMake (firstVideoAssetTrack.timeRange.duration, CMTimeAdd (firstVideoAssetTrack.timeRange.duration, secondVideoAssetTrack.timeRange.duration)); AVMutableVideoCompositionLayerInstruction *secondVideoLayerInstruction = [AVMutableVideoCompositionLayerInstruction videoCompositionLayerInstructionWithAssetTrack:mutableCompositionVideoTrack];firstVideoCompositionInstruction.layerInstructions = @[firstVideoLayerInstruction]; secondVideoCompositionInstruction.layerInstructions = @[secondVideoLayerInstruction]; AVMutableVideoComposition *mutableVideoComposition = [AVMutableVideoComposition videoComposition];mutableVideoComposition.instructions = @[firstVideoCompositionInstruction, secondVideoCompositionInstruction];
3. 结合 Core Animation Video composition 的 animationTool 属性可以在 composition 中展示 Core Animation 框架的强大能力,例如视频水印、视频标题、动画遮罩等。
在 Video compositions 中 Core Animatio 有两种不同的使用方式:
添加一个 Core Animation layer 作为独立的 composition track;
使用 Core Animation layer 将核心动画的效果直接渲染到视频帧中。
下面的代码展示了后面一种使用方式,在视频区域的中心添加水印:
1 2 3 4 5 6 7 8 9 10 11 12 CALayer *watermarkLayer = <#CALayer representing your desired watermark image#>;CALayer *parentLayer = [CALayer layer];CALayer *videoLayer = [CALayer layer];parentLayer.frame = CGRectMake (0 , 0 , mutableVideoComposition.renderSize.width, mutableVideoComposition.renderSize.height); videoLayer.frame = CGRectMake (0 , 0 , mutableVideoComposition.renderSize.width, mutableVideoComposition.renderSize.height); [parentLayer addSublayer:videoLayer]; watermarkLayer.position = CGPointMake (mutableVideoComposition.renderSize.width/2 , mutableVideoComposition.renderSize.height/4 ); [parentLayer addSublayer:watermarkLayer]; mutableVideoComposition.animationTool = [AVVideoCompositionCoreAnimationTool videoCompositionCoreAnimationToolWithPostProcessingAsVideoLayer:videoLayer inLayer:parentLayer];
3.4 音视频组合(AVAssetExportSession) 如下图所示,要对音视频进行组合,可以使用 AVAssetExportSession。使用 composition 初始化一个 export session,然后分别其设置 audioMix 和 videoComposition 属性。
3.5 示例: 多个asset的合成与导出 下面的代码简要的展示了如何合并两个 video asset tracks 和一个 audio asset track 为一个视频文件。 包括:
创建 AVMutableComposition 对象, 并添加多个 AVMutableCompositionTrack 对象
在 composition tracks 中添加 AVAssetTrack 对象的时间范围
检查 video asset track 的 preferredTransform 属性,判断视频方向
使用 AVMutableVideoCompositionLayerInstruction 对象进行 transform 变换
设置 video composition 的 renderSize 和 frameDuration 属性
导出视频文件
保存视频文件到相册
提示:为了展示核心代码,这份示例省略了某些内容,比如内存管理和通知的移除等。使用 AV Foundation 之前,你最好已经拥有 Cocoa 框架的使用经验。
1. 创建 Composition 使用AVMutableComposition对象组合多个 assets 中的 tracks。下面的代码创建了一个 composition,并向其添加了一个 audio track 和一个 video track。
1 2 3 AVMutableComposition *mutableComposition = [AVMutableComposition composition];AVMutableCompositionTrack *videoCompositionTrack = [mutableComposition addMutableTrackWithMediaType: AVMediaTypeVideo preferredTrackID:kCMPersistentTrackID_Invalid];AVMutableCompositionTrack *audioCompositionTrack = [mutableComposition addMutableTrackWithMediaType: AVMediaTypeAudio preferredTrackID:kCMPersistentTrackID_Invalid];
2. 添加 Assets 向 composition 添加两个 video asset tracks 和一个 audio asset track。
1 2 3 4 5 6 7 8 9 10 11 12 13 14 AVAssetTrack *firstVideoAssetTrack = [[firstVideoAsset tracksWithMediaType:AVMediaTypeVideo ] objectAtIndex:0 ];AVAssetTrack *secondVideoAssetTrack = [[secondVideoAsset tracksWithMediaType:AVMediaTypeVideo ] objectAtIndex:0 ];[videoCompositionTrack insertTimeRange: CMTimeRangeMake (kCMTimeZero, firstVideoAssetTrack.timeRange.duration) ofTrack: firstVideoAssetTrack atTime: kCMTimeZero error: nil ]; [videoCompositionTrack insertTimeRange: CMTimeRangeMake (kCMTimeZero, secondVideoAssetTrack.timeRange.duration) ofTrack: secondVideoAssetTrack atTime: firstVideoAssetTrack.timeRange.duration error: nil ]; [audioCompositionTrack insertTimeRange: CMTimeRangeMake (kCMTimeZero, CMTimeAdd (firstVideoAssetTrack.timeRange.duration, secondVideoAssetTrack.timeRange.duration)) ofTrack: [[audioAsset tracksWithMediaType:AVMediaTypeAudio ] objectAtIndex:0 ] atTime: kCMTimeZero error: nil ];
3. 判断视频方向 一旦在 composition 中添加了 audio tracks 和 videotracks,必须确保其中所有的 video tracks 的视频方向都是正确的。
默认情况下,video tracks 默认为横屏模式,如果 video track 是在竖屏模式下采集的,那么导出视频时会出现方向错误。同理,也不能将一个横向的视频和一个纵向的视频进行合并后导出。
1 2 3 4 5 6 7 8 9 10 11 12 13 14 15 16 17 18 19 20 21 BOOL isFirstVideoPortrait = NO ;CGAffineTransform firstTransform = firstVideoAssetTrack.preferredTransform;if (firstTransform.a == 0 && firstTransform.d == 0 && (firstTransform.b == 1.0 || firstTransform.b == -1.0 ) && (firstTransform.c == 1.0 || firstTransform.c == -1.0 )) { isFirstVideoPortrait = YES ; } BOOL isSecondVideoPortrait = NO ;CGAffineTransform secondTransform = secondVideoAssetTrack.preferredTransform;if (secondTransform.a == 0 && secondTransform.d == 0 && (secondTransform.b == 1.0 || secondTransform.b == -1.0 ) && (secondTransform.c == 1.0 || secondTransform.c == -1.0 )) { isSecondVideoPortrait = YES ; } if ((isFirstVideoAssetPortrait && !isSecondVideoAssetPortrait) || (!isFirstVideoAssetPortrait && isSecondVideoAssetPortrait)) { UIAlertView *incompatibleVideoOrientationAlert = [[UIAlertView alloc] initWithTitle:@"Error!" message:@"Cannot combine a video shot in portrait mode with a video shot in landscape mode." delegate:self cancelButtonTitle:@"Dismiss" otherButtonTitles:nil ]; [incompatibleVideoOrientationAlert show]; return ; }
所有的 AVAssetTrack 对象都有一个 preferredTransform 属性,包含了 asset track 的方向信息。这个 transform 会在 asset track 在屏幕上展示时被应用。在下面一节的代码中,会将 layer instruction 的 transform 设置为 asset track 的 transform,这样便于修改了视频尺寸时,新的 composition 中的视频也能正确的进行展示。
4. 设置视频合成图层指令 一旦确认了视频方向,就可以对每个视频设置必要的 layer instructions,并将这些 layer instructions 添加到 video composition 中去.
1 2 3 4 5 6 7 8 9 10 11 12 13 14 15 16 17 18 19 20 21 AVMutableVideoCompositionInstruction *firstVideoCompositionInstruction = [AVMutableVideoCompositionInstruction videoCompositionInstruction];firstVideoCompositionInstruction.timeRange = CMTimeRangeMake (kCMTimeZero, firstVideoAssetTrack.timeRange.duration); AVMutableVideoCompositionInstruction * secondVideoCompositionInstruction = [AVMutableVideoCompositionInstruction videoCompositionInstruction];secondVideoCompositionInstruction.timeRange = CMTimeRangeMake (firstVideoAssetTrack.timeRange.duration, CMTimeAdd (firstVideoAssetTrack.timeRange.duration, secondVideoAssetTrack.timeRange.duration)); AVMutableVideoCompositionLayerInstruction *firstVideoLayerInstruction = [AVMutableVideoCompositionLayerInstruction videoCompositionLayerInstructionWithAssetTrack: videoCompositionTrack];Set the transform of the first layer instruction to the preferred transform of the first video track. [firstVideoLayerInstruction setTransform:firstTransform atTime:kCMTimeZero]; AVMutableVideoCompositionLayerInstruction *secondVideoLayerInstruction = [AVMutableVideoCompositionLayerInstruction videoCompositionLayerInstructionWithAssetTrack: videoCompositionTrack];[secondVideoLayerInstruction setTransform:secondTransform atTime:firstVideoAssetTrack.timeRange.duration]; firstVideoCompositionInstruction.layerInstructions = @[firstVideoLayerInstruction]; secondVideoCompositionInstruction.layerInstructions = @[secondVideoLayerInstruction]; AVMutableVideoComposition *mutableVideoComposition = [AVMutableVideoComposition videoComposition];mutableVideoComposition.instructions = @[firstVideoCompositionInstruction, secondVideoCompositionInstruction];
5. 设置渲染尺寸和帧率 要修正视频方向,还必须对 renderSize 属性进行调整。同时也需要设置一个合理的帧持续时间 frameDuration,比如 1/30 秒(30FPS)。默认情况下,renderScale 值为 1.0。
1 2 3 4 5 6 7 8 9 10 11 12 13 14 15 16 17 18 19 20 21 22 23 24 25 26 27 CGSize naturalSizeFirst, naturalSizeSecond;if (isFirstVideoAssetPortrait) { naturalSizeFirst = CGSizeMake (firstVideoAssetTrack.naturalSize.height, firstVideoAssetTrack.naturalSize.width); naturalSizeSecond = CGSizeMake (secondVideoAssetTrack.naturalSize.height, secondVideoAssetTrack.naturalSize.width); }else { naturalSizeFirst = firstVideoAssetTrack.naturalSize; naturalSizeSecond = secondVideoAssetTrack.naturalSize; } float renderWidth, renderHeight;if (naturalSizeFirst.width > naturalSizeSecond.width) { renderWidth = naturalSizeFirst.width; }else { renderWidth = naturalSizeSecond.width; } if (naturalSizeFirst.height > naturalSizeSecond.height) { renderHeight = naturalSizeFirst.height; }else { renderHeight = naturalSizeSecond.height; } mutableVideoComposition.renderSize = CGSizeMake (renderWidth, renderHeight); mutableVideoComposition.frameDuration = CMTimeMake (1 ,30 );
6. 导出 Composition 最后一步是导出 composition 到一个视频文件中,并将视频文件保存到用户相册中。使用 AVAssetExportSession 创建一个新的视频文件,并指定要输出的文件目录的 URL。使用 ALAssetsLibrary 可以将生成的视频文件保存到用户相册中。
1 2 3 4 5 6 7 8 9 10 11 12 13 14 15 16 17 18 19 20 21 22 23 24 25 26 static NSDateFormatter *kDateFormatter;if (!kDateFormatter) { kDateFormatter = [[NSDateFormatter alloc] init]; kDateFormatter.dateStyle = NSDateFormatterMediumStyle ; kDateFormatter.timeStyle = NSDateFormatterShortStyle ; } AVAssetExportSession *exporter = [[AVAssetExportSession alloc] initWithAsset:mutableComposition presetName:AVAssetExportPresetHighestQuality ];exporter.outputURL = [[[[NSFileManager defaultManager] URLForDirectory:NSDocumentDirectory inDomain:NSUserDomainMask appropriateForURL:nil create:@YES error:nil ] URLByAppendingPathComponent:[kDateFormatter stringFromDate:[NSDate date]]] URLByAppendingPathExtension:CFBridgingRelease (UTTypeCopyPreferredTagWithClass((CFStringRef )AVFileTypeQuickTimeMovie , kUTTagClassFilenameExtension))]; exporter.outputFileType = AVFileTypeQuickTimeMovie ; exporter.shouldOptimizeForNetworkUse = YES ; exporter.videoComposition = mutableVideoComposition; [exporter exportAsynchronouslyWithCompletionHandler:^{ dispatch_async (dispatch_get_main_queue(), ^{ if (exporter.status == AVAssetExportSessionStatusCompleted ) { ALAssetsLibrary *assetsLibrary = [[ALAssetsLibrary alloc] init]; if ([assetsLibrary videoAtPathIsCompatibleWithSavedPhotosAlbum:exporter.outputURL]) { [assetsLibrary writeVideoAtPathToSavedPhotosAlbum:exporter.outputURL completionBlock:NULL ]; } } }); }];
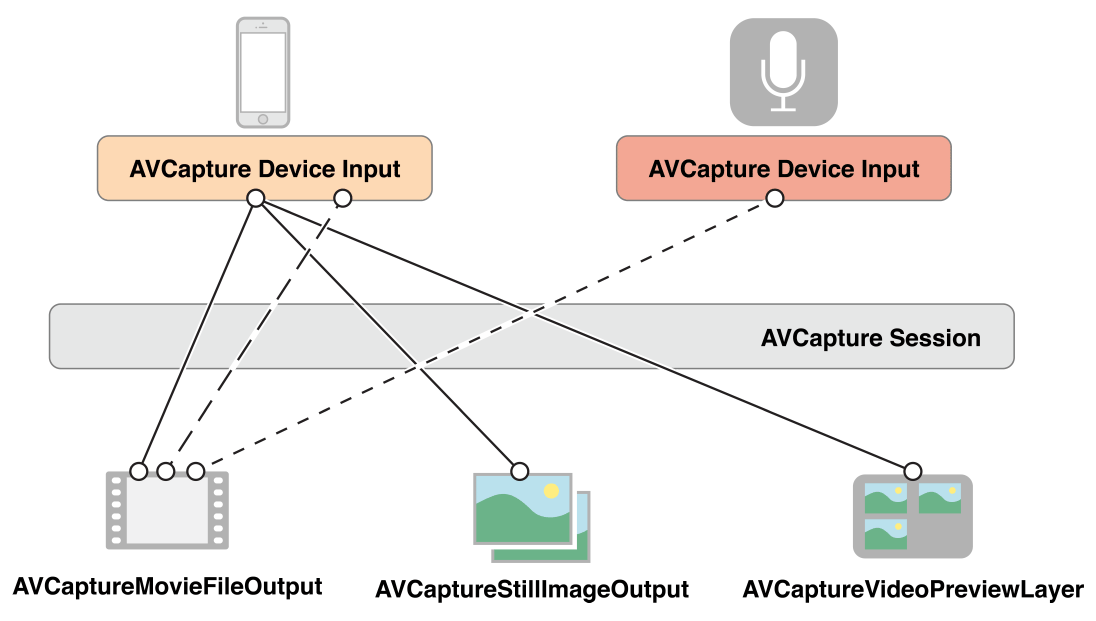
四、静态图片和视频捕捉 核心类概述 通过输入 (inputs) 和输出 (outputs) 对象对设备 (比如摄像头或麦克风) 采集到的数据进行管理。使用 AVCaptureSession 对象协调 inputs 和 outputs 之间的数据流。
AVCaptureDevice 代表输入设备,比如摄像头和麦克风。
AVCaptureInput 的子类用来对输入设备进行配置。
AVCaptureOutput 的子类用来管理输出的数据(输出结果为图片或者视频)。
AVCaptureSession 用来协调 inputs 和 outputs 之间的数据流
可以为单个session配置多个输入和输出,即使这个会话正在运行时也可以。
可以向会话发送消息以启动和停止数据流。
AVCaptureVideoPreviewLayer预览图层(CALayer 的子类),可以展示摄像头正在采集的画面预览。
对于一个 session,可以配置多个 inputs 和 outputs,如图所示:
对于大部分的应用而言,这已经足够了。但是有些情况下,会涉及到如何表示一个 inputs 的多个端口 (ports),以及这些 ports 如何连接到 outputs。
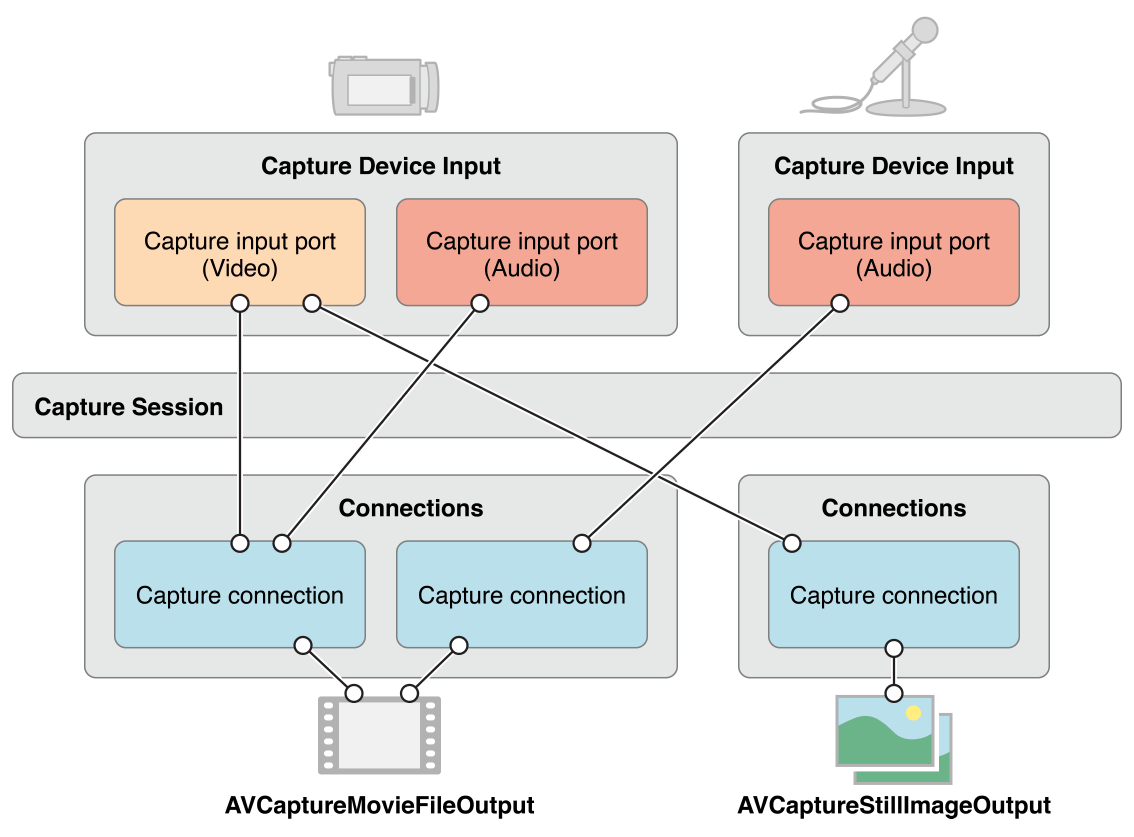
Capture session 中:
一个 Inputs(AVCaptureInput实例) 包含一个或多个 input ports(AVCaptureInputPort)。比如输入设备可能同时提供音频和视频数据。
一个 Outputs(AVCaptureOutput实例) 可以从一个或多个源接收数据,比如 AVCaptureMovieFileOutput 可以同时接收视频和音频数据。
使用 AVCaptureConnection 对象来定义一组 AVCaptureInputPort 对象和单个 AVCaptureOutput 之间的映射。
如下图所示,当在 session 中添加一个 input 或 output 时,session 会为所有可匹配的 inputs 和 outputs 之前生成 connections(AVCaptureConnection)。
可以使用一个 connection 来开启或关闭一个 input 或 output 数据流。也可以使用 connection 监控一个 audio 频道的功率平均值和峰值。
注意:媒体捕获不支持同时使用呢 iOS 设备上的前置和后置摄像头捕获。
4.1 使用AVCaptureSession协调数据流 AVCaptureSession 对象是管理数据捕获的中央协调对象,协调从输入设备到输出的数据流。
4.1.1 AVCaptureSession 类 1 2 3 4 5 6 7 8 9 10 11 12 13 14 15 16 17 18 19 20 21 22 23 24 25 26 27 28 29 30 31 32 33 34 35 36 37 38 39 40 41 42 @interface AVCaptureSession : NSObject - (BOOL )canSetSessionPreset:(AVCaptureSessionPreset )preset; @property (nonatomic , copy ) AVCaptureSessionPreset sessionPreset;@property (nonatomic , readonly ) NSArray <__kindof AVCaptureInput *> *inputs; - (BOOL )canAddInput:(AVCaptureInput *)input; - (void )addInput:(AVCaptureInput *)input; - (void )removeInput:(AVCaptureInput *)input; @property (nonatomic , readonly ) NSArray <__kindof AVCaptureOutput *> *outputs;- (BOOL )canAddOutput:(AVCaptureOutput *)output; - (void )addOutput:(AVCaptureOutput *)output; - (void )removeOutput:(AVCaptureOutput *)output; - (void )addInputWithNoConnections:(AVCaptureInput *)input; - (void )addOutputWithNoConnections:(AVCaptureOutput *)output; @property (nonatomic , readonly ) NSArray <AVCaptureConnection *> *connections;- (BOOL )canAddConnection:(AVCaptureConnection *)connection; - (void )addConnection:(AVCaptureConnection *)connection; - (void )removeConnection:(AVCaptureConnection *)connection; - (void )beginConfiguration; - (void )commitConfiguration; @property (nonatomic , readonly , getter =isRunning) BOOL running;@property (nonatomic , readonly , getter =isInterrupted) BOOL interrupted;@property (nonatomic ) BOOL usesApplicationAudioSession;@property (nonatomic ) BOOL automaticallyConfiguresApplicationAudioSession;@property (nonatomic ) BOOL automaticallyConfiguresCaptureDeviceForWideColor;- (void )startRunning; - (void )stopRunning; @property (nonatomic , readonly ) CMClockRef masterClock;@end
在 session 中添加采集设备并对 output 进行配置之后,可以向 session 发送 startRunning 消息开始采集, 发送 stopRunning 消息停止采集。
1 2 3 AVCaptureSession *session = [[AVCaptureSession alloc] init];[session startRunning];
4.1.2 配置 Capture Session 使用 session 的 sessionPreset 属性指定图片质量和分辨率,perset是一个常数,系统定义了多种配置,需注意,有些配置只有在特定设备上才生效。
1 2 3 4 5 6 AVCaptureSessionPresetHigh AVCaptureSessionPresetMedium AVCaptureSessionPresetLow AVCaptureSessionPreset640x480 AVCaptureSessionPreset1280x720 AVCaptureSessionPresetPhoto
在设置一个 preset 之前,需要判断设备是否支持该 preset 值:
1 2 3 4 5 if ([session canSetSessionPreset:AVCaptureSessionPreset1280x720 ]) { session.sessionPreset = AVCaptureSessionPreset1280x720 ; }else { }
如果需要设置一个更高分辨率的 preset,或者在 session 运行时修改一些配置,需要在 beginConfiguration 和 commitConfiguration 之间完成修改。
1 2 3 4 5 6 7 8 [session beginConfiguration]; [session commitConfiguration];
beginConfiguration 和 commitConfiguration 方法确保所有的修改作为一个group被整体应用,减少对预览状态的影响。
4.1.3 监听 Capture Session 的状态 可以监听 session 的状态,例如何时开始运行、停止运行、被中断等。
当发生运行时错误,会发送 AVCaptureSessionRuntimeErrorNotification 通知。
可以使用Session的running属性判断当前的运行状态,interrupted属性则可以判断当前是否中断。这两者都可以通过 KVO 进行监听,并且通知都在主线程中发送。
4.1.4 补充: AVCaptureConnection 类 1 2 3 4 5 6 7 8 9 10 11 12 13 14 15 16 17 18 19 20 21 22 23 24 25 26 27 28 29 30 31 32 33 34 35 36 37 38 39 40 41 @interface AVCaptureConnection : NSObject + (instancetype )connectionWithInputPorts:(NSArray <AVCaptureInputPort *> *)ports output:(AVCaptureOutput *)output; + (instancetype )connectionWithInputPort:(AVCaptureInputPort *)port videoPreviewLayer:(AVCaptureVideoPreviewLayer *)layer; - (instancetype )initWithInputPorts:(NSArray <AVCaptureInputPort *> *)ports output:(AVCaptureOutput *)output; - (instancetype )initWithInputPort:(AVCaptureInputPort *)port videoPreviewLayer:(AVCaptureVideoPreviewLayer *)layer; @property (nonatomic , readonly ) NSArray <AVCaptureInputPort *> *inputPorts;@property (nonatomic , readonly ) AVCaptureOutput *output;@property (nonatomic , readonly ) AVCaptureVideoPreviewLayer *videoPreviewLayer;@property (nonatomic ) BOOL enabled;@property (nonatomic , readonly ) BOOL active;@property (nonatomic , readonly ) NSArray <AVCaptureAudioChannel *> *audioChannels;@property (nonatomic , readonly ) BOOL supportsVideoMirroring;@property (nonatomic ) BOOL videoMirrored;@property (nonatomic ) BOOL automaticallyAdjustsVideoMirroring;@property (nonatomic , readonly ) BOOL supportsVideoOrientation;@property (nonatomic ) AVCaptureVideoOrientation videoOrientation;@property (nonatomic , readonly ) BOOL supportsVideoFieldMode; @property (nonatomic ) AVVideoFieldMode videoFieldMode; @property (nonatomic , readonly ) CGFloat videoMaxScaleAndCropFactor;@property (nonatomic ) CGFloat videoScaleAndCropFactor;@property (nonatomic , readonly ) BOOL supportsVideoStabilization;@property (nonatomic ) AVCaptureVideoStabilizationMode preferredVideoStabilizationMode;@property (nonatomic , readonly ) AVCaptureVideoStabilizationMode activeVideoStabilizationMode;@property (nonatomic , readonly ) BOOL cameraIntrinsicMatrixDeliverySupported;@property (nonatomic ) BOOL cameraIntrinsicMatrixDeliveryEnabled;@end
4.2 使用AVCaptureDevice表示输入设备 AVCaptureDevice 是对实际的物理捕捉设备的抽象,物体捕捉设备向 AVCaptureSession 提供数据。每个 AVCaptureDevice 对象代表一个实际的输入设备,例如前摄像头或后摄像头、或麦克风。
1 2 3 4 5 6 7 8 9 10 11 @interface AVCaptureDevice : NSObject + (NSArray <AVCaptureDevice *> *)devices API_DEPRECATED("Use AVCaptureDeviceDiscoverySession instead." ; + (NSArray <AVCaptureDevice *> *)devicesWithMediaType:(AVMediaType )mediaType; + (nullable AVCaptureDevice *)defaultDeviceWithMediaType:(AVMediaType )mediaType; @end @interface AVCaptureDeviceDiscoverySession : NSObject @property (nonatomic , readonly ) NSArray <AVCaptureDevice *> *devices;@end
当前的可用设备的状态可能会发生改变:
当前使用的输入设备可能会变为不可用状态 (如果设备被另外一个应用使用);
也可能会有新的设备变为可用状态 (被其他应用释放)。
注册接收 AVCaptureDeviceWasConnectedNotification 和 AVCaptureDeviceWasDisconnectedNotification 通知可以得知可用设备列表的变化。
使用捕捉输入(AVCaptureInput)将输入设备添加到 capture session 中。
4.2.1 设备特性 可以获取一个设备的设备特性,比如:
1 2 3 4 5 6 7 8 9 10 11 12 13 14 @property (nonatomic , readonly ) NSString *uniqueID;@property (nonatomic , readonly ) NSString *modelID;@property (nonatomic , readonly ) NSString *localizedName;@property (nonatomic , readonly ) NSString *manufacturer;@property (nonatomic , readonly ) int32_t transportType;- (BOOL )hasMediaType:(AVMediaType )mediaType; - (BOOL )supportsAVCaptureSessionPreset:(AVCaptureSessionPreset )preset;
当要提供一个可用的捕捉设备列表给用户进行选择时,获取展示出设备的位置以及名称 (比如前摄像头或后摄像头) 拥有更好的用户体验。
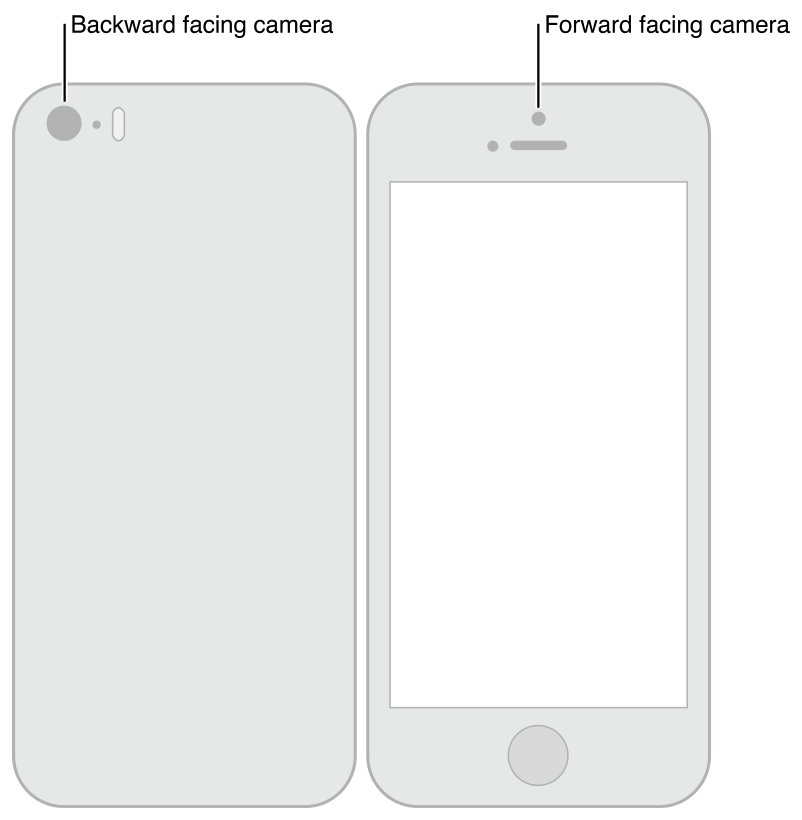
下图展示了前摄像头 (AVCaptureDevicePositionFront) 和后摄像头 (AVCaptureDevicePositionBack):
注意:媒体捕获不支持同时捕获 iOS 设备上的前置和后置摄像头。
下面的代码遍历了所有的可用设备并打印其名称,如果是视频设备,则打印其位置:
1 2 3 4 5 6 7 8 9 10 11 12 13 14 15 16 NSArray *devices = [AVCaptureDevice devices]; for (AVCaptureDevice *device in devices) { NSLog (@"Device name: %@" , [device localizedName]); if ([device hasMediaType:AVMediaTypeVideo ]) { if ([device position] == AVCaptureDevicePositionBack ) { NSLog (@"Device position : back" ); } else { NSLog (@"Device position : front" ); } } }
此外,还可以获取设备的 model ID 以及 unique ID。
4.2.2 设备捕捉时的参数设置 不同的设备之间具备不同的能力,比如一些设备支持不同的对焦或闪光灯模式,某些设备还支持兴趣点对焦。
下面的代码示例了如何找出一个具有手电筒模式和并支持给定capture session preset 的视频输入设备:
1 2 3 4 5 6 7 8 9 NSArray *devices = [AVCaptureDevice devicesWithMediaType:AVMediaTypeVideo ];NSMutableArray *torchDevices = [[NSMutableArray alloc] init]; for (AVCaptureDevice *device in devices) { [if ([device hasTorch] && [device supportsAVCaptureSessionPreset:AVCaptureSessionPreset640x480 ]) { [torchDevices addObject:device]; } }
如果找到了多个符合要求的设备,你可能需要让用户选择其中的某一个设备,这时可以使用 localizedName 属性获取设备的描述信息.
可以用类似的方式实现各种不同的捕捉设置。框架预定义了一些常量用来代表特定的捕捉模式,你可以使用这些常量以便于判断设备是否支持特定的模式。
在大部分情况下,可以通过属性值的监听,获悉设备特性的变化。
任何情况下,在改变设备的捕捉参数配置之前,都应该先锁定设备,详见下节设备的配置。
兴趣点对焦模式和兴趣点曝光模式是互斥的,正如对焦模式和曝光模式也是互斥的一样
1. 对焦模式(Focus分类) 1 2 3 4 5 6 7 8 9 10 11 12 13 14 15 16 17 18 19 20 21 22 23 24 25 26 27 28 @interface AVCaptureDevice (AVCaptureDeviceFocus )@property (nonatomic , readonly ) BOOL lockingFocusWithCustomLensPositionSupported;- (BOOL )isFocusModeSupported:(AVCaptureFocusMode )focusMode; @property (nonatomic ) AVCaptureFocusMode focusMode;@property (nonatomic , readonly ) BOOL focusPointOfInterestSupported;@property (nonatomic ) CGPoint focusPointOfInterest;@property (nonatomic , readonly ) BOOL adjustingFocus;@property (nonatomic , readonly ) BOOL autoFocusRangeRestrictionSupported;@property (nonatomic ) AVCaptureAutoFocusRangeRestriction autoFocusRangeRestriction;@property (nonatomic , readonly ) BOOL smoothAutoFocusSupported;@property (nonatomic ) BOOL smoothAutoFocusEnabled;@property (nonatomic , readonly ) float lensPosition;AVF_EXPORT const float AVCaptureLensPositionCurrent ;- (void )setFocusModeLockedWithLensPosition:(float )lensPosition completionHandler:(nullable void (^)(CMTime syncTime))handler; @property (nonatomic , readonly ) NSInteger minimumFocusDistance;@end
设置对焦模式的示例代码如下:
1 2 3 4 5 if ([currentDevice isFocusModeSupported:AVCaptureFocusModeContinuousAutoFocus ]) { CGPoint autofocusPoint = CGPointMake (0.5 f, 0.5 f); [currentDevice setFocusPointOfInterest:autofocusPoint]; [currentDevice setFocusMode:AVCaptureFocusModeContinuousAutoFocus ]; }
2. 曝光模式(Exposure分类) 1 2 3 4 5 6 7 8 9 10 11 12 13 14 15 16 17 18 19 20 21 22 23 24 25 26 27 28 29 30 @interface AVCaptureDevice (AVCaptureDeviceExposure )- (BOOL )isExposureModeSupported:(AVCaptureExposureMode )exposureMode; @property (nonatomic ) AVCaptureExposureMode exposureMode;@property (nonatomic , readonly ) BOOL exposurePointOfInterestSupported;@property (nonatomic ) CGPoint exposurePointOfInterest;@property (nonatomic ) CMTime activeMaxExposureDuration;@property (nonatomic , readonly ) BOOL adjustingExposure;@property (nonatomic , readonly ) float lensAperture;@property (nonatomic , readonly ) CMTime exposureDuration;@property (nonatomic , readonly ) float ISO;AVF_EXPORT const CMTime AVCaptureExposureDurationCurrent ;AVF_EXPORT const float AVCaptureISOCurrent ;- (void )setExposureModeCustomWithDuration:(CMTime )duration ISO:(float )ISO completionHandler:(nullable void (^)(CMTime syncTime))handler; @property (nonatomic , readonly ) float exposureTargetOffset;@property (nonatomic , readonly ) float exposureTargetBias;@property (nonatomic , readonly ) float minExposureTargetBias;@property (nonatomic , readonly ) float maxExposureTargetBias;AVF_EXPORT const float AVCaptureExposureTargetBiasCurrent ;- (void )setExposureTargetBias:(float )bias completionHandler:(nullable void (^)(CMTime syncTime))handler; @end
设置曝光模式的示例代码如下:
1 2 3 4 5 if ([currentDevice isExposureModeSupported:AVCaptureExposureModeContinuousAutoExposure ]) { CGPoint exposurePoint = CGPointMake (0.5 f, 0.5 f); [currentDevice setExposurePointOfInterest:exposurePoint]; [currentDevice setExposureMode:AVCaptureExposureModeContinuousAutoExposure ]; }
3. 闪光模式(Flash分类) 1 2 3 4 5 6 7 8 9 10 11 12 13 14 15 16 17 18 19 @interface AVCaptureDevice (AVCaptureDeviceFlash )@property (nonatomic , readonly ) BOOL hasFlash;@property (nonatomic , readonly , getter =isFlashAvailable) BOOL flashAvailable API_AVAILABLE(macos(10.15 ), ios(5.0 ), macCatalyst(14.0 )) API_UNAVAILABLE(tvos);@property (nonatomic , readonly , getter =isFlashActive) BOOL flashActive API_DEPRECATED("Use AVCapturePhotoOutput's -isFlashScene instead." , ios(5.0 , 10.0 )) API_UNAVAILABLE(macos) API_UNAVAILABLE(tvos);- (BOOL )isFlashModeSupported:(AVCaptureFlashMode )flashMode API_DEPRECATED("Use AVCapturePhotoOutput's -supportedFlashModes instead." , ios(4.0 , 10.0 )) API_UNAVAILABLE(tvos); @property (nonatomic ) AVCaptureFlashMode flashMode API_DEPRECATED("Use AVCapturePhotoSettings.flashMode instead." , ios(4.0 , 10.0 )) API_UNAVAILABLE(tvos);@end
4. 手电筒模式(Torch分类) 手电筒模式下,闪光灯会一直处于开启状态,用于视频捕捉。
1 2 3 4 5 6 7 8 9 10 11 12 13 14 15 16 17 18 @interface AVCaptureDevice (AVCaptureDeviceTorch )@property (nonatomic , readonly ) BOOL hasTorch;@property (nonatomic , readonly ) BOOL torchAvailable;@property (nonatomic , readonly ) BOOL torchActive;@property (nonatomic , readonly ) float torchLevel;- (BOOL )isTorchModeSupported:(AVCaptureTorchMode )torchMode; @property (nonatomic ) AVCaptureTorchMode torchMode;- (BOOL )setTorchModeOnWithLevel:(float )torchLevel error:(NSError ** _Nullable)outError; @end
对于一个有手电筒的设备,手电筒只有在设备与一个运行中的 capture session 进行了关联后才可以设置为开启。
5. 白平衡(WhiteBalance分类) 有两种白平衡模式:
AVCaptureWhiteBalanceModeLocked: 固定参数的白平衡AVCaptureWhiteBalanceModeContinuousAutoWhiteBalance: 由相机自动调整白平衡参数
使用方法 isWhiteBalanceModeSupported: 判断设备是否支持给定的白平衡模式,然后通过属性 whiteBalanceMode 设置白平衡模式。
使用属性 adjustingWhiteBalance 判断当前是否正在修改白平衡模式。可以使用 KVO 监听该属性获取开始设置白平衡模式与结束设置白平衡模式的通知。
6. 视频稳定性(AVCaptureConnection) 依赖于某些特殊的硬件设备,视频会有更好的稳定性。但并不支持所有的视频格式和分辨率。
开启电影视频稳定性特性在捕捉视频时可能会增加延迟。
使用属性 videoStabilizationEnabled 可以判断当前是否使用了视频稳定性特性。
属性 enablesVideoStabilizationWhenAvailable 可以在设备支持的情况下自动开启视频稳定性特性,该属性默认为关闭状态。
7. 设置设备方向(AVCaptureConnection) 可以在AVCaptureConnection上指定期望的设备方向,用来设置输出时AVCaptureOutput(AVCaptureMovieFileOutput、AVCaptureStillImageOutput和AVCaptureVideoDataOutput) 的设备方向。
使用属性AVCaptureConnectionsupportsVideoOrientation判断设备是否支持修改视频方向,使用属性videoOrientation指定一个方向。下面的代码将AVCaptureConnection的方向设置为AVCaptureVideoOrientationLandscapeLeft:
1 2 3 4 5 AVCaptureConnection *captureConnection = <#A capture connection#>;if ([captureConnection isVideoOrientationSupported]) { AVCaptureVideoOrientation orientation = AVCaptureVideoOrientationLandscapeLeft ; [captureConnection setVideoOrientation:orientation]; }
4.2.3 设备配置 要修改设备的捕捉参数相关的属性,首先需要使用方法 lockForConfiguration: 锁定设备,这样可以避免与其他应用的设置产生冲突。
1 2 3 4 5 6 7 8 if ([device isFocusModeSupported:AVCaptureFocusModeLocked ]) { NSError *error = nil ; if ([device lockForConfiguration:&error]) { device.focusMode = AVCaptureFocusModeLocked ; [device unlockForConfiguration]; } else {
只有当你需要设备属性保持不变时,您应该保持设备锁定。不必要地保持设备锁定可能会降低共享设备的其他应用程序的捕获质量。
4.2.4 切换设备 某些场景下可能需要允许用户切换输入设备,比如前后摄像头。为了避免卡顿,可以重新配置正在运行的 session,使用 beginConfiguration 和 commitConfiguration 方法。
1 2 3 4 5 6 7 AVCaptureSession *session = <#A capture session#>;[session beginConfiguration]; [session removeInput:frontFacingCameraDeviceInput]; [session addInput:backFacingCameraDeviceInput]; [session commitConfiguration];
当最后的commitConfiguration方法被调用时,所有的设置变化会一起执行,确保了切换的流畅性.
要把一个 capture device 添加到 capture session 中,需要使用 AVCaptureDeviceInput(抽象类AVCaptureInput的子类)。
Capture device input 管理设备的端口。
1 2 3 4 5 6 7 8 9 10 11 12 13 14 15 16 17 18 19 20 21 22 23 24 @interface AVCaptureInputPort : NSObject @property (nonatomic , readonly ) AVCaptureInput *input;@property (nonatomic , readonly ) AVMediaType mediaType;@property (nonatomic , readonly ) CMFormatDescriptionRef formatDescription;@property (nonatomic , getter =isEnabled) BOOL enabled;@property (nonatomic , readonly ) CMClockRef clock;@property (nonatomic , readonly ) AVCaptureDeviceType sourceDeviceType;@property (nonatomic , readonly ) AVCaptureDevicePosition sourceDevicePosition;@end @interface AVCaptureInput : NSObject @property (nonatomic , readonly ) NSArray <AVCaptureInputPort *> *ports;@end @interface AVCaptureDeviceInput : AVCaptureInput + (instancetype )deviceInputWithDevice:(AVCaptureDevice *)device error:(NSError **)outError; - (instancetype )initWithDevice:(AVCaptureDevice *)device error:(NSError **)outError; @property (nonatomic , readonly )AVCaptureDevice *device;@property (nonatomic ) BOOL unifiedAutoExposureDefaultsEnabled;- (NSArray <AVCaptureInputPort *> *)portsWithMediaType:(AVMediaType )mediaType sourceDeviceType:(AVCaptureDeviceType )sourceDeviceType sourceDevicePosition:(AVCaptureDevicePosition )sourceDevicePosition; @property (nonatomic ) CMTime videoMinFrameDurationOverride;@end
4.3.2 添加输入设备(AVCaptureSession) 1 2 3 4 5 6 NSError *error;AVCaptureDeviceInput *input = [AVCaptureDeviceInput deviceInputWithDevice:device error:&error]; if (!input) { }
使用 addInput: 添加输入,使用 canAddInput: 判断该设备是否可以被添加到 session 中。
1 2 3 4 5 6 7 AVCaptureSession *captureSession = <#Get a capture session#>;AVCaptureDeviceInput *captureDeviceInput = <#Get a capture device input#>;if ([captureSession canAddInput:captureDeviceInput]) { [captureSession addInput:captureDeviceInput]; } else { }
一个AVCaptureInput对象包含一个或多个数据流。例如,输入设备可能同时提供音频和视频数据。
每个 AVCaptureInputPort 对象代表一个媒体数据流。
Capture session 使用一个AVCaptureConnection 对象定义一组 AVCaptureInputPort 和一个 AVCaptureOutput 之间的映射关系。
4.4 使用AVCaptureOutput输出数据 要从 capture session 中输出数据,可以向其添加一个或多个 outputs(AVCaptureOutput 的子类),比如:
AVCaptureFileOutput: 输出为文件
AVCaptureMovieFileOutput 电影文件
AVCaptureAudioFileOutput 音频文件
AVCaptureVideoDataOutput: 可以逐帧处理捕捉到的视频
AVCaptureAudioDataOutput: 可以处理捕捉到的音频数据
AVCaptureStillImageOutput: 输出为静态图片
…等
使用方法 addOutput: 在 capture session 中添加 outputs。使用方法 canAddOutput: 判断是否可以添加一个给定的 output。可以根据需要在 session 运行过程中添加或移除一个 output。
1 2 3 4 5 6 7 8 AVCaptureSession *captureSession = <#Get a capture session#>;AVCaptureMovieFileOutput *movieOutput = <#Create and configure a movie output#>;if ([captureSession canAddOutput:movieOutput]) { [captureSession addOutput:movieOutput]; } else { }
4.4.1 输出为视频文件(AVCaptureFileOutput) 使用 AVCaptureMovieFileOutput 将视频数据保存为一个本地文件(AVCaptureMovieFileOutput 是 AVCaptureFileOutput 的一个具体子类,它定义了许多基本行为)。
1. 三个输出文件类 1 2 3 4 5 6 7 8 9 10 11 12 13 14 15 16 17 18 19 20 21 22 23 24 25 26 27 28 29 30 31 32 33 34 35 36 37 38 39 40 41 42 43 44 45 46 47 48 49 50 51 52 53 54 @interface AVCaptureFileOutput : AVCaptureOutput @property (nonatomic , assign ) id <AVCaptureFileOutputDelegate > delegate;@property (nonatomic , readonly ) NSURL *outputFileURL;- (void )startRecordingToOutputFileURL:(NSURL *)outputFileURL recordingDelegate:(id <AVCaptureFileOutputRecordingDelegate >)delegate; - (void )stopRecording; @property (nonatomic , readonly ) BOOL recording;@property (nonatomic , readonly ) BOOL recordingPaused __IOS_PROHIBITED __TVOS_PROHIBITED __WATCHOS_PROHIBITED;- (void )pauseRecording __IOS_PROHIBITED __TVOS_PROHIBITED __WATCHOS_PROHIBITED; - (void )resumeRecording __IOS_PROHIBITED __TVOS_PROHIBITED __WATCHOS_PROHIBITED; @property (nonatomic , readonly ) CMTime recordedDuration;@property (nonatomic , readonly ) int64_t recordedFileSize;@property (nonatomic ) CMTime maxRecordedDuration; @property (nonatomic ) int64_t maxRecordedFileSize;@property (nonatomic ) int64_t minFreeDiskSpaceLimit;@end @interface AVCaptureMovieFileOutput : AVCaptureFileOutput - (instancetype )init; + (instancetype )new; @property (nonatomic ) CMTime movieFragmentInterval;@property (nonatomic , copy ) NSArray <AVMetadataItem *> *metadata;@property (nonatomic , readonly ) NSArray <AVVideoCodecType > *availableVideoCodecTypes;- (NSArray <NSString *> *)supportedOutputSettingsKeysForConnection:(AVCaptureConnection *)connection; - (NSDictionary <NSString *, id > *)outputSettingsForConnection:(AVCaptureConnection *)connection; - (void )setOutputSettings:(NSDictionary <NSString *, id > *)outputSettings forConnection:(AVCaptureConnection *)connection; - (BOOL )recordsVideoOrientationAndMirroringChangesAsMetadataTrackForConnection:(AVCaptureConnection *)connection; - (void )setRecordsVideoOrientationAndMirroringChanges:(BOOL )doRecordChanges asMetadataTrackForConnection:(AVCaptureConnection *)connection; @property (nonatomic , getter =isPrimaryConstituentDeviceSwitchingBehaviorForRecordingEnabled) BOOL primaryConstituentDeviceSwitchingBehaviorForRecordingEnabled;- (void )setPrimaryConstituentDeviceSwitchingBehaviorForRecording:(AVCapturePrimaryConstituentDeviceSwitchingBehavior )switchingBehavior restrictedSwitchingBehaviorConditions:(AVCapturePrimaryConstituentDeviceRestrictedSwitchingBehaviorConditions )restrictedSwitchingBehaviorConditions; @property (nonatomic , readonly ) AVCapturePrimaryConstituentDeviceSwitchingBehavior primaryConstituentDeviceSwitchingBehaviorForRecording;@property (nonatomic , readonly ) AVCapturePrimaryConstituentDeviceRestrictedSwitchingBehaviorConditions primaryConstituentDeviceRestrictedSwitchingBehaviorConditionsForRecording;@end @interface AVCaptureAudioFileOutput : AVCaptureFileOutput - (instancetype )init; + (instancetype )new; + (NSArray <AVFileType > *)availableOutputFileTypes; - (void )startRecordingToOutputFileURL:(NSURL *)outputFileURL outputFileType:(AVFileType )fileType recordingDelegate:(id <AVCaptureFileOutputRecordingDelegate >)delegate; @property (nonatomic , copy ) NSArray <AVMetadataItem *> *metadata;@property (nonatomic , copy ) NSDictionary <NSString *, id > *audioSettings;@end
可以对 movie file output 的参数进行配置,比如最大的录制时长、最大的录制文件大小。如果设备磁盘空间不足的话,还可以阻止用户进行视频录制。
1 2 3 4 AVCaptureMovieFileOutput *aMovieFileOutput = [[AVCaptureMovieFileOutput alloc] init];CMTime maxDuration = <#Create a CMTime to represent the maximum duration#>;aMovieFileOutput.maxRecordedDuration = maxDuration; aMovieFileOutput.minFreeDiskSpaceLimit = <#An appropriate minimum given the quality of the movie format and the duration#>;
输出的分辨率和码率依赖于 capture session 的sessionPreset 属性,常用的视频编码格式是 H.264,音频编码格式是 AAC。实际的编码格式可能由于设备不同有所差异。
2. 两个协议 1 2 3 4 5 6 7 8 9 10 11 12 13 14 15 16 17 18 19 20 21 22 @protocol AVCaptureFileOutputRecordingDelegate <NSObject >@optional - (void )captureOutput:(AVCaptureFileOutput *)output didStartRecordingToOutputFileAtURL:(NSURL *)fileURL fromConnections:(NSArray <AVCaptureConnection *> *)connections; - (void )captureOutput:(AVCaptureFileOutput *)output didPauseRecordingToOutputFileAtURL:(NSURL *)fileURL fromConnections:(NSArray <AVCaptureConnection *> *)connections; - (void )captureOutput:(AVCaptureFileOutput *)output didResumeRecordingToOutputFileAtURL:(NSURL *)fileURL fromConnections:(NSArray <AVCaptureConnection *> *)connections; - (void )captureOutput:(AVCaptureFileOutput *)output willFinishRecordingToOutputFileAtURL:(NSURL *)fileURL fromConnections:(NSArray <AVCaptureConnection *> *)connections error:(NSError *)error; @required - (void )captureOutput:(AVCaptureFileOutput *)output didFinishRecordingToOutputFileAtURL:(NSURL *)outputFileURL fromConnections:(NSArray <AVCaptureConnection *> *)connections error:(NSError *)error; @end @protocol AVCaptureFileOutputDelegate <NSObject >@required - (BOOL )captureOutputShouldProvideSampleAccurateRecordingStart:(AVCaptureOutput *)output; @optional - (void )captureOutput:(AVCaptureFileOutput *)output didOutputSampleBuffer:(CMSampleBufferRef )sampleBuffer fromConnection:(AVCaptureConnection *)connection; @end
3. 简单示例 1 2 3 4 5 6 7 8 9 10 11 12 13 14 15 16 17 18 19 20 21 22 23 24 25 26 AVCaptureMovieFileOutput *aMovieFileOutput = <#Get a movie file output#>;NSURL *fileURL = <#A file URL that identifies the output location#>;[aMovieFileOutput startRecordingToOutputFileURL:fileURL recordingDelegate:<#The delegate#>]; - (void )captureOutput:(AVCaptureFileOutput *)captureOutput didFinishRecordingToOutputFileAtURL:(NSURL *)outputFileURL fromConnections:(NSArray *)connections error:(NSError *)error { BOOL recordedSuccessfully = YES ; if ([error code] != noErr) { id value = [[error userInfo] objectForKey:AVErrorRecordingSuccessfullyFinishedKey ]; if (value) { recordedSuccessfully = [value boolValue]; } } }
之所以需要对AVErrorRecordingSuccessfullyFinishedKey进行判断,是因为即使写入过程中抛出了一个 error,文件也可能被成功写入了。抛出的 error 可能是因为:
达到了一些设置的限制约束条件,比如:
AVErrorMaximumDurationReached
AVErrorMaximumFileSizeReached
其他可能导致录制中断的情况如下:
磁盘已满 - AVErrorDiskFull
与录制的设备的连接断开 - AVErrorDeviceWasDisconnected
session 中断 (比如有电话接入) - AVErrorSessionWasInterrupted
可在任何时刻对文件的元数据 (metadata) 进行设置,哪怕是在录制过程中。一个 file output 的 metadata 由一个 AVMetadataItem 对象的数组来表示。可以使用其可变子类 AVMutableMetadataItem 创建自定义的 metadata。
1 2 3 4 5 6 7 8 9 10 11 12 13 14 15 16 17 18 19 20 21 AVCaptureMovieFileOutput *aMovieFileOutput = <#Get a movie file output#>;NSArray *existingMetadataArray = aMovieFileOutput.metadata;NSMutableArray *newMetadataArray = nil ;if (existingMetadataArray) { newMetadataArray = [existingMetadataArray mutableCopy]; } else { newMetadataArray = [[NSMutableArray alloc] init]; } AVMutableMetadataItem *item = [[AVMutableMetadataItem alloc] init];item.keySpace = AVMetadataKeySpaceCommon ; item.key = AVMetadataCommonKeyLocation ; CLLocation *location - <#The location to set#>;item.value = [NSString stringWithFormat:@"%+08.4lf%+09.4lf/" location.coordinate.latitude, location.coordinate.longitude]; [newMetadataArray addObject:item]; aMovieFileOutput.metadata = newMetadataArray;
4.4.2 处理视频帧(AVCaptureVideoDataOutput) 1. AVCaptureVideoDataOutput类 AVCaptureVideoDataOutput 使用代理模式来对视频帧进行处理。
1 2 3 4 5 6 7 8 9 10 11 12 13 14 15 16 17 18 19 20 21 22 23 24 25 26 27 28 29 30 31 32 33 @interface AVCaptureVideoDataOutput : AVCaptureOutput - (instancetype )init; + (instancetype )new; - (void )setSampleBufferDelegate:(id <AVCaptureVideoDataOutputSampleBufferDelegate >)sampleBufferDelegate queue:(dispatch_queue_t )sampleBufferCallbackQueue; @property (nonatomic , readonly ) id <AVCaptureVideoDataOutputSampleBufferDelegate > sampleBufferDelegate;@property (nonatomic , readonly ) dispatch_queue_t sampleBufferCallbackQueue;@property (nonatomic , copy , null_resettable ) NSDictionary <NSString *, id > *videoSettings;- (NSDictionary <NSString *, id > *)recommendedVideoSettingsForAssetWriterWithOutputFileType:(AVFileType )outputFileType; - (NSArray <AVVideoCodecType > *)availableVideoCodecTypesForAssetWriterWithOutputFileType:(AVFileType )outputFileType; - (NSDictionary <NSString *, id > *)recommendedVideoSettingsForVideoCodecType:(AVVideoCodecType )videoCodecType assetWriterOutputFileType:(AVFileType )outputFileType; @property (nonatomic , readonly ) NSArray <NSNumber *> *availableVideoCVPixelFormatTypes;@property (nonatomic , readonly ) NSArray <AVVideoCodecType > *availableVideoCodecTypes;@property (nonatomic ) CMTime minFrameDuration API_DEPRECATED("Use AVCaptureConnection's videoMinFrameDuration property instead." ;@property (nonatomic ) BOOL alwaysDiscardsLateVideoFrames;@property (nonatomic ) BOOL automaticallyConfiguresOutputBufferDimensions;@property (nonatomic ) BOOL deliversPreviewSizedOutputBuffers;@end @protocol AVCaptureVideoDataOutputSampleBufferDelegate <NSObject >@optional - (void )captureOutput:(AVCaptureOutput *)output didOutputSampleBuffer:(CMSampleBufferRef )sampleBuffer fromConnection:(AVCaptureConnection *)connection; - (void )captureOutput:(AVCaptureOutput *)output didDropSampleBuffer:(CMSampleBufferRef )sampleBuffer fromConnection:(AVCaptureConnection *)connection API_AVAILABLE(ios(6.0 ), macCatalyst(14.0 )) API_UNAVAILABLE(tvos); @end
设置队列时,可以使用队列修改视频帧传递处理的优先级,参见示例 SquareCam 。
Core Graphics 和 OpenGL 都很好的兼容了BGRA格式。
1 2 3 4 5 6 7 8 9 10 11 12 13 14 15 16 AVCaptureVideoDataOutput *videoDataOutput = [AVCaptureVideoDataOutput new];NSDictionary *newSettings = @{ (NSString *)kCVPixelBufferPixelFormatTypeKey : @(kCVPixelFormatType_32BGRA) }; videoDataOutput.videoSettings = newSettings; [videoDataOutput setAlwaysDiscardsLateVideoFrames:YES ];) videoDataOutputQueue = dispatch_queue_create("VideoDataOutputQueue" , DISPATCH_QUEUE_SERIAL); [videoDataOutput setSampleBufferDelegate:self queue:videoDataOutputQueue]; AVCaptureSession *captureSession = <#The Capture Session#>;if ( [captureSession canAddOutput:videoDataOutput] ) [captureSession addOutput:videoDataOutput];
2. 视频处理时的性能考虑 导出视频应当尽可能的使用低分辨率,高分辨率会消耗额外的 CPU 和电量。
确保在代理方法 captureOutput:didOutputSampleBuffer:fromConnection: 中处理 sample buffer 时不要使用耗时操作,如果处理占用时间过长,AV Foundation 会停止向代理方法中传递视频帧,而且会停止其他的输出,比如 preview layer 上的预览。
可以设置 capture video data 的属性 minFrameDuration 通过降低帧率来确保有足够的时间对视频帧进行处理。
将属性 alwaysDiscardsLateVideoFrames 设置为YES(默认值) 的话,后面的视频帧将会被丢弃,而不是排队等待处理。如果你并不介意延迟,而且需要处理所有的视频帧,也可以将alwaysDiscardsLateVideoFrames设置为NO(即使如此, 也可能会出现掉帧的情况)。
4.4.3 捕捉静态图像(AVCaptureStillImageOutput) 使用 AVCaptureStillImageOutput 捕捉带元数据的静态图像。图片的分辨率依赖于 session 的 preset 设置和具体的硬件设备。
1 2 3 4 5 6 7 8 9 10 11 12 13 14 15 16 17 @interface AVCaptureStillImageOutput : AVCaptureOutput - (instancetype )init; + (instancetype )new; @property (nonatomic , copy ) NSDictionary <NSString *, id > *outputSettings;@property (nonatomic , readonly ) NSArray <NSNumber *> *availableImageDataCVPixelFormatTypes;@property (nonatomic , readonly ) NSArray <AVVideoCodecType > *availableImageDataCodecTypes;@property (nonatomic , readonly ) BOOL stillImageStabilizationSupported;@property (nonatomic ) BOOL automaticallyEnablesStillImageStabilizationWhenAvailable;@property (nonatomic , readonly ) BOOL stillImageStabilizationActive;@property (nonatomic ) BOOL highResolutionStillImageOutputEnabled;@property (readonly ) BOOL capturingStillImage;- (void )captureStillImageAsynchronouslyFromConnection:(AVCaptureConnection *)connection completionHandler:(void (^)(CMSampleBufferRef _Nullable imageDataSampleBuffer, NSError * _Nullable error))handler NS_SWIFT_DISABLE_ASYNC ; + (nullable NSData *)jpegStillImageNSDataRepresentation:(CMSampleBufferRef )jpegSampleBuffer; @end
1. 像素和编码格式 不同的设备支持不同的图片格式。
可以使用 availableImageDataCVPixelFormatTypes、availableImageDataCodecTypes 查询。使用outputSettings 设置。
1 2 3 AVCaptureStillImageOutput *stillImageOutput = [[AVCaptureStillImageOutput alloc] init]; NSDictionary *outputSettings = @{ AVVideoCodecKey : AVVideoCodecJPEG}; [stillImageOutput setOutputSettings:outputSettings];
如果需要的是 JPEG 图片,则不要指定压缩格式。相反,应该让 still image output 进行压缩 (因为它是硬件加速的)。可以使用 jpegStillImageNSDataRepresentation: 获取 NSData对象,且无需重新压缩数据,即使你修改了图像的元数据。
2. 捕捉图片 使用方法 captureStillImageAsynchronouslyFromConnection:completionHandler: 捕捉图片。
第一个参数是需要捕捉的 connection,需要判断当前的 connection 中哪个 input 正在采集视频。
第二个参数是一个有两个参数的block:
一个包含图像数据的CMSampleBuffer类型
一个是 NSError 对象。Sample buffer 自身包含了元数据,比如 EXIF 信息字典,可以对这些元数据进行修改。
1 2 3 4 5 6 7 8 9 10 11 12 13 14 15 16 17 18 19 20 AVCaptureConnection *videoConnection = nil ;for (AVCaptureConnection *connection in stillImageOutput.connections) { for (AVCaptureInputPort *port in [connection inputPorts]) { if ([[port mediaType] isEqual:AVMediaTypeVideo ] ) { videoConnection = connection; break ; } } if (videoConnection) { break ; } } [stillImageOutput captureStillImageAsynchronouslyFromConnection:videoConnection completionHandler: ^(CMSampleBufferRef imageSampleBuffer, NSError *error) { CFDictionaryRef exifAttachments = CMGetAttachment (imageSampleBuffer, kCGImagePropertyExifDictionary, NULL ); if (exifAttachments) { } }];
4.5 录制预览 可以提供给用户一个 preview,用来展示正在通过摄像头录制的内容 (使用 preview layer),或者正在通过麦克风记录的音频内容 (通过监听 audio channel)。
4.5.1 视频预览(AVCaptureVideoPreviewLayer) 1. AVCaptureVideoPreviewLayer类 使用 AVCaptureVideoPreviewLayer 可以进行视频预览。 AVCaptureVideoPreviewLayer是CALayer的子类. 进行视频预览不需要设置任何的 output 对象。
大体上,video preview layer 的性质与CALayer类似。你可以对图像进行缩放,向操作其他任何 layer 一样进行 transformations,rotations 等操作。
1 2 3 4 5 6 7 8 9 10 11 12 13 14 15 16 17 18 19 20 21 22 23 @interface AVCaptureVideoPreviewLayer : CALayer + (instancetype )layerWithSession:(AVCaptureSession *)session; - (instancetype )initWithSession:(AVCaptureSession *)session; + (instancetype )layerWithSessionWithNoConnection:(AVCaptureSession *)session; - (instancetype )initWithSessionWithNoConnection:(AVCaptureSession *)session; @property (nonatomic , retain ) AVCaptureSession *session;- (void )setSessionWithNoConnection:(AVCaptureSession *)session; @property (nonatomic , readonly ) AVCaptureConnection *connection;@property (copy ) AVLayerVideoGravity videoGravity;@property (nonatomic , readonly ) BOOL previewing;- (CGPoint )captureDevicePointOfInterestForPoint:(CGPoint )pointInLayer; - (CGPoint )pointForCaptureDevicePointOfInterest:(CGPoint )captureDevicePointOfInterest; - (CGRect )metadataOutputRectOfInterestForRect:(CGRect )rectInLayerCoordinates; - (CGRect )rectForMetadataOutputRectOfInterest:(CGRect )rectInMetadataOutputCoordinates; - (nullable AVMetadataObject *)transformedMetadataObjectForMetadataObject:(AVMetadataObject *)metadataObject; @end
使用 AVCaptureVideoDataOutput 类可以在视频展示给用户预览之前对视频进行处理。
与 capture output 不同,一个 video preview layer 会强引用与其相关联的 session。这是为了确保在进行视频预览时 session 不会被销毁。
1 2 3 4 5 AVCaptureSession *captureSession = <#Get a capture session#>;CALayer *viewLayer = <#Get a layer from the view in which you want to present the preview#>;AVCaptureVideoPreviewLayer *captureVideoPreviewLayer = [[AVCaptureVideoPreviewLayer alloc] initWithSession:captureSession];[viewLayer addSublayer:captureVideoPreviewLayer];
2. 预览时使用点击聚焦功能 在 preview layer 上实现点击聚焦功能时,需要注意视频方向、视频重力模式以及可能预览设置了视频镜像。参见代码示例 AVCam-iOS: Using AVFoundation to Capture Images and Movies .
4.5.2 展示声音等级(AVCaptureAudioChannel) 要在 capture connection 中检测声音的均值和峰值,可以使用 AVCaptureAudioChannel 对象。
1 2 3 4 5 6 @interface AVCaptureAudioChannel : NSObject @property (nonatomic , readonly ) float averagePowerLevel;@property (nonatomic , readonly ) float peakHoldLevel;@property (nonatomic ) float volume;@property (nonatomic , getter =isEnabled) BOOL enabled;@end
声音等级不能使用 KVO 的方式获取,所以需要根据界面更新的需求定时进行轮询 (比如每秒 10 次)。
1 2 3 4 5 6 7 8 9 10 11 12 13 14 AVCaptureAudioDataOutput *audioDataOutput = <#Get the audio data output#>;NSArray *connections = audioDataOutput.connections;if ([connections count] > 0 ) { AVCaptureConnection *connection = [connections objectAtIndex:0 ]; NSArray *audioChannels = connection.audioChannels; for (AVCaptureAudioChannel *channel in audioChannels) { float avg = channel.averagePowerLevel; float peak = channel.peakHoldLevel; } }
4.6 示例: 捕捉视频帧为UIImage对象 接下来的代码简单示例了如何捕捉视频,并将捕捉到的视频帧转换为 UIImage 对象:
创建AVCaptureSession对象
找到合适类型的AVCaptureDevice对象进行输入
为设备创建AVCaptureDeviceInput对象
创建AVCaptureVideoDataOutput对象获取视频帧
实现AVCaptureVideoDataOutput的代理
实现一个方法将接收到的CMSampleBuffer转换为UIImage
提示:为了展示核心代码,这份示例省略了某些内容,比如内存管理和通知的移除等。使用 AV Foundation 之前,你最好已经拥有 Cocoa 框架的使用经验。
1 2 3 4 5 6 7 8 9 10 11 12 13 14 15 16 17 18 19 20 21 22 23 24 25 26 27 28 29 30 31 32 33 34 35 36 37 38 39 40 41 42 43 44 45 46 47 48 49 50 51 52 53 54 55 56 57 58 59 60 61 62 63 64 65 66 - (void )config { AVCaptureSession *session = [[AVCaptureSession alloc] init]; session.sessionPreset = AVCaptureSessionPresetMedium ; AVCaptureDevice *device = [AVCaptureDevice defaultDeviceWithMediaType:AVMediaTypeVideo ]; NSError *error = nil ; AVCaptureDeviceInput *input = [AVCaptureDeviceInput deviceInputWithDevice:device error:&error]; if (!input) { } [session addInput:input]; AVCaptureVideoDataOutput *output = [[AVCaptureVideoDataOutput alloc] init]; [session addOutput:output]; output.videoSettings = @{ (NSString *)kCVPixelBufferPixelFormatTypeKey : @(kCVPixelFormatType_32BGRA) }; output.minFrameDuration = CMTimeMake (1 , 15 ); dispatch_queue_t queue = dispatch_queue_create("MyQueue" , NULL ); [output setSampleBufferDelegate:self queue:queue]; dispatch_release(queue); } - (void )captureOutput:(AVCaptureOutput *)captureOutput didOutputSampleBuffer:(CMSampleBufferRef )sampleBuffer fromConnection:(AVCaptureConnection *)connection { UIImage *image = imageFromSampleBuffer(sampleBuffer); } - (void )checkAccess { NSString *mediaType = AVMediaTypeVideo ; [AVCaptureDevice requestAccessForMediaType:mediaType completionHandler:^(BOOL granted) { if (granted){ [self setDeviceAuthorized:YES ]; } else { dispatch_async (dispatch_get_main_queue(), ^{ [[[UIAlertView alloc] initWithTitle:@"AVCam!" message:@"AVCam doesn't have permission to use Camera, please change privacy settings" delegate:self cancelButtonTitle:@"OK" otherButtonTitles:nil ] show]; [self setDeviceAuthorized:NO ]; }); } }]; } [session startRunning]; [session stopRunning];
4.7 高帧率视频捕捉 iOS 7.0 在选定的硬件上引入了高帧率视频捕获支持(也称为“SloMo”视频)。完整的 AVFoundation 框架支持高帧率内容。
可以使用 AVCaptureDeviceFormat 类确定设备的捕获能力。此类具有返回支持的媒体类型、帧速率、视野、最大缩放系数、是否支持视频稳定等的方法。
捕捉:支持每秒 60 帧 (fps) 、720p(1280 x 720 像素)分辨率,包括视频稳定和可丢弃的 P 帧(H264 编码电影的一项功能,即使在较慢和较旧的硬件上也可以流畅地播放电影。 )
播放:增强了对慢速和快速播放的音频支持,允许音频的时间音高可以在更慢或更快的速度下保存。
编辑:完全支持可变 compositions 中的缩放编辑。
导出:支持 60 fps 影片时,导出提供两个选项。可以保留可变帧速率、慢动作或快动作,或者将电影转换为任意较慢的帧速率,例如每秒 30 帧。
SloPoke 示例代码演示了 AVFoundation 对快速视频捕获的支持、确定硬件是否支持高帧率视频捕获、使用各种速率和时间间距算法进行播放以及编辑(包括为部分合成设置时间比例)。
4.7.1 播放 AVPlayer 的实例通过设置 setRate: 方法值自动管理大部分播放速度。该值用作播放速度的乘数。值 1.0 会导致正常播放,0.5 会以半速播放,5.0 会比正常播放快五倍,依此类推。
AVPlayerItem 对象支持 audioTimePitchAlgorithm 属性(指示缩放音频编辑时,音频音高的处理算法)。此属性允许您使用 Time Pitch Algorithm Settings 常量指定在以各种帧速率播放电影时如何播放音频。
下表显示了支持的时间音高算法、质量、算法是否导致音频匹配特定的帧速率,以及每种算法支持的帧速率范围。
Time pitch algorithm
Quality
Snaps to specific frame rate
Rate range
AVAudioTimePitchAlgorithmLowQualityZeroLatency(低质量零延迟)
低质量,适用于快进、快退或低质量语音。
YES0.5, 0.666667, 0.8, 1.0, 1.25, 1.5, 2.0 rates.
AVAudioTimePitchAlgorithmTimeDomain(时域)
质量适中,计算成本较低,适用于语音。
NO0.5–2x rates.
AVAudioTimePitchAlgorithmSpectral(光谱)
最高质量,最昂贵的计算,保留原始项目的音高。
NO1/32–32 rates.
AVAudioTimePitchAlgorithmVarispeed(变速)
无需音高校正的高质量播放。
NO1/32–32 rates.
4.7.2 编辑 编辑时,您使用 AVMutableComposition 类来构建临时编辑。
使用类方法 composition 创建一个新的 AVMutableComposition 实例。
使用 insertTimeRange:ofAsset:atTime:error: 方法插入视频资产。
使用 scaleTimeRange:toDuration: 设置部分 composition 的时间比例。
4.7.3 导出 导出 60 fps 视频使用 AVAssetExportSession 类来导出资产。可以使用两种技术导出内容:
使用 AVAssetExportPresetPassthrough 预设来避免重新编码电影。它使用标记为 60 fps 部分、减速部分或加速部分的媒体部分重新定时媒体。
使用恒定帧速率导出以获得最大的播放兼容性。将视频合成的 frameDuration 属性设置为 30 fps。还可以通过设置导出会话的 audioTimePitchAlgorithm 属性来指定时间音高。
4.7.4 录制 使用 AVCaptureMovieFileOutput 类捕获高帧率视频,该类自动支持高帧率录制。它将自动选择正确的 H264 音高电平和比特率。
要进行自定义录制,您必须使用 AVAssetWriter 类,这需要一些额外的设置。
1 assetWriterInput.expectsMediaDataInRealTime=YES ;
此设置确保捕获可以跟上传入的数据。
五、Asset的读、写、重编码
Asset → AssetReader → AssetReaderOutput → 内存 → AssetWriteInput → AssetWrite → 文件URL
可以使用AVAssetExportSession 、 AVAssetReader 、AVAssetWriter 对象,完成一些的音视频资源操作需求,比如:
可以通过一个导出会话 (export session ),将一个已存在的 asset 进行重新编码为,一些已经预设置好的常用格式 (commonly-used presets)。
协同使用 AVAssetReader 和 AVAssetWriter 对象,可以实现更多的自定义设置,如可以选择将哪些 track 输出到文件中,对资源进行修改。
在需要对 asset 内容进行操作时使用AVAssetReader。例如,需要读取 audio track 绘制音频波形图.。
在需要将媒体 (比如 sample buffers 或者静态图像) 转换为一个 asset 时,使用AVAssetWriter。
注意:
这两个类不适用于实时处理。
AVAssetReader不能用来读取 HTTP 直播流这样的实时资源。如果在实时数据处理 (比如 AVCaptureOutput) 中使用了AVAssetWriter,需要将AVAssetWriter的属性 expectsMediaDataInRealTime 设置为YES,这样可以保证以正确的顺序写入文件。
5.1 读取Asset(AVAssetReader) AVAssetReader 和 Output 类 1 2 3 4 5 6 7 8 9 10 11 12 13 14 @interface AVAssetReader : NSObject + (instancetype )assetReaderWithAsset:(AVAsset *)asset error:(NSError **)outError; - (instancetype )initWithAsset:(AVAsset *)asset error:(NSError **)outError; @property (nonatomic , retain , readonly ) AVAsset *asset;@property (readonly ) AVAssetReaderStatus status;@property (readonly ) NSError *error;@property (nonatomic ) CMTimeRange timeRange;@property (nonatomic , readonly ) NSArray <AVAssetReaderOutput *> *outputs;- (BOOL )canAddOutput:(AVAssetReaderOutput *)output; - (void )addOutput:(AVAssetReaderOutput *)output; - (BOOL )startReading; - (void )cancelReading; @end
每个AVAssetReader对象只能被关联到一个 asset,但是这个 asset 可能包含多个 track。因此,在开始读取之前,需要为 asset reader配置一个 AVAssetReaderOutput 的子类来设置媒体数据的读取方式。
AVAssetReaderOutput有三个子类可以用来读取 asset:AVAssetReaderTrackOutput、AVAssetReaderAudioMixOutput、AVAssetReaderVideoCompositionOutput。
1 2 3 4 5 6 7 8 9 10 11 12 13 14 15 16 17 18 19 20 21 22 23 24 25 26 27 28 29 30 31 32 33 34 35 36 37 38 39 40 41 42 43 44 45 @interface AVAssetReaderOutput : NSObject @property (nonatomic , readonly ) AVMediaType mediaType;@property (nonatomic ) BOOL alwaysCopiesSampleData;- (CMSampleBufferRef )copyNextSampleBuffer CF_RETURNS_RETAINED ; @end @interface AVAssetReaderOutput (AVAssetReaderOutputRandomAccess )@property (nonatomic ) BOOL supportsRandomAccess;- (void )resetForReadingTimeRanges:(NSArray <NSValue *> *)timeRanges; - (void )markConfigurationAsFinal; @end @interface AVAssetReaderTrackOutput : AVAssetReaderOutput + (instancetype )assetReaderTrackOutputWithTrack:(AVAssetTrack *)track outputSettings:(NSDictionary <NSString *, id > *)outputSettings; - (instancetype )initWithTrack:(AVAssetTrack *)track outputSettings:(NSDictionary <NSString *, id > *)outputSettings NS_DESIGNATED_INITIALIZER ; @property (nonatomic , readonly ) AVAssetTrack *track;@property (nonatomic , readonly ) NSDictionary <NSString *, id > *outputSettings;@property (nonatomic , copy ) AVAudioTimePitchAlgorithm audioTimePitchAlgorithm;@end @interface AVAssetReaderAudioMixOutput : AVAssetReaderOutput + (instancetype )assetReaderAudioMixOutputWithAudioTracks:(NSArray <AVAssetTrack *> *)audioTracks audioSettings:(NSDictionary <NSString *, id > *)audioSettings; - (instancetype )initWithAudioTracks:(NSArray <AVAssetTrack *> *)audioTracks audioSettings:(NSDictionary <NSString *, id > *)audioSettings NS_DESIGNATED_INITIALIZER ; @property (nonatomic , readonly ) NSArray <AVAssetTrack *> *audioTracks;@property (nonatomic , readonly ) NSDictionary <NSString *, id > *audioSettings;@property (nonatomic , copy ) AVAudioMix *audioMix;@property (nonatomic , copy ) AVAudioTimePitchAlgorithm audioTimePitchAlgorithm;@end @interface AVAssetReaderVideoCompositionOutput : AVAssetReaderOutput + (instancetype )assetReaderVideoCompositionOutputWithVideoTracks:(NSArray <AVAssetTrack *> *)videoTracks videoSettings:(NSDictionary <NSString *, id > *)videoSettings; - (instancetype )initWithVideoTracks:(NSArray <AVAssetTrack *> *)videoTracks videoSettings:(NSDictionary <NSString *, id > *)videoSettings NS_DESIGNATED_INITIALIZER ; @property (nonatomic , readonly ) NSArray <AVAssetTrack *> *videoTracks;@property (nonatomic , readonly ) NSDictionary <NSString *, id > *videoSettings;@property (nonatomic , copy ) AVVideoComposition *videoComposition;@property (nonatomic , readonly ) id <AVVideoCompositing > customVideoCompositor;@end
5.1.1 创建 AVAssetReader 1 2 3 4 5 6 NSError *outError;AVAsset *someAsset = <#AVAsset that you want to read#>;AVAssetReader *assetReader = [AVAssetReader assetReaderWithAsset:someAsset error:&outError];BOOL success = (assetReader != nil );
5.1.2 设置 AVAssetReaderOutput 成功创建 assetReader 后,至少需要设置一个 output 来接收读取的媒体数据。确保 output 的属性 alwaysCopiesSampleData 被设置为NO,这样能提升性能。本章所有的实例代码中,该属性都设置为NO。
1. AVAssetReaderTrackOutput 如果只是需要从一个或多个 track 中读取数据并修改其格式,那么可以使用AVAssetReaderTrackOutput。
要解压一个 audio track 为 Linear PCM,需要进行如下设置:
1 2 3 4 5 6 7 8 9 10 AVAsset *localAsset = assetReader.asset;AVAssetTrack *audioTrack = [[localAsset tracksWithMediaType:AVMediaTypeAudio ] objectAtIndex:0 ];NSDictionary *decompressionAudioSettings = @{ AVFormatIDKey : [NSNumber numberWithUnsignedInt:kAudioFormatLinearPCM] };AVAssetReaderOutput *trackOutput = [AVAssetReaderTrackOutput assetReaderTrackOutputWithTrack:audioTrack outputSettings:decompressionAudioSettings];if ([assetReader canAddOutput:trackOutput]) [assetReader addOutput:trackOutput];
要以存储时的格式读取数据,将参数outputSettings设置为nil.
2. AVAssetReaderAudioMixOutput 对于使用 AVAudioMix 和 AVVideoComposition 处理过的 asset,需要使用AVAssetReaderAudioMixOutput 和 AVAssetReaderVideoCompositionOutput进行读取。
通常,当从 AVComposition 对象中读取数据时,会使用到这些 output 对象。
使用一个AVAssetReaderAudioMixOutput对象,可以读取 asset 中的多个 audio track。下面的代码展示了如何使用 asset 中所有的 audio track 创建一个AVAssetReaderAudioMixOutput对象,解压缩 audio track 为 Linear PCM,并为 output 设置音频混合方式 (audio mix):
1 2 3 4 5 6 7 8 9 10 11 12 13 14 AVAudioMix *audioMix = <#"一个 AVAudioMix,指定如何混合来自 AVAsset 的音轨" #>;AVComposition *composition = (AVComposition *)assetReader.asset;NSArray *audioTracks = [composition tracksWithMediaType:AVMediaTypeAudio ];NSDictionary *decompressionAudioSettings = @{ AVFormatIDKey : [NSNumber numberWithUnsignedInt:kAudioFormatLinearPCM] };AVAssetReaderOutput *audioMixOutput = [AVAssetReaderAudioMixOutput assetReaderAudioMixOutputWithAudioTracks:audioTracks audioSettings:decompressionAudioSettings];audioMixOutput.audioMix = audioMix; if ([assetReader canAddOutput:audioMixOutput]) [assetReader addOutput:audioMixOutput];
设置参数audioSettings 为 nil,将返回未被压缩的样本数据。对AVAssetReaderVideoCompositionOutput也一样。
3. AVAssetReaderVideoCompositionOutput AVAssetReaderVideoCompositionOutput 的使用方法大致与AVAssetReaderAudioMixOutput 相同,可以从 asset 中读取多个 video track。下面的代码示例了如何从多个 video track 中读取数据,并解压为 ARGB:
1 2 3 4 5 6 7 8 9 10 11 12 13 14 AVVideoComposition *videoComposition = <#"一个 AVVideoComposition,指定如何合成来自 AVAsset 的视频轨道" #>;AVComposition *composition = (AVComposition *)assetReader.asset;NSArray *videoTracks = [composition tracksWithMediaType:AVMediaTypeVideo ];NSDictionary *decompressionVideoSettings = @{ (id )kCVPixelBufferPixelFormatTypeKey : [NSNumber numberWithUnsignedInt:kCVPixelFormatType_32ARGB], (id )kCVPixelBufferIOSurfacePropertiesKey : [NSDictionary dictionary] };AVAssetReaderOutput *videoCompositionOutput = [AVAssetReaderVideoCompositionOutput assetReaderVideoCompositionOutputWithVideoTracks:videoTracks videoSettings:decompressionVideoSettings];videoCompositionOutput.videoComposition = videoComposition; if ([assetReader canAddOutput:videoCompositionOutput]) [assetReader addOutput:videoCompositionOutput];
5.1.3 读取 Asset 中的媒体数据 按需设置 outputs 之后,调用 asset reader 的方法 startReading 开始读取数据。然后使用方法 copyNextSampleBuffer 从 output 中开始检索、获取媒体数据。示例如下:
1 2 3 4 5 6 7 8 9 10 11 12 13 14 15 16 17 18 19 20 21 22 23 24 25 26 27 28 [self .assetReader startReading]; BOOL done = NO ;while (!done){ CMSampleBufferRef sampleBuffer = [self .assetReaderOutput copyNextSampleBuffer]; if (sampleBuffer) { CFRelease (sampleBuffer); sampleBuffer = NULL ; } else { if (self .assetReader.status == AVAssetReaderStatusFailed ) { NSError *failureError = self .assetReader.error; } else { done = YES ; } } }
5.2 写入Asset(AVAssetWriter) AVAssetWriter 将多个来源的数据以指定格式写入到单个文件中。Asset writer 并不与一个特定的 asset 相关联,但必须与要创建的输出文件相关联。
1 2 3 4 5 6 7 8 9 10 11 12 13 14 15 16 17 18 19 20 21 22 23 24 25 26 27 28 29 30 31 @interface AVAssetWriter : NSObject + (instancetype )assetWriterWithURL:(NSURL *)outputURL fileType:(AVFileType )outputFileType error:(NSError **)outError; - (instancetype )initWithURL:(NSURL *)outputURL fileType:(AVFileType )outputFileType error:(NSError **)outError NS_DESIGNATED_INITIALIZER ; - (instancetype )initWithContentType:(UTType *)outputContentType NS_DESIGNATED_INITIALIZER ; @property (nonatomic , copy , readonly ) NSURL *outputURL;@property (nonatomic , copy , readonly ) AVFileType outputFileType;@property (nonatomic , readonly ) NSArray <AVMediaType > *availableMediaTypes;@property (readonly ) AVAssetWriterStatus status;@property (readonly ) NSError *error;@property (nonatomic , copy ) NSArray <AVMetadataItem *> *metadata;@property (nonatomic ) BOOL shouldOptimizeForNetworkUse;@property (nonatomic , copy ) NSURL *directoryForTemporaryFiles;@property (nonatomic , readonly ) NSArray <AVAssetWriterInput *> *inputs;- (BOOL )canApplyOutputSettings:(NSDictionary <NSString *, id > *)outputSettings forMediaType:(AVMediaType )mediaType; - (BOOL )canAddInput:(AVAssetWriterInput *)input; - (void )addInput:(AVAssetWriterInput *)input; - (BOOL )startWriting; - (void )startSessionAtSourceTime:(CMTime )startTime; - (void )endSessionAtSourceTime:(CMTime )endTime; - (void )cancelWriting; - (BOOL )finishWriting API_DEPRECATED_WITH_REPLACEMENT("finishWritingWithCompletionHandler:" ; - (void )finishWritingWithCompletionHandler:(void (^)(void ))handler; @end @protocol AVAssetWriterDelegate <NSObject >@optional - (void )assetWriter:(AVAssetWriter *)writer didOutputSegmentData:(NSData *)segmentData segmentType:(AVAssetSegmentType )segmentType segmentReport:(AVAssetSegmentReport *)segmentReport; - (void )assetWriter:(AVAssetWriter *)writer didOutputSegmentData:(NSData *)segmentData segmentType:(AVAssetSegmentType )segmentType; @end
由于一个 asset writer 可以从多个来源获取数据,所以需要为每个要写入的 track 创建对应的 AVAssetWriterInput 对象。
接收 CMSampleBufferRef 类型的数据,使用AVAssetWriterInput对象
如果想要添加 CVPixelBufferRef 类型的数据,可以使用 AVAssetWriterInputPixelBufferAdaptor。
1 2 3 4 5 6 7 8 9 10 11 12 13 14 15 @interface AVAssetWriterInput : NSObject + (instancetype )assetWriterInputWithMediaType:(AVMediaType )mediaType outputSettings:(NSDictionary <NSString *, id > *)outputSettings; + (instancetype )assetWriterInputWithMediaType:(AVMediaType )mediaType outputSettings:(NSDictionary <NSString *, id > *)outputSettings sourceFormatHint:(CMFormatDescriptionRef )sourceFormatHint; - (instancetype )initWithMediaType:(AVMediaType )mediaType outputSettings:(NSDictionary <NSString *, id > *)outputSettings; - (instancetype )initWithMediaType:(AVMediaType )mediaType outputSettings:(NSDictionary <NSString *, id > *)outputSettings sourceFormatHint:(CMFormatDescriptionRef )sourceFormatHint; @property (nonatomic , readonly ) AVMediaType mediaType;@property (nonatomic , readonly ) NSDictionary <NSString *, id > *outputSettings;@property (nonatomic , readonly ) CMFormatDescriptionRef sourceFormatHint;@property (nonatomic , copy ) NSArray <AVMetadataItem *> *metadata;@property (nonatomic , readonly ) BOOL readyForMoreMediaData;@property (nonatomic ) BOOL expectsMediaDataInRealTime;- (void )requestMediaDataWhenReadyOnQueue:(dispatch_queue_t )queue usingBlock:(void (^)(void ))block; - (BOOL )appendSampleBuffer:(CMSampleBufferRef )sampleBuffer; - (void )markAsFinished; @end
5.2.1 创建 AVAssetWriter 创建 AVAssetWriter 对象需要指定一个文件 URL 和文件格式。下面的代码示例了如何初始化一个 AVAssetWriter 用来创建 QuickTime 电影.
1 2 3 4 5 6 NSError *outError;NSURL *outputURL = <#"NSURL对象,表示您要保存视频的URL" #>;AVAssetWriter *assetWriter = [AVAssetWriter assetWriterWithURL:outputURL fileType:AVFileTypeQuickTimeMovie error:&outError]; BOOL success = (assetWriter != nil );
要让 AVAssetWriter 能写入媒体数据,必须至少设置一个 asset writer input。
例如要写入CMSampleBufferRef类型的数据,需要使用AVAssetWriterInput。下面的代码示例了将压缩的音频数据写入为 128 kbps 的 AAC 格式:
1 2 3 4 5 6 7 8 9 10 11 12 13 14 15 16 17 18 19 20 21 22 23 24 AudioChannelLayout stereoChannelLayout = { .mChannelLayoutTag = kAudioChannelLayoutTag_Stereo, .mChannelBitmap = 0 , .mNumberChannelDescriptions = 0 }; NSData *channelLayoutAsData = [NSData dataWithBytes:&stereoChannelLayout length:offsetof(AudioChannelLayout, mChannelDescriptions)];NSDictionary *compressionAudioSettings = @{ AVFormatIDKey : [NSNumber numberWithUnsignedInt:kAudioFormatMPEG4AAC], AVEncoderBitRateKey : [NSNumber numberWithInteger:128000 ], AVSampleRateKey : [NSNumber numberWithInteger:44100 ], AVChannelLayoutKey : channelLayoutAsData, AVNumberOfChannelsKey : [NSNumber numberWithUnsignedInteger:2 ] }; AVAssetWriterInput *assetWriterInput = [AVAssetWriterInput assetWriterInputWithMediaType:AVMediaTypeAudio outputSettings:compressionAudioSettings];if ([assetWriter canAddInput:assetWriterInput]) [assetWriter addInput:assetWriterInput];
只有 asset writer 初始化时fileType为 AVFileTypeQuickTimeMovie,参数outputSettings才能为 nil,意味着写入的文件格式为 QuickTime movie。
使用属性 metadata 和 transform 可以为指定的 track 设置 metadata 和 transform。(注意,需要在开始写入之前设置这两个属性才会生效)
当输入源为 video track 时,可以通过如下方式持有 video track 的原始 transform:
1 2 3 AVAsset *videoAsset = <#"具有至少一个视频轨道的 AVAsset" #>;AVAssetTrack *videoAssetTrack = [[videoAsset tracksWithMediaType:AVMediaTypeVideo ] objectAtIndex:0 ];assetWriterInput.transform = videoAssetTrack.preferredTransform
在写入文件时,有时候可能会需要分配一个 pixel buffer,这时可以使用AVAssetWriterInputPixelBufferAdaptor类。为了提高效率,可以直接使用 pixel buffer adaptor 提供的 pixel buffer pool。下面的代码示例了创建了一个 pixel buffer 对象处理 RGB 色域:
1 2 3 4 5 6 NSDictionary *pixelBufferAttributes = @{ kCVPixelBufferCGImageCompatibilityKey : [NSNumber numberWithBool:YES ], kCVPixelBufferCGBitmapContextCompatibilityKey : [NSNumber numberWithBool:YES ], kCVPixelBufferPixelFormatTypeKey : [NSNumber numberWithInt:kCVPixelFormatType_32ARGB] }; AVAssetWriterInputPixelBufferAdaptor *inputPixelBufferAdaptor = [AVAssetWriterInputPixelBufferAdaptor assetWriterInputPixelBufferAdaptorWithAssetWriterInput:self .assetWriterInput sourcePixelBufferAttributes:pixelBufferAttributes];
注意,所有的AVAssetWriterInputPixelBufferAdaptor对象都必须与一个 asset writer input 相关联 。这个 asset writer input 对象必须接收AVMediaTypeVideo类型的数据。
5.2.3 写入媒体数据 当配置完 asset writer 之后,就可以开始写入数据了。
下面的代码示例了从一个输入源读取数据并写入所有读取到的数据:
1 2 3 4 5 6 7 8 9 10 11 12 13 14 15 16 17 18 19 20 21 22 23 24 25 26 27 28 29 30 31 32 33 34 35 36 37 [self .assetWriter startWriting]; [self .assetWriter startSessionAtSourceTime:kCMTimeZero]; [self .assetWriterInput requestMediaDataWhenReadyOnQueue:myInputSerialQueue usingBlock:^{ while ([self .assetWriterInput isReadyForMoreMediaData]) { CMSampleBufferRef nextSampleBuffer = [self copyNextSampleBufferToWrite]; if (nextSampleBuffer) { [self .assetWriterInput appendSampleBuffer:nextSampleBuffer]; CFRelease (nextSampleBuffer); nextSampleBuffer = nil ; } else { [self .assetWriterInput markAsFinished]; break ; } } }];
一般情况下,方法 endSessionAtSourceTime: 用来结束写入会话。但是如果文件已经写入完毕,则可以方法 finishWriting 结束写入会话。
5.3 重编码Assets 可以搭配使用 asset reader 和 asset writer 进行 asset 之间的转换。相比于使用AVAssetExportSession,使用这些对象可以更好的控制转换细节。例如:
可以选择导出哪个 track
可以指定导出的文件格式
可以在转换过程中修改asset,如指定导出的时间范围。
下面的代码片段示例了如何从一个 asset reader output 读取数据,并使用 asset writer input 写入这些数据.
1 2 3 4 5 6 7 8 9 10 11 12 13 14 15 16 17 18 19 20 21 22 23 24 25 26 27 28 29 30 31 32 33 34 35 36 37 38 39 40 41 NSString *serializationQueueDescription = [NSString stringWithFormat:@"%@ serialization queue" , self ];dispatch_queue_t serializationQueue = dispatch_queue_create([serializationQueueDescription UTF8String], NULL );[self .assetWriterInput requestMediaDataWhenReadyOnQueue:serializationQueue usingBlock:^{ while ([self .assetWriterInput isReadyForMoreMediaData]) { CMSampleBufferRef sampleBuffer = [self .assetReaderOutput copyNextSampleBuffer]; if (sampleBuffer != NULL ) { BOOL success = [self .assetWriterInput appendSampleBuffer:sampleBuffer]; CFRelease (sampleBuffer); sampleBuffer = NULL ; if (!success && self .assetWriter.status == AVAssetWriterStatusFailed ) { NSError *failureError = self .assetWriter.error; } } else { if (self .assetReader.status == AVAssetReaderStatusFailed ) { NSError *failureError = self .assetReader.error; } else { [self .assetWriterInput markAsFinished]; break ; } } } }];
5.4 示例: Asset Reader和Writer 重编码 Asset 下面的代码简要示例了使用 asset reader 和 writer 对一个 asset 中的第一个 video 和 audio track 进行重新编码并将结果数据写入到一个新文件中.
提示: 为了将注意力集中在核心代码上,这份示例省略了某些内容.
5.4.1 初始化设置 在创建和配置 asset reader 和 writer 之前,需要进行一些初始化设置。首先需要为读写过程创建三个串行队列.
1 2 3 4 5 6 7 8 9 10 11 12 NSString *serializationQueueDescription = [NSString stringWithFormat:@"%@ serialization queue" , self ];self .mainSerializationQueue = dispatch_queue_create([serializationQueueDescription UTF8String], NULL );NSString *rwAudioSerializationQueueDescription = [NSString stringWithFormat:@"%@ rw audio serialization queue" , self ];self .rwAudioSerializationQueue = dispatch_queue_create([rwAudioSerializationQueueDescription UTF8String], NULL );NSString *rwVideoSerializationQueueDescription = [NSString stringWithFormat:@"%@ rw video serialization queue" , self ];self .rwVideoSerializationQueue = dispatch_queue_create([rwVideoSerializationQueueDescription UTF8String], NULL );
5.4.2 加载 asset 中的 track,并开始重编码. 1 2 3 4 5 6 7 8 9 10 11 12 13 14 15 16 17 18 19 20 21 22 23 24 25 26 27 28 29 30 self .asset = <#AVAsset that you want to reencode#>;self .cancelled = NO ;self .outputURL = <#NSURL representing desired output URL for file generated by asset writer#>;[self .asset loadValuesAsynchronouslyForKeys:@[@"tracks" ] completionHandler:^{ dispatch_async (self .mainSerializationQueue, ^{ if (self .cancelled) return ; BOOL success = YES ; NSError *localError = nil ; success = ([self .asset statusOfValueForKey:@"tracks" error:&localError] == AVKeyValueStatusLoaded ); if (success) { NSFileManager *fm = [NSFileManager defaultManager]; NSString *localOutputPath = [self .outputURL path]; if ([fm fileExistsAtPath:localOutputPath]) success = [fm removeItemAtPath:localOutputPath error:&localError]; } if (success) success = [self setupAssetReaderAndAssetWriter:&localError]; if (success) success = [self startAssetReaderAndWriter:&localError]; if (!success) [self readingAndWritingDidFinishSuccessfully:success withError:localError]; }); }];
剩下的工作就是实现取消的处理,并实现三个自定义方法.
5.4.3 初始化 Asset Reader 和 Writer 自定义方法 setupAssetReaderAndAssetWriter 实现了 asset Reader 和 writer 的初始化和配置。在这个示例中:
audio 先被 asset reader 解压为 Linear PCM,然后被 asset write 压缩为 128 kbps AAC。
video 被 asset reader 解压为 YUV,然后被 asset writer 压缩为 H.264:
1 2 3 4 5 6 7 8 9 10 11 12 13 14 15 16 17 18 19 20 21 22 23 24 25 26 27 28 29 30 31 32 33 34 35 36 37 38 39 40 41 42 43 44 45 46 47 48 49 50 51 52 53 54 55 56 57 58 59 60 61 62 63 64 65 66 67 68 69 70 71 72 73 74 75 76 77 78 79 80 81 82 83 84 85 86 87 88 89 90 91 92 93 94 95 96 97 98 99 100 101 102 103 104 105 106 107 108 109 110 111 112 113 114 115 116 117 118 119 120 121 - (BOOL )setupAssetReaderAndAssetWriter:(NSError **)outError { self .assetReader = [[AVAssetReader alloc] initWithAsset:self .asset error:outError]; BOOL success = (self .assetReader != nil ); if (success) { self .assetWriter = [[AVAssetWriter alloc] initWithURL:self .outputURL fileType:AVFileTypeQuickTimeMovie error:outError]; success = (self .assetWriter != nil ); } if (success) { AVAssetTrack *assetAudioTrack = nil , *assetVideoTrack = nil ; NSArray *audioTracks = [self .asset tracksWithMediaType:AVMediaTypeAudio ]; if ([audioTracks count] > 0 ) assetAudioTrack = [audioTracks objectAtIndex:0 ]; NSArray *videoTracks = [self .asset tracksWithMediaType:AVMediaTypeVideo ]; if ([videoTracks count] > 0 ) assetVideoTrack = [videoTracks objectAtIndex:0 ]; if (assetAudioTrack) { NSDictionary *decompressionAudioSettings = @{ AVFormatIDKey : [NSNumber numberWithUnsignedInt:kAudioFormatLinearPCM] }; self .assetReaderAudioOutput = [AVAssetReaderTrackOutput assetReaderTrackOutputWithTrack:assetAudioTrack outputSettings:decompressionAudioSettings]; [self .assetReader addOutput:self .assetReaderAudioOutput]; AudioChannelLayout stereoChannelLayout = { .mChannelLayoutTag = kAudioChannelLayoutTag_Stereo, .mChannelBitmap = 0 , .mNumberChannelDescriptions = 0 }; NSData *channelLayoutAsData = [NSData dataWithBytes:&stereoChannelLayout length:offsetof(AudioChannelLayout, mChannelDescriptions)]; NSDictionary *compressionAudioSettings = @{ AVFormatIDKey : [NSNumber numberWithUnsignedInt:kAudioFormatMPEG4AAC], AVEncoderBitRateKey : [NSNumber numberWithInteger:128000 ], AVSampleRateKey : [NSNumber numberWithInteger:44100 ], AVChannelLayoutKey : channelLayoutAsData, AVNumberOfChannelsKey : [NSNumber numberWithUnsignedInteger:2 ] }; self .assetWriterAudioInput = [AVAssetWriterInput assetWriterInputWithMediaType:[assetAudioTrack mediaType] outputSettings:compressionAudioSettings]; [self .assetWriter addInput:self .assetWriterAudioInput]; } if (assetVideoTrack) { NSDictionary *decompressionVideoSettings = @{ (id )kCVPixelBufferPixelFormatTypeKey : [NSNumber numberWithUnsignedInt:kCVPixelFormatType_422YpCbCr8], (id )kCVPixelBufferIOSurfacePropertiesKey : [NSDictionary dictionary] }; self .assetReaderVideoOutput = [AVAssetReaderTrackOutput assetReaderTrackOutputWithTrack:assetVideoTrack outputSettings:decompressionVideoSettings]; [self .assetReader addOutput:self .assetReaderVideoOutput]; CMFormatDescriptionRef formatDescription = NULL ; NSArray *videoFormatDescriptions = [assetVideoTrack formatDescriptions]; if ([videoFormatDescriptions count] > 0 ) formatDescription = (__bridge CMFormatDescriptionRef )[formatDescriptions objectAtIndex:0 ]; CGSize trackDimensions = { .width = 0.0 , .height = 0.0 , }; if (formatDescription) trackDimensions = CMVideoFormatDescriptionGetPresentationDimensions (formatDescription, false , false ); else trackDimensions = [assetVideoTrack naturalSize]; NSDictionary *compressionSettings = nil ; if (formatDescription) { NSDictionary *cleanAperture = nil ; NSDictionary *pixelAspectRatio = nil ; CFDictionaryRef cleanApertureFromCMFormatDescription = CMFormatDescriptionGetExtension (formatDescription, kCMFormatDescriptionExtension_CleanAperture); if (cleanApertureFromCMFormatDescription) { cleanAperture = @{ AVVideoCleanApertureWidthKey : (id )CFDictionaryGetValue (cleanApertureFromCMFormatDescription, kCMFormatDescriptionKey_CleanApertureWidth), AVVideoCleanApertureHeightKey : (id )CFDictionaryGetValue (cleanApertureFromCMFormatDescription, kCMFormatDescriptionKey_CleanApertureHeight), AVVideoCleanApertureHorizontalOffsetKey : (id )CFDictionaryGetValue (cleanApertureFromCMFormatDescription, kCMFormatDescriptionKey_CleanApertureHorizontalOffset), AVVideoCleanApertureVerticalOffsetKey : (id )CFDictionaryGetValue (cleanApertureFromCMFormatDescription, kCMFormatDescriptionKey_CleanApertureVerticalOffset) }; } CFDictionaryRef pixelAspectRatioFromCMFormatDescription = CMFormatDescriptionGetExtension (formatDescription, kCMFormatDescriptionExtension_PixelAspectRatio); if (pixelAspectRatioFromCMFormatDescription) { pixelAspectRatio = @{ AVVideoPixelAspectRatioHorizontalSpacingKey : (id )CFDictionaryGetValue (pixelAspectRatioFromCMFormatDescription, kCMFormatDescriptionKey_PixelAspectRatioHorizontalSpacing), AVVideoPixelAspectRatioVerticalSpacingKey : (id )CFDictionaryGetValue (pixelAspectRatioFromCMFormatDescription, kCMFormatDescriptionKey_PixelAspectRatioVerticalSpacing) }; } if (cleanAperture || pixelAspectRatio) { NSMutableDictionary *mutableCompressionSettings = [NSMutableDictionary dictionary]; if (cleanAperture) [mutableCompressionSettings setObject:cleanAperture forKey:AVVideoCleanApertureKey ]; if (pixelAspectRatio) [mutableCompressionSettings setObject:pixelAspectRatio forKey:AVVideoPixelAspectRatioKey ]; compressionSettings = mutableCompressionSettings; } } NSMutableDictionary *videoSettings = (NSMutableDictionary *) @{ AVVideoCodecKey : AVVideoCodecH264 , AVVideoWidthKey : [NSNumber numberWithDouble:trackDimensions.width], AVVideoHeightKey : [NSNumber numberWithDouble:trackDimensions.height] }; if (compressionSettings) [videoSettings setObject:compressionSettings forKey:AVVideoCompressionPropertiesKey ]; self .assetWriterVideoInput = [AVAssetWriterInput assetWriterInputWithMediaType:[videoTrack mediaType] outputSettings:videoSettings]; [self .assetWriter addInput:self .assetWriterVideoInput]; } } return success; }
5.4.4 重编码 Asset 方法startAssetReaderAndWriter负责读取和写入 asset:
1 2 3 4 5 6 7 8 9 10 11 12 13 14 15 16 17 18 19 20 21 22 23 24 25 26 27 28 29 30 31 32 33 34 35 36 37 38 39 40 41 42 43 44 45 46 47 48 49 50 51 52 53 54 55 56 57 58 59 60 61 62 63 64 65 66 67 68 69 70 71 72 73 74 75 76 77 78 79 80 81 82 83 84 85 86 87 88 89 90 91 92 93 94 95 96 97 98 99 100 101 102 103 104 105 106 107 108 109 110 111 112 113 114 115 116 117 118 119 120 121 122 123 124 125 126 127 128 129 130 131 132 133 134 135 136 137 138 - (BOOL )startAssetReaderAndWriter:(NSError **)outError { BOOL success = YES ; success = [self .assetReader startReading]; if (!success) *outError = [self .assetReader error]; if (success) { success = [self .assetWriter startWriting]; if (!success) *outError = [self .assetWriter error]; } if (success) { self .dispatchGroup = dispatch_group_create(); [self .assetWriter startSessionAtSourceTime:kCMTimeZero]; self .audioFinished = NO ; self .videoFinished = NO ; if (self .assetWriterAudioInput) { dispatch_group_enter(self .dispatchGroup); [self .assetWriterAudioInput requestMediaDataWhenReadyOnQueue:self .rwAudioSerializationQueue usingBlock:^{ if (self .audioFinished) return ; BOOL completedOrFailed = NO ; while ([self .assetWriterAudioInput isReadyForMoreMediaData] && !completedOrFailed) { CMSampleBufferRef sampleBuffer = [self .assetReaderAudioOutput copyNextSampleBuffer]; if (sampleBuffer != NULL ) { BOOL success = [self .assetWriterAudioInput appendSampleBuffer:sampleBuffer]; CFRelease (sampleBuffer); sampleBuffer = NULL ; completedOrFailed = !success; } else { completedOrFailed = YES ; } } if (completedOrFailed) { BOOL oldFinished = self .audioFinished; self .audioFinished = YES ; if (oldFinished == NO ) { [self .assetWriterAudioInput markAsFinished]; } dispatch_group_leave(self .dispatchGroup); } }]; } if (self .assetWriterVideoInput) { dispatch_group_enter(self .dispatchGroup); [self .assetWriterVideoInput requestMediaDataWhenReadyOnQueue:self .rwVideoSerializationQueue usingBlock:^{ if (self .videoFinished) return ; BOOL completedOrFailed = NO ; while ([self .assetWriterVideoInput isReadyForMoreMediaData] && !completedOrFailed) { CMSampleBufferRef sampleBuffer = [self .assetReaderVideoOutput copyNextSampleBuffer]; if (sampleBuffer != NULL ) { BOOL success = [self .assetWriterVideoInput appendSampleBuffer:sampleBuffer]; CFRelease (sampleBuffer); sampleBuffer = NULL ; completedOrFailed = !success; } else { completedOrFailed = YES ; } } if (completedOrFailed) { BOOL oldFinished = self .videoFinished; self .videoFinished = YES ; if (oldFinished == NO ) { [self .assetWriterVideoInput markAsFinished]; } dispatch_group_leave(self .dispatchGroup); } }]; } dispatch_group_notify(self .dispatchGroup, self .mainSerializationQueue, ^{ BOOL finalSuccess = YES ; NSError *finalError = nil ; if (self .cancelled) { [self .assetReader cancelReading]; [self .assetWriter cancelWriting]; } else { if ([self .assetReader status] == AVAssetReaderStatusFailed ) { finalSuccess = NO ; finalError = [self .assetReader error]; } if (finalSuccess) { finalSuccess = [self .assetWriter finishWriting]; if (!finalSuccess) finalError = [self .assetWriter error]; } } [self readingAndWritingDidFinishSuccessfully:finalSuccess withError:finalError]; }); } return success; }
在重编码过程中,为了提升性能,音频处理和视频处理在两个不同队列中进行。但这两个队列在一个 dispatchGroup 中,当每个队列的任务都完成后,会发送通知。判断重新编码结果是否成功。
最后调用readingAndWritingDidFinishSuccessfully:。
5.4.5 处理编码结果 对重编码的结果进行处理并同步到 UI:
1 2 3 4 5 6 7 8 9 10 11 12 13 14 15 16 17 18 19 20 21 22 - (void )readingAndWritingDidFinishSuccessfully:(BOOL )success withError:(NSError *)error { if (!success) { [self .assetReader cancelReading]; [self .assetWriter cancelWriting]; dispatch_async (dispatch_get_main_queue(), ^{ }); } else { self .cancelled = NO ; self .videoFinished = NO ; self .audioFinished = NO ; dispatch_async (dispatch_get_main_queue(), ^{ }); } }
5.4.6 取消重编码 使用多个串行队列,可以很轻松的取消对 asset 的重编码。
在主序列化队列上,消息被异步发送到每个 asset 重新编码序列化队列,以取消它们的读取和写入。
当这两个序列化队列完成取消时,调度组向主序列化队列发送通知,其中取消属性设置为 YES。
可以将下面的代码与 UI 上的 “取消” 按钮关联起来:
1 2 3 4 5 6 7 8 9 10 11 12 13 14 15 16 17 18 19 20 21 22 23 24 25 26 27 28 29 30 31 32 33 34 35 36 37 38 39 40 - (void )cancel { dispatch_async (self .mainSerializationQueue, ^{ if (self .assetWriterAudioInput) { dispatch_async (self .rwAudioSerializationQueue, ^{ BOOL oldFinished = self .audioFinished; self .audioFinished = YES ; if (oldFinished == NO ) { [self .assetWriterAudioInput markAsFinished]; } dispatch_group_leave(self .dispatchGroup); }); } if (self .assetWriterVideoInput) { dispatch_async (self .rwVideoSerializationQueue, ^{ BOOL oldFinished = self .videoFinished; self .videoFinished = YES ; if (oldFinished == NO ) { [self .assetWriterVideoInput markAsFinished]; } dispatch_group_leave(self .dispatchGroup); }); } self .cancelled = YES ; }); }
5.5 AVOutputSettingsAssistant介绍 AVOutputSettingsAssistant 类的功能是为 asset reader 或 writer 创建设置信息。这使得设置更简单,特别是在对于具有许多特定预设的高帧率的 H264 视频进行参数设置时。
下面的代码是AVOutputSettingsAssistant的使用示例:
1 2 3 4 5 6 7 8 9 10 11 12 13 14 15 16 17 18 19 20 AVOutputSettingsAssistant *outputSettingsAssistant = [AVOutputSettingsAssistant outputSettingsAssistantWithPreset:<some preset>];CMFormatDescriptionRef audioFormat = [self getAudioFormat];if (audioFormat != NULL ) [outputSettingsAssistant setSourceAudioFormat:(CMAudioFormatDescriptionRef )audioFormat]; CMFormatDescriptionRef videoFormat = [self getVideoFormat];if (videoFormat != NULL ) [outputSettingsAssistant setSourceVideoFormat:(CMVideoFormatDescriptionRef )videoFormat]; CMTime assetMinVideoFrameDuration = [self getMinFrameDuration];CMTime averageFrameDuration = [self getAvgFrameDuration][outputSettingsAssistant setSourceVideoAverageFrameDuration:averageFrameDuration]; [outputSettingsAssistant setSourceVideoMinFrameDuration:assetMinVideoFrameDuration]; AVAssetWriter *assetWriter = [AVAssetWriter assetWriterWithURL:<some URL> fileType:[outputSettingsAssistant outputFileType] error:NULL ];AVAssetWriterInput *audioInput = [AVAssetWriterInput assetWriterInputWithMediaType:AVMediaTypeAudio outputSettings:[outputSettingsAssistant audioSettings] sourceFormatHint:audioFormat];AVAssetWriterInput *videoInput = [AVAssetWriterInput assetWriterInputWithMediaType:AVMediaTypeVideo outputSettings:[outputSettingsAssistant videoSettings] sourceFormatHint:videoFormat];
六、时间和媒体的表示 AV Foundation 框架中使用的一些用来代表时间和媒体的底层数据结构来源于 Core Media 框架。
6.1 时间的表示 AV Foundation 框架中的时间由一个 Core Media 框架中的数据结构表示.
6.1.1 用 CMTime 表示一段时间 CMTime 是一个以有理数表示时间的 C 语言结构体。
1 2 3 4 5 6 7 8 9 10 11 12 13 14 typedef int64_t CMTimeValue;typedef int32_t CMTimeScale;typedef int64_t CMTimeEpochtypedef struct { CMTimeValue value; CMTimeScale timescale; CMTimeFlags flags; CMTimeEpoch epoch; } CMTime;
从概念上来看,timescale (时间段/时间刻度) 描述了一秒中包含多少个时间单元。
如果 timescale 等于 4,则每个时间单元代表四分之一秒;
如果果 timescale 等于 10,则每个时间单元代表十分之一秒,以此类推;
经常使用 600 的 timescale ,因为这是几个常用帧速率的倍数:电影 24 fps、NTSC 30 fps(用于北美和日本的电视)和 PAL 25 fps(用于电视欧洲)。使用 600 的timescale,可以准确地表示这些系统中的任意数量的帧。
1. CMTime的创建与使用 使用方法 CMTimeMake 或者 CMTimeMakeWithSeconds 创建一个时间。
1 2 3 4 CMTime CMTimeMake (int64_t value, int32_t timescale);CMTime CMTimeMakeWithSeconds (Float64 seconds, int32_t preferredTimescale)
比如:
1 2 3 4 5 6 7 8 9 10 11 12 13 14 15 16 17 18 CMTime time1 = CMTimeMake (200 , 2 ); CMTime time2 = CMTimeMake (400 , 4 ); if (CMTimeCompare (time1, time2) == 0 ) { NSLog (@"time1 and time2 are the same" ); } Float64 float64Seconds = 200.0 / 3 ; CMTime time3 = CMTimeMakeWithSeconds (float64Seconds , 3 ); time3 = CMTimeMultiply (time3, 3 ); time3 = CMTimeSubtract (time3, time1); CMTimeShow (time3);if (CMTIME_COMPARE_INLINE (time2, ==, time3)) { NSLog (@"time2 and time3 are the same" ); }
更多详细信息参见 CMTime Reference
2. CMTime 的特殊值与判断宏 Core Media 框架提供了一些常量:
kCMTimeZerokCMTimeInvalidkCMTimePositiveInfinity kCMTimeNegativeInfinity。
CMTime结构体能够进行很多操作,比如要判断一个时间是否有效(是否为非数字值),可以使用一些定义好的宏:
1 2 3 4 5 6 7 8 9 10 11 12 13 #define CMTIME_IS_VALID(time) ((Boolean)(((time).flags & kCMTimeFlags_Valid) != 0)) #define CMTIME_IS_INVALID(time) (! CMTIME_IS_VALID(time)) #define CMTIME_IS_POSITIVE_INFINITY(time) ((Boolean)(CMTIME_IS_VALID(time) && (((time).flags & kCMTimeFlags_PositiveInfinity) != 0))) #define CMTIME_IS_NEGATIVE_INFINITY(time) ((Boolean)(CMTIME_IS_VALID(time) && (((time).flags & kCMTimeFlags_NegativeInfinity) != 0))) #define CMTIME_IS_INDEFINITE(time) ((Boolean)(CMTIME_IS_VALID(time) && (((time).flags & kCMTimeFlags_Indefinite) != 0))) #define CMTIME_IS_NUMERIC(time) ((Boolean)(((time).flags & (kCMTimeFlags_Valid | kCMTimeFlags_ImpliedValueFlagsMask)) == kCMTimeFlags_Valid)) #define CMTIME_HAS_BEEN_ROUNDED(time) ((Boolean)(CMTIME_IS_NUMERIC(time) && (((time).flags & kCMTimeFlags_HasBeenRounded) != 0)))
比如:
1 2 3 4 CMTime myTime = <#Get a CMTime #>;if (CMTIME_IS_INVALID (myTime)) { }
不能将 CMTime 结构体与kCMTimeZero直接进行比较。
3. 将 CMTime 转换为对象 如果要在注释或者Core Foundation容器中使用 CMTime,使用方法 CMTimeCopyAsDictionary 和 CMTimeMakeFromDictionary 可以在 CMTime 结构体和CFDictionary类型 (参见 CFDictionaryRef ) 之间进行相互转换。
使用方法 CMTimeCopyDescription 可以获取 CMTime 结构体的字符串描述。
4. 纪元 (Epochs) CMTime结构体中的 epoch 通常被设置为 0。但有些场景下,可以用到,比如在循环中,可以使用这个值来区分不同循环次数中的同一个时间点。
6.1.2 用 CMTimeRange 表示一个时间范围 CMTimeRange 是一个 C 语言结构体。
1 2 3 4 5 6 7 8 typedef struct { CMTime start; CMTime duration; } CMTimeRange; CMTimeRange CMTimeRangeMake (CMTime start, CMTime duration) ;CMTimeRange CMTimeRangeFromTimeToTime (CMTime start, CMTime end) ;
一个时间范围并不包含start加上duration得到的时间。(是个数学上的开区间,不包含后边界)
使用上面两个方法可以创建一个时间范围,但是存在一些限制:
CMTimeRange不能跨过不同的epoch。start的epoch值可能不为0,我们只能对start的epoch值相同的 CMTimeRange 进行范围操作(例如 CMTimeRangeGetUnion)。duration的epoch值应该一直为 0,value 值为非负。
1. 处理 CMTimeRange Core Media 框架提供了一些一个时间范围操作方法:
判断一个时间范围是否包含某个时间点或者其他时间范围的方法
判断两个时间范围是否相同
对两个时间范围进行交集和并集运算的方法。
例如,CMTimeRangeContainsTime ,CMTimeRangeEqual ,CMTimeRangeContainsTimeRange 和 CMTimeRangeGetUnion .
注意下面的表达式永远返回 false(包前不包后,前闭后开 ):
1 CMTimeRangeContainsTime (range, CMTimeRangeGetEnd (range));
更多相关的详细信息,参见 CMTimeRange Reference
2. CMTimeRange 的特殊值 Core Media 提供了两个常量:
kCMTimeRangeZero:表示空范围
kCMTimeRangeInvalid:表示无效范围
可以使用以下这些宏对 CMTimeRange 的特殊值进行判断:
1 2 3 4 5 6 7 #define CMTIMERANGE_IS_VALID(range) ((Boolean)(CMTIME_IS_VALID(range.start) && CMTIME_IS_VALID(range.duration) && (range.duration.epoch == 0) && (range.duration.value >= 0))) #define CMTIMERANGE_IS_INVALID(range) (! CMTIMERANGE_IS_VALID(range)) #define CMTIMERANGE_IS_INDEFINITE(range) ((Boolean)(CMTIMERANGE_IS_VALID(range) && (CMTIME_IS_INDEFINITE(range.start) || CMTIME_IS_INDEFINITE(range.duration)))) #define CMTIMERANGE_IS_EMPTY(range) ((Boolean)(CMTIMERANGE_IS_VALID(range) && (CMTIME_COMPARE_INLINE(range.duration, ==, kCMTimeZero))))
不能将 CMTimeRange 结构体与kCMTimeRangeInvalid直接进行比较。
3. 将 CMTimeRange 转换为对象 如果要在注释或者Core Foundation容器中使用 CMTimeRange,使用方法 CMTimeRangeCopyAsDictionary 和 CMTimeRangeMakeFromDictionary 可以在 CMTimeRange 结构体和CFDictionary类型 (参见 CFDictionaryRef ) 之间进行相互转换。
使用方法 CMTimeRangeCopyDescription 可以获取 CMTimeRange 结构体的字符串描述.
6.2 媒体的表示(CMSampleBuffer) 视频数据和与其相关联的元数据都使用 Core Media 框架中的对象类型来表示。
Core Media 使用CMSampleBuffer(参见 CMSampleBufferRef ) 类型表示视频数据。
CMSampleBuffers 是包含零个或多个特定媒体类型(音频、视频、多路混合等)的压缩(或未压缩)样本的 CF 对象,用于在媒体系统中移动媒体样本数据。
CMSampleBuffer 可以包含一个或多个媒体样本的 CMBlockBuffer 或 CVImageBuffer、CMSampleBuffer 流的格式描述、每个包含的媒体样本的大小和时间信息,以及缓冲区级别(buffer-level)和样本级别(sample-level)的附件。
一个CMSampleBuffer对象是一个包含了视频数据帧的 sample buffer(样本缓冲区),用来作为 Core Video pixel buffer(核心视频像素缓冲区,参见 CVPixelBufferRef )。
可以使用 CMSampleBufferGetImageBuffer 方法访问 sample buffer 中的 pixel buffer.
1 CVPixelBufferRef pixelBuffer = CMSampleBufferGetImageBuffer (<#A CMSampleBuffer #>);
可以在 pixel buffer 访问到实际的视频数据,参见下节示例代码。
除了视频数据而言,还可以获取视频帧其他方面的信息:
6.3 将CMSampleBuffer转换为UIImage 下面的代码示例了如何将CMSampleBuffer转换为UIImage。这个转换相当消耗性能,使用时必须进行谨慎考虑。
例如,它适用于从大约每秒钟拍摄的一帧视频数据创建静态图像。您不应该将此作为实时操作来自捕获设备的每一帧视频的方法。
1 2 3 4 5 6 7 8 9 10 11 12 13 14 15 16 17 18 19 20 21 22 23 24 25 26 27 28 29 30 31 32 33 34 35 36 37 38 39 40 - (UIImage *) imageFromSampleBuffer:(CMSampleBufferRef ) sampleBuffer { CVImageBufferRef imageBuffer = CMSampleBufferGetImageBuffer (sampleBuffer); CVPixelBufferLockBaseAddress(imageBuffer, 0 ); void *baseAddress = CVPixelBufferGetBaseAddress(imageBuffer); size_t bytesPerRow = CVPixelBufferGetBytesPerRow(imageBuffer); size_t width = CVPixelBufferGetWidth(imageBuffer); size_t height = CVPixelBufferGetHeight(imageBuffer); CGColorSpaceRef colorSpace = CGColorSpaceCreateDeviceRGB (); CGContextRef context = CGBitmapContextCreate (baseAddress, width, height, 8 , bytesPerRow, colorSpace, kCGBitmapByteOrder32Little | kCGImageAlphaPremultipliedFirst); CGImageRef quartzImage = CGBitmapContextCreateImage (context); CVPixelBufferUnlockBaseAddress(imageBuffer,0 ); CGContextRelease (context); CGColorSpaceRelease (colorSpace); UIImage *image = [UIImage imageWithCGImage:quartzImage]; CGImageRelease (quartzImage); return (image); }
七、并发编程 来自 AVFoundation 的回调 —— block、KVO、notification,都不能保证会在任何特定线程或队列上进行。相反,AVFoundation 会在任务的线程或队列上执行这些回调。
两个有关通知和线程的准则:
UI 相关的通知必须在主线程中发送
需要创建或指定一个队列的类或方法,将在该队列上返回通知
除了这两个准则之外,您不应该假设将在任何特定线程上返回通知。
如果你正在编写一个多线程的应用程序,你可以使用 NSThread 类的下面方法来判断当前是否是你所需要的线程:
1 2 3 @property (readonly ) BOOL isMainThread;[[NSThread currentThread] isEqual:<#A stored thread reference#>]
可以使用 NSObject 下面的方法来指定线程:
1 2 3 4 5 6 7 8 - (void)performSelectorOnMainThread:(SEL)aSelector withObject:(nullable id)arg waitUntilDone:(BOOL)wait; - (void)performSelector:(SEL)aSelector onThread:(NSThread *)thr withObject:(nullable id)arg waitUntilDone:(BOOL)wait modes:(nullable NSArray<NSString *> *)array;
也可以使用 dispatch_async将回调 block 放到合适的线程中执行。