原文链接 — AFNetworking到底做了什么? ,有一些细节修改
作为一个iOS开发,也许你不知道NSUrlRequest、不知道NSUrlConnection、也不知道NSURLSession…(说不下去了…怎么会什么都不知道…)但是你一定知道AFNetworking。
大多数人习惯了只要是请求网络都用AF,但是你真的知道AF做了什么吗?为什么我们不用原生的NSURLSession而选择AFNetworking?
本文将从源码的角度去分析AF的实际作用。 或许看完这篇文章,你心里会有一个答案。
一、框架结构 先从最新的AF3.x讲起吧:
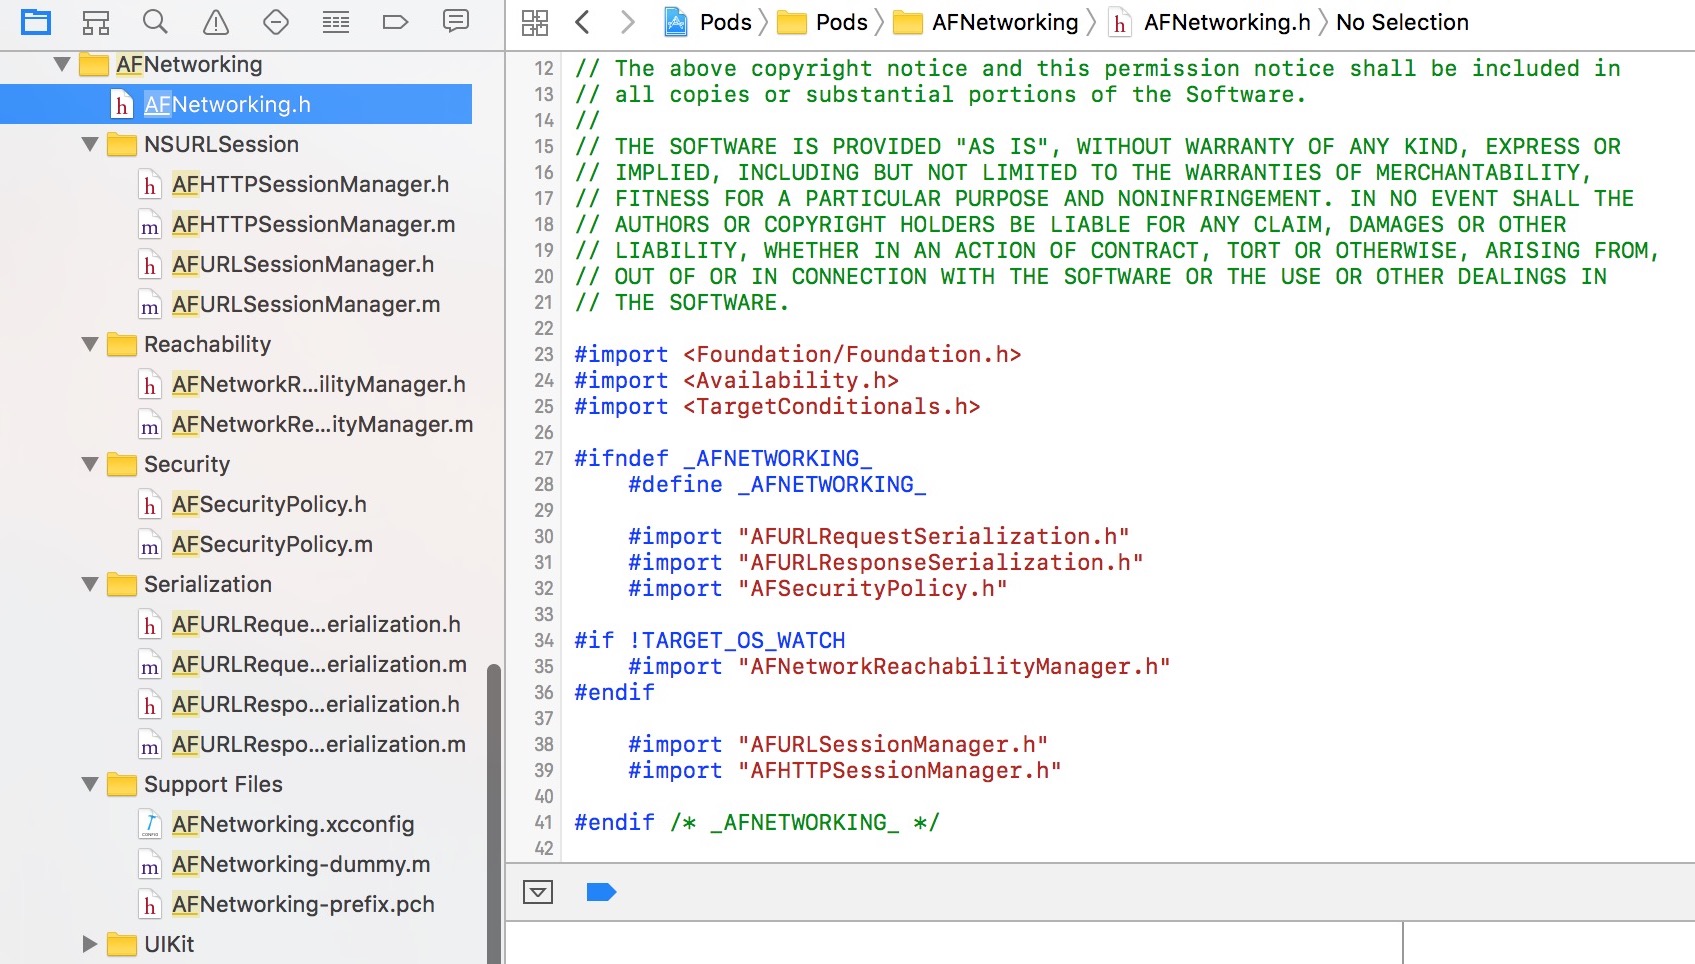
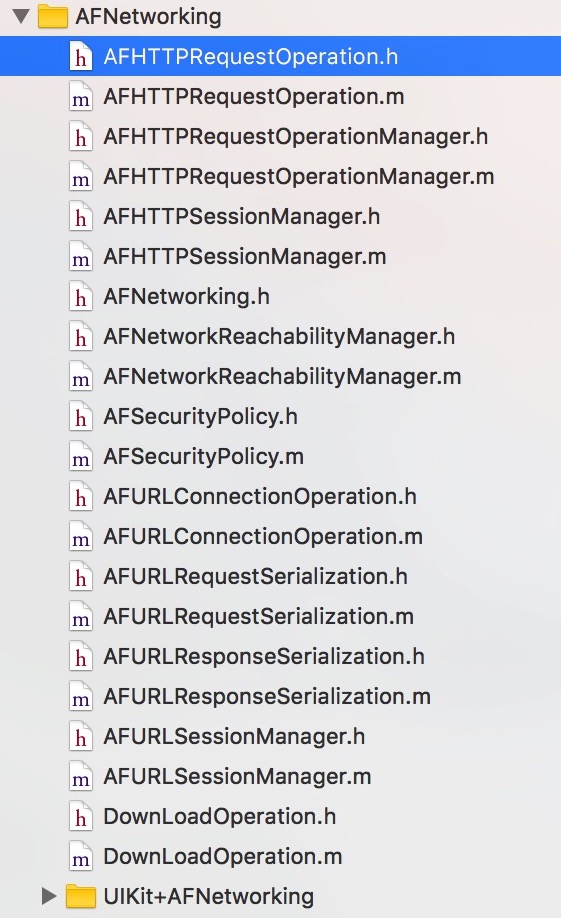
首先,我们就一起分析一下该框架的组成。 将AF下载导入工程后,下面是AF代码结构图,相对于2.x变得非常简单了:
除去Support Files,可以看到AF分为如下5个功能模块:
网络通信模块(AFURLSessionManager、AFHTTPSessionManger)
网络状态监听模块(Reachability)
网络通信安全策略模块(Security)
网络通信信息序列化/反序列化模块(Serialization)
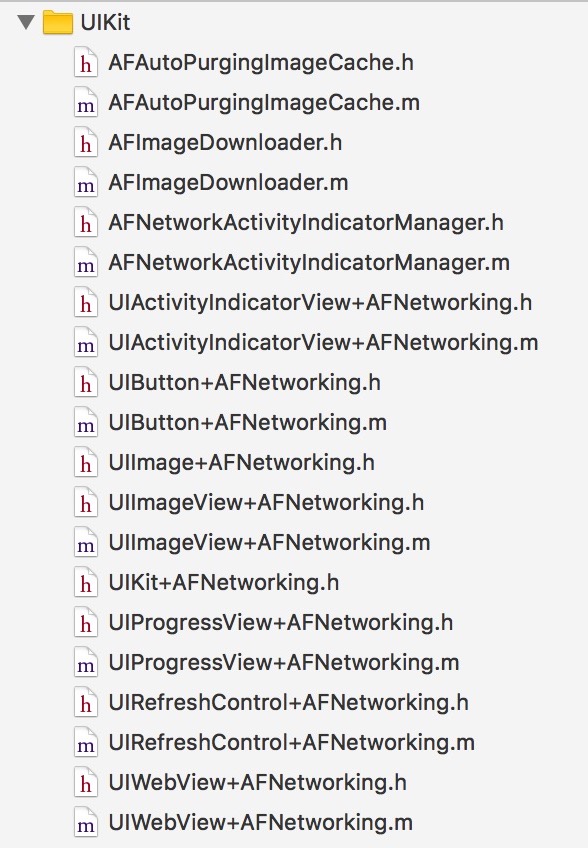
对于iOS UIKit库的扩展(UIKit)
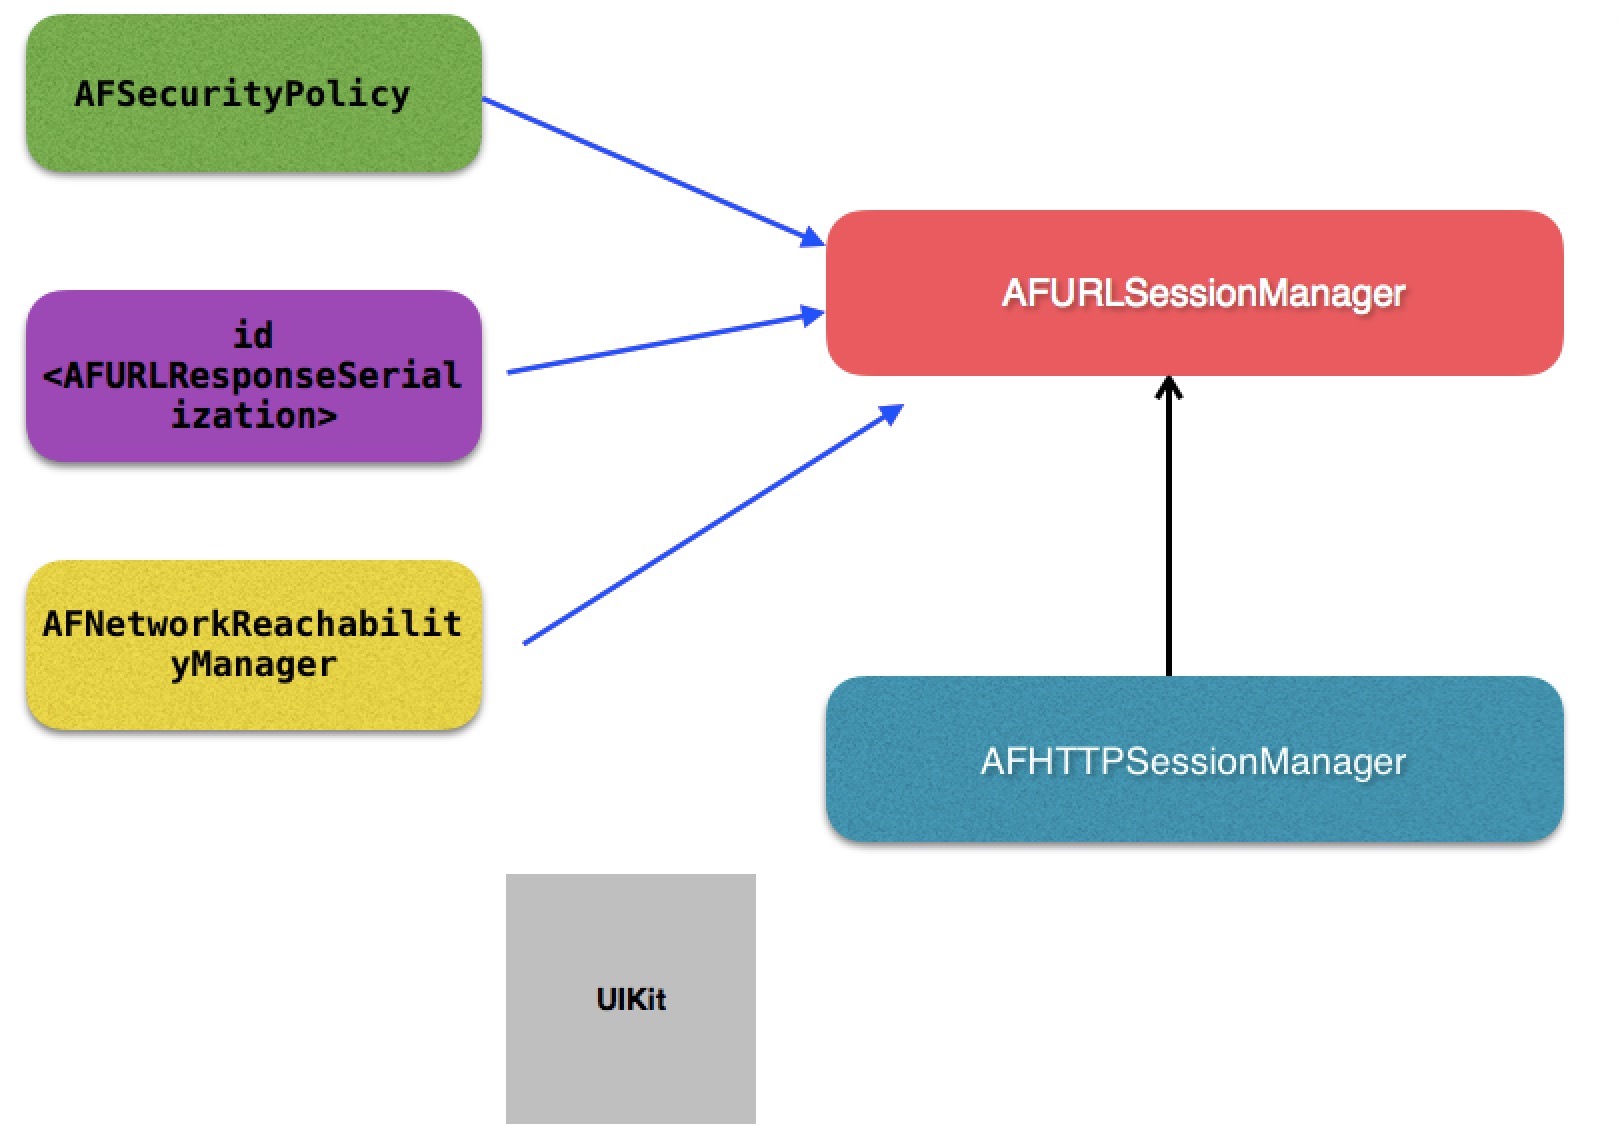
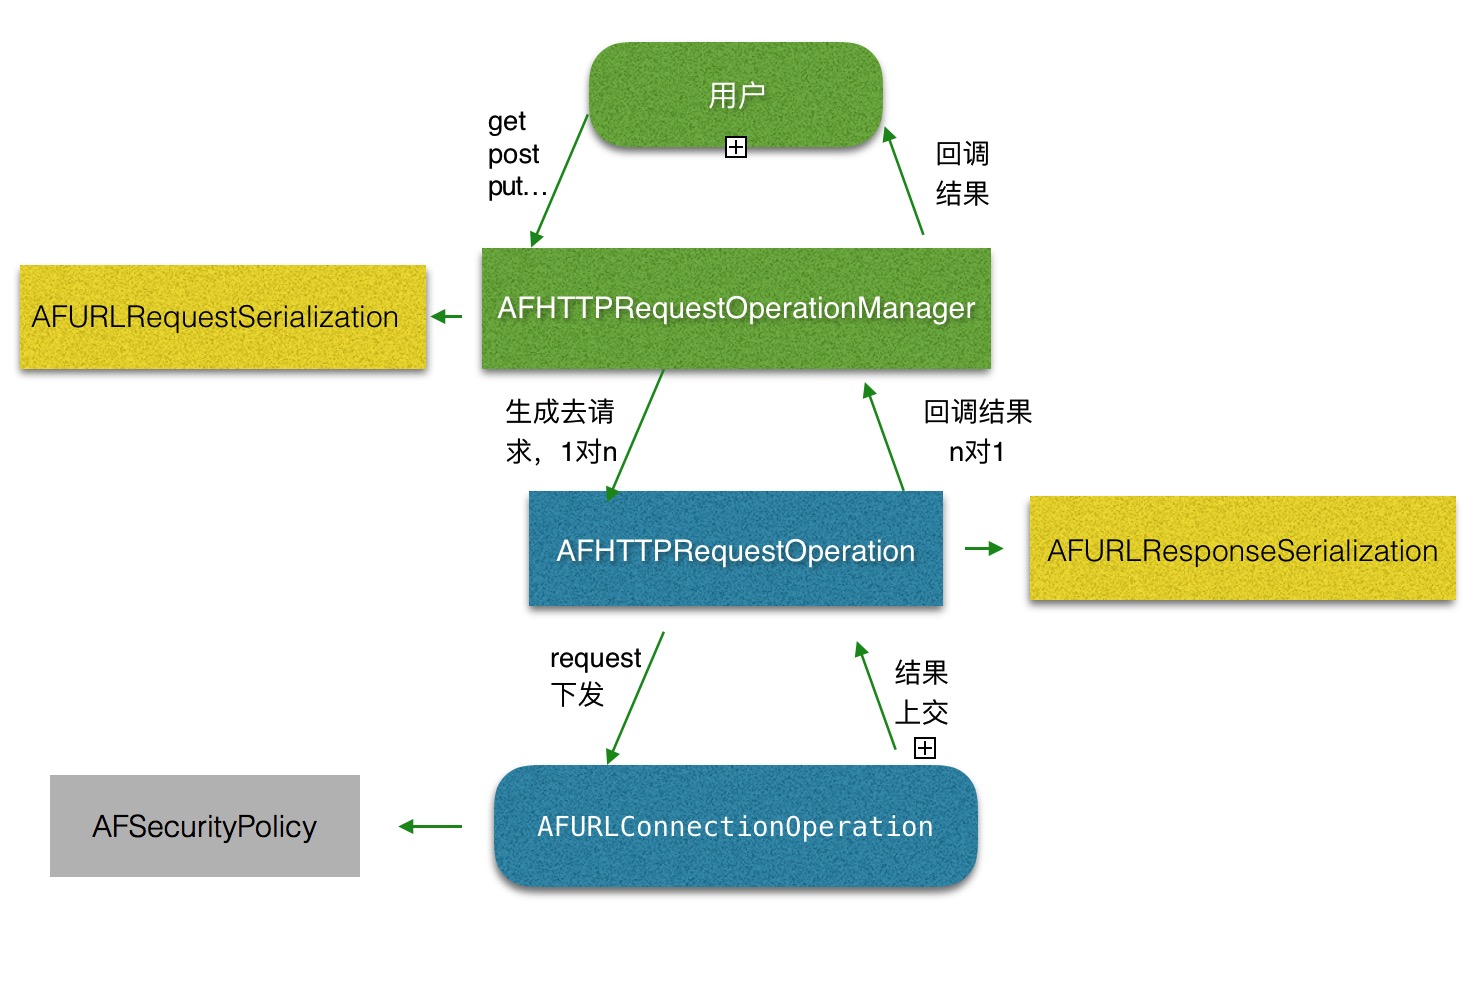
这五个模块所对应的类的结构关系图(AF架构图)如下所示:
其核心当然是网络通信模块AFURLSessionManager。大家都知道,AF3.x是基于NSURLSession来封装的。所以这个类围绕着NSURLSession做了一系列的封装。而其余的四个模块,均是为了配合网络通信或对已有UIKit的一个扩展工具包。 其中AFHTTPSessionManager是继承于AFURLSessionManager的,我们一般做网络请求都是用这个类,但是它本身是没有做实事的,只是做了一些简单的封装,把请求逻辑分发给父类AFURLSessionManager或者其它类去做。
二、AFURL&HTTPSessionManager 2.1 AFHTTPSessionManager的初始化 2.1.1 初始化源码 首先我们简单的写个get请求:
1
2
3
4
5
6
7
AFHTTPSessionManager *manager = [[AFHTTPSessionManager alloc]init]; [manager GET:@"http://localhost" parameters:nil progress:nil success:^(NSURLSessionDataTask * _Nonnull task, id _Nullable responseObject) { } failure:^(NSURLSessionDataTask * _Nullable task, NSError * _Nonnull error) { }];
1. AFHTTPSessionManager 首先我们我们调用了初始化方法生成了一个manager,我们点进去看看初始化做了什么:
1
2
3
4
5
6
7
8
9
10
11
12
13
14
15
16
17
18
19
20
21
22
23
24
25
26
27
28
29
30
31
32
33
34
35
36
+ (instancetype )manager { return [[[self class ] alloc] initWithBaseURL:nil ]; } - (instancetype )init { return [self initWithBaseURL:nil ]; } - (instancetype )initWithBaseURL:(NSURL *)url { return [self initWithBaseURL:url sessionConfiguration:nil ]; } - (instancetype )initWithSessionConfiguration:(NSURLSessionConfiguration *)configuration { return [self initWithBaseURL:nil sessionConfiguration:configuration]; } - (instancetype )initWithBaseURL:(NSURL *)url sessionConfiguration:(NSURLSessionConfiguration *)configuration { self = [super initWithSessionConfiguration:configuration]; if (!self ) { return nil ; } if ([[url path] length] > 0 && ![[url absoluteString] hasSuffix:@"/" ]) { url = [url URLByAppendingPathComponent:@"" ]; } self .baseURL = url; self .requestSerializer = [AFHTTPRequestSerializer serializer]; self .responseSerializer = [AFJSONResponseSerializer serializer]; return self ; }
其实初始化方法都调用父类的初始化方法。 父类也就是AF3.x最最核心的类AFURLSessionManager 。几乎所有的类都是围绕着这个类在处理业务逻辑。除此之外,方法中把baseURL存了起来,还生成了一个请求序列对象和一个响应序列对象。后面再细说这两个类是干什么用的。
2. AFURLSessionManager 直接来到父类AFURLSessionManager的初始化方法:
1
2
3
4
5
6
7
8
9
10
11
12
13
14
15
16
17
18
19
20
21
22
23
24
25
26
27
28
29
30
31
32
33
34
35
36
37
38
39
40
41
42
43
44
45
46
47
48
49
50
51
52
53
54
55
- (instancetype )init { return [self initWithSessionConfiguration:nil ]; } - (instancetype )initWithSessionConfiguration:(NSURLSessionConfiguration *)configuration { self = [super init]; if (!self ) { return nil ; } if (!configuration) { configuration = [NSURLSessionConfiguration defaultSessionConfiguration]; } self .sessionConfiguration = configuration; self .operationQueue = [[NSOperationQueue alloc] init]; self .operationQueue.maxConcurrentOperationCount = 1 ; self .session = [NSURLSession sessionWithConfiguration:self .sessionConfiguration delegate:self delegateQueue:self .operationQueue]; self .responseSerializer = [AFJSONResponseSerializer serializer]; self .securityPolicy = [AFSecurityPolicy defaultPolicy]; #if !TARGET_OS_WATCH self .reachabilityManager = [AFNetworkReachabilityManager sharedManager]; #endif self .mutableTaskDelegatesKeyedByTaskIdentifier = [[NSMutableDictionary alloc] init]; self .lock = [[NSLock alloc] init]; self .lock.name = AFURLSessionManagerLockName; [self .session getTasksWithCompletionHandler:^(NSArray *dataTasks, NSArray *uploadTasks, NSArray *downloadTasks) { for (NSURLSessionDataTask *task in dataTasks) { [self addDelegateForDataTask:task uploadProgress:nil downloadProgress:nil completionHandler:nil ]; } for (NSURLSessionUploadTask *uploadTask in uploadTasks) { [self addDelegateForUploadTask:uploadTask progress:nil completionHandler:nil ]; } for (NSURLSessionDownloadTask *downloadTask in downloadTasks) { [self addDelegateForDownloadTask:downloadTask progress:nil destination:nil completionHandler:nil ]; } }]; return self ; }
2.1.2 AF maxConcurrentOperationCount设置 回到初始化的这行代码上:
1 self .operationQueue.maxConcurrentOperationCount = 1 ;
这里先说结论,有些内容是在下面陈述的:
首先我们要明确一个概念,这里的并发数仅仅是回调代理的线程并发数。而不是请求网络的线程并发数。请求网络是由NSURLSession来做的,它内部维护了一个线程池,用来做网络请求 。它调度线程,基于底层的CFSocket去发送请求和接收数据。这些线程是并发的 。
明确了这个概念之后,我们来梳理一下AF3.x的整个流程和线程的关系:
我们一开始初始化sessionManager的时候,一般都是在主线程,(当然不排除有些人喜欢在分线程初始化…)
然后我们调用get或者post等去请求数据,接着会进行request拼接,AF代理的字典映射,progress的KVO添加等等,到NSUrlSession的resume之前这些准备工作,仍旧是在主线程中的。
然后我们调用NSUrlSession的resume,接着就跑到NSUrlSession内部去对网络进行数据请求了,在它内部是多线程并发的去请求数据的。
紧接着数据请求完成后,回调回来在我们一开始生成的并发数为1的NSOperationQueue中,这个时候会是多线程串行的回调回来的。(注:不明白的朋友可以看看雷纯峰大神这篇iOS 并发编程之 Operation Queues )
然后我们到返回数据解析那一块,我们自己又创建了并发的多线程,去对这些数据进行了各种类型的解析。
最后我们如果有自定义的completionQueue,则在自定义的queue中回调回来,也就是分线程回调回来,否则就是主队列,主线程中回调结束。
最后我们来解释解释为什么回调Queue要设置并发数为1:个人认为AF这么做有以下两点原因:
众所周知,AF2.x所有的回调是在一条线程(参考6.7小节 ),这条线程是AF的常驻线程,而这一条线程正是AF调度request的思想精髓所在,所以第一个目的就是为了和之前版本保持一致。
因为跟代理相关的一些操作AF都使用了NSLock。所以就算Queue的并发数设置为n,因为多线程回调,锁的等待,导致所提升的程序速度也并不明显。反而多task回调导致的多线程并发,平白浪费了部分性能。
而设置Queue的并发数为1(注:这里虽然回调Queue的并发数为1,仍然会有不止一条线程,但是因为是串行回调,所以同一时间,只会有一条线程在操作AFURLSessionManager的那些方法)至少回调的事件,是不需要多线程并发的。回调没有了NSLock的等待时间,所以对时间并没有多大的影响。
注:但是还是会有多线程的操作的,因为设置刚开始调起请求的时候,是在主线程的,而回调则是串行分线程:response的解析是并发线程执行的 (参考2.3.6-1小节 )。
初始化方法到这就全部完成了。
2.2 AFHTTPSessionManager创建GET Task 2.2.1 源码实现 接着我们来看看网络请求:
1
2
3
4
5
6
7
8
9
10
11
12
13
14
15
16
17
18
19
20
- (NSURLSessionDataTask *)GET:(NSString *)URLString parameters:(id )parameters progress:(void (^)(NSProgress * _Nonnull))downloadProgress success:(void (^)(NSURLSessionDataTask * _Nonnull, id _Nullable))success failure:(void (^)(NSURLSessionDataTask * _Nullable, NSError * _Nonnull))failure { NSURLSessionDataTask *dataTask = [self dataTaskWithHTTPMethod:@"GET" URLString:URLString parameters:parameters uploadProgress:nil downloadProgress:downloadProgress success:success failure:failure]; [dataTask resume]; return dataTask; }
1
2
3
4
5
6
7
8
9
10
11
12
13
14
15
16
17
18
19
20
21
22
23
24
25
26
27
28
29
30
31
32
33
34
35
36
37
38
39
40
41
42
43
44
45
46
47
- (NSURLSessionDataTask *)dataTaskWithHTTPMethod:(NSString *)method URLString:(NSString *)URLString parameters:(id )parameters uploadProgress:(nullable void (^)(NSProgress *uploadProgress)) uploadProgress downloadProgress:(nullable void (^)(NSProgress *downloadProgress)) downloadProgress success:(void (^)(NSURLSessionDataTask *, id ))success failure:(void (^)(NSURLSessionDataTask *, NSError *))failure { NSError *serializationError = nil ; NSMutableURLRequest *request = [self .requestSerializer requestWithMethod:method URLString:[[NSURL URLWithString:URLString relativeToURL:self .baseURL] absoluteString] parameters:parameters error:&serializationError]; if (serializationError) { if (failure) { #pragma clang diagnostic push #pragma clang diagnostic ignored "-Wgnu" dispatch_async (self .completionQueue ?: dispatch_get_main_queue(), ^{ failure(nil , serializationError); }); #pragma clang diagnostic pop } return nil ; } __block NSURLSessionDataTask *dataTask = nil ; dataTask = [self dataTaskWithRequest:request uploadProgress:uploadProgress downloadProgress:downloadProgress completionHandler:^(NSURLResponse * __unused response, id responseObject, NSError *error) { if (error) { if (failure) { failure(dataTask, error); } } else { if (success) { success(dataTask, responseObject); } } }]; return dataTask; }
2.2.2 AFURLRequestSerialization创建request AFURLRequestSerialization文件中定义了三个请求参数序列化的类:
AFHTTPRequestSerializer
符合 AFURLRequestSerialization 和 AFURLResponseSerialization 协议,提供 query 字符串 / URL form-encoded 参数序列化和默认请求头的具体基础实现,以及响应状态代码和内容类型验证。
鼓励任何处理 HTTP 请求序列化的程序继承 AFHTTPRequestSerializer ,以确保一致的默认行为。
当请求的 Content-Type 是 application/x-www-form-urlencoded 时使用。默认
AFJSONRequestSerializer
继承自AFHTTPRequestSerializer,使用 NSJSONSerialization 将参数编码为 JSON,将请求的 Content-Type 设置为 application/json。
当请求的 Content-Type 是 application/json 时使用。
AFPropertyListRequestSerializer
继承自AFHTTPRequestSerializer,使用 NSPropertyListSerializer 将参数编码为 JSON,将请求的 Content-Type 设置为 application/x-plist。
当请求的 Content-Type 是 application/x-plist 时使用。
此处主要看的也是 AFHTTPRequestSerializer 序列化类:
1
2
3
4
5
6
7
8
9
10
11
12
13
14
15
16
17
18
19
20
21
22
23
24
25
26
27
28
29
- (NSMutableURLRequest *)requestWithMethod:(NSString *)method URLString:(NSString *)URLString parameters:(id )parameters error:(NSError *__autoreleasing *)error { NSParameterAssert (method); NSParameterAssert (URLString); NSURL *url = [NSURL URLWithString:URLString]; NSParameterAssert (url); NSMutableURLRequest *mutableRequest = [[NSMutableURLRequest alloc] initWithURL:url]; mutableRequest.HTTPMethod = method; for (NSString *keyPath in AFHTTPRequestSerializerObservedKeyPaths()) { if ([self .mutableObservedChangedKeyPaths containsObject:keyPath]) { [mutableRequest setValue:[self valueForKeyPath:keyPath] forKey:keyPath]; } } mutableRequest = [[self requestBySerializingRequest:mutableRequest withParameters:parameters error:error] mutableCopy]; return mutableRequest; }
讲一下这个方法,这个方法做了3件事:
1. 设置request请求类型 设置request的请求类型,get、post、put…等
2. 添加request配置参数 往request里添加一些参数设置,其中AFHTTPRequestSerializerObservedKeyPaths()是一个c函数,返回一个数组,我们来看看这个函数:
1
2
3
4
5
6
7
8
9
10
11
static NSArray * AFHTTPRequestSerializerObservedKeyPaths() { static NSArray *_AFHTTPRequestSerializerObservedKeyPaths = nil ; static dispatch_once_t onceToken; dispatch_once (&onceToken, ^{ _AFHTTPRequestSerializerObservedKeyPaths = @[NSStringFromSelector (@selector (allowsCellularAccess)), NSStringFromSelector (@selector (cachePolicy)), NSStringFromSelector (@selector (HTTPShouldHandleCookies)), NSStringFromSelector (@selector (HTTPShouldUsePipelining)), NSStringFromSelector (@selector (networkServiceType)), NSStringFromSelector (@selector (timeoutInterval))]; }); return _AFHTTPRequestSerializerObservedKeyPaths; }
其实这个函数就是封装了一些属性的名字,这些都是NSURLRequest的属性。
再来看看self.mutableObservedChangedKeyPaths,这个是 AFHTTPRequestSerializer 类的一个属性,在 init 方法中对这个集合进行了初始化,并对当前类的和NSURLRequest相关的那些属性添加了KVO监听 :
1
2
3
4
5
6
7
8
9
10
11
12
13
14
15
16
17
18
19
20
21
22
23
24
25
26
27
28
29
30
31
32
@property (readwrite , nonatomic , strong ) NSMutableSet *mutableObservedChangedKeyPaths;- (instancetype )init { self .mutableObservedChangedKeyPaths = [NSMutableSet set]; for (NSString *keyPath in AFHTTPRequestSerializerObservedKeyPaths()) { if ([self respondsToSelector:NSSelectorFromString (keyPath)]) { [self addObserver:self forKeyPath:keyPath options:NSKeyValueObservingOptionNew context:AFHTTPRequestSerializerObserverContext]; } } return self ; } -(void )observeValueForKeyPath:(NSString *)keyPath ofObject:(__unused id )object change:(NSDictionary *)change context:(void *)context { if (context == AFHTTPRequestSerializerObserverContext) { if ([change[NSKeyValueChangeNewKey ] isEqual:[NSNull null]]) { [self .mutableObservedChangedKeyPaths removeObject:keyPath]; } else { [self .mutableObservedChangedKeyPaths addObject:keyPath]; } } }
至此我们知道self.mutableObservedChangedKeyPaths其实就是我们自己设置的request属性值的集合。
接下来调用下面的代码,用KVC的方式,把属性值都设置到我们请求的request中去。
1 [mutableRequest setValue:[self valueForKeyPath:keyPath] forKey:keyPath];
3. 编码及设置请求参数 把需要传递的参数进行编码,并且设置到request中去:
1 2 mutableRequest = [[self requestBySerializingRequest:mutableRequest withParameters:parameters error:error] mutableCopy];
1
2
3
4
5
6
7
8
9
10
11
12
13
14
15
16
17
18
19
20
21
22
23
24
25
26
27
28
29
30
31
32
33
34
35
36
37
38
39
40
41
42
43
44
45
46
47
48
49
50
51
52
53
54
55
56
57
58
59
60
61
- (NSURLRequest *)requestBySerializingRequest:(NSURLRequest *)request withParameters:(id )parameters error:(NSError *__autoreleasing *)error { NSParameterAssert (request); NSMutableURLRequest *mutableRequest = [request mutableCopy]; [self .HTTPRequestHeaders enumerateKeysAndObjectsUsingBlock:^(id field, id value, BOOL * __unused stop) { if (![request valueForHTTPHeaderField:field]) { [mutableRequest setValue:value forHTTPHeaderField:field]; } }]; NSString *query = nil ; if (parameters) { if (self .queryStringSerialization) { NSError *serializationError; query = self .queryStringSerialization(request, parameters, &serializationError); if (serializationError) { if (error) { *error = serializationError; } return nil ; } } else { switch (self .queryStringSerializationStyle) { case AFHTTPRequestQueryStringDefaultStyle: query = AFQueryStringFromParameters(parameters); break ; } } } if ([self .HTTPMethodsEncodingParametersInURI containsObject:[[request HTTPMethod] uppercaseString]]) { if (query && query.length > 0 ) { mutableRequest.URL = [NSURL URLWithString:[[mutableRequest.URL absoluteString] stringByAppendingFormat:mutableRequest.URL.query ? @"&%@" : @"?%@" , query]]; } } else { if (!query) { query = @"" ; } if (![mutableRequest valueForHTTPHeaderField:@"Content-Type" ]) { [mutableRequest setValue:@"application/x-www-form-urlencoded" forHTTPHeaderField:@"Content-Type" ]; } [mutableRequest setHTTPBody:[query dataUsingEncoding:self .stringEncoding]]; } return mutableRequest; }
这个方法做了3件事:
从self.HTTPRequestHeaders中拿到设置的参数,赋值要请求的request里去
2) 将请求参数转换为字符串 把请求网络的参数,从array dic set这些容器类型转换为字符串,具体转码方式,我们可以使用自定义的方式,也可以用AF默认的转码方式。自定义的方式没什么好说的,想怎么去解析由你自己来决定。我们可以来看看默认的方式:
1
2
3
4
5
6
7
8
9
10
11
12
13
14
15
16
17
18
19
20
21
22
23
24
25
26
27
28
29
30
31
32
33
34
35
36
37
38
39
40
41
42
43
44
45
46
47
48
49
50
51
NSString * AFQueryStringFromParameters(NSDictionary *parameters) { NSMutableArray *mutablePairs = [NSMutableArray array]; for (AFQueryStringPair *pair in AFQueryStringPairsFromDictionary(parameters)) { [mutablePairs addObject:[pair URLEncodedStringValue]]; } return [mutablePairs componentsJoinedByString:@"&" ]; } NSArray * AFQueryStringPairsFromDictionary(NSDictionary *dictionary) { return AFQueryStringPairsFromKeyAndValue(nil , dictionary); } NSArray * AFQueryStringPairsFromKeyAndValue(NSString *key, id value) { NSMutableArray *mutableQueryStringComponents = [NSMutableArray array]; NSSortDescriptor *sortDescriptor = [NSSortDescriptor sortDescriptorWithKey:@"description" ascending:YES selector:@selector (compare:)]; if ([value isKindOfClass:[NSDictionary class ]]) { NSDictionary *dictionary = value; for (id nestedKey in [dictionary.allKeys sortedArrayUsingDescriptors:@[ sortDescriptor ]]) { id nestedValue = dictionary[nestedKey]; if (nestedValue) { [mutableQueryStringComponents addObjectsFromArray:AFQueryStringPairsFromKeyAndValue((key ? [NSString stringWithFormat:@"%@[%@]" , key, nestedKey] : nestedKey), nestedValue)]; } } } else if ([value isKindOfClass:[NSArray class ]]) { NSArray *array = value; for (id nestedValue in array) { [mutableQueryStringComponents addObjectsFromArray:AFQueryStringPairsFromKeyAndValue([NSString stringWithFormat:@"%@[]" , key], nestedValue)]; } } else if ([value isKindOfClass:[NSSet class ]]) { NSSet *set = value; for (id obj in [set sortedArrayUsingDescriptors:@[ sortDescriptor ]]) { [mutableQueryStringComponents addObjectsFromArray:AFQueryStringPairsFromKeyAndValue(key, obj)]; } } else { [mutableQueryStringComponents addObject:[[AFQueryStringPair alloc] initWithField:key value:value]]; } return mutableQueryStringComponents; }
转码主要是以上三个函数,配合着注释应该也很好理解:主要是在递归调用AFQueryStringPairsFromKeyAndValue。判断vaLue是什么类型的,然后去递归调用自己,直到解析的是除了array dic set以外的元素,然后把得到的参数数组返回。
其中有个AFQueryStringPair对象,其只有两个属性和两个方法:
1
2
3
4
5
6
7
8
9
10
11
12
13
14
15
16
17
18
19
20
21
22
@property (readwrite , nonatomic , strong ) id field;@property (readwrite , nonatomic , strong ) id value; - (instancetype )initWithField:(id )field value:(id )value { self = [super init]; if (!self ) { return nil ; } self .field = field; self .value = value; return self ; } - (NSString *)URLEncodedStringValue { if (!self .value || [self .value isEqual:[NSNull null]]) { return AFPercentEscapedStringFromString([self .field description]); } else { return [NSString stringWithFormat:@"%@=%@" , AFPercentEscapedStringFromString([self .field description]), AFPercentEscapedStringFromString([self .value description])]; } }
方法很简单,现在我们也很容易理解这整个转码过程了,我们举个例子梳理下,就是以下这3步:
1
2
3
4
5
6
7
8
9
10
11
12
13
14
15
16
17
18
@{ @"name" : @"bang" , @"phone" : @{@"mobile" : @"xx" , @"home" : @"xx" }, @"families" : @[@"father" , @"mother" ], @"nums" : [NSSet setWithObjects:@"1" , @"2" , nil] } -> @[ field: @"name" , value : @"bang" , field: @"phone[mobile]" , value : @"xx" , field: @"phone[home]" , value : @"xx" , field: @"families[]" , value : @"father" , field: @"families[]" , value : @"mother" , field: @"nums" , value : @"1" , field: @"nums" , value : @"2" , ] -> name=bang&phone[mobile]=xx&phone[home]=xx&families[]=father&families[]=mother&nums=1 &num=2
至此,我们原来的容器类型的参数,就这样变成字符串类型了。
3) 根据请求类型设置请求参数 紧接着这个方法还根据该request中请求类型,来判断参数字符串应该如何设置到request中去。如果是GET、HEAD、DELETE,则把参数quey是拼接到url后面的。而POST、PUT是把query拼接到http body中的:
1
2
3
4
5
6
7
8
9
10
11
12
13
14
15
16
17
if ([self .HTTPMethodsEncodingParametersInURI containsObject:[[request HTTPMethod] uppercaseString]]) { if (query && query.length > 0 ) { mutableRequest.URL = [NSURL URLWithString:[[mutableRequest.URL absoluteString] stringByAppendingFormat:mutableRequest.URL.query ? @"&%@" : @"?%@" , query]]; } } else { if (!query) { query = @"" ; } if (![mutableRequest valueForHTTPHeaderField:@"Content-Type" ]) { [mutableRequest setValue:@"application/x-www-form-urlencoded" forHTTPHeaderField:@"Content-Type" ]; } [mutableRequest setHTTPBody:[query dataUsingEncoding:self .stringEncoding]]; }
至此,我们生成了一个request。
2.2.3 AFURLSessionManger父类创建task 现在弄清楚request的创建流程中,我们跳出当前方法,再回到上层AFHTTPSessionManager类中的 dataTaskWithHTTPMethod:URLString:... 方法:
1 2 3 4 5 6 7 8 9 10 11 12 13 14 15 16 __block NSURLSessionDataTask *dataTask = nil ; dataTask = [self dataTaskWithRequest:request uploadProgress:uploadProgress downloadProgress:downloadProgress completionHandler:^(NSURLResponse * __unused response, id responseObject, NSError *error) { if (error) { if (failure) { failure(dataTask, error); } } else { if (success) { success(dataTask, responseObject); } } }];
这是调用了继承自父类的生成task的方法,并且执行了一个成功和失败的回调,我们接着去父类AFURLSessionManger里看(总算到我们的核心类了..):
1
2
3
4
5
6
7
8
9
10
11
12
13
14
15
16
- (NSURLSessionDataTask *)dataTaskWithRequest:(NSURLRequest *)request uploadProgress:(nullable void (^)(NSProgress *uploadProgress)) uploadProgressBlock downloadProgress:(nullable void (^)(NSProgress *downloadProgress)) downloadProgressBlock completionHandler:(nullable void (^)(NSURLResponse *response, id _Nullable responseObject, NSError * _Nullable error))completionHandler { __block NSURLSessionDataTask *dataTask = nil ; url_session_manager_create_task_safely(^{ dataTask = [self .session dataTaskWithRequest:request]; }); [self addDelegateForDataTask:dataTask uploadProgress:uploadProgressBlock downloadProgress:downloadProgressBlock completionHandler:completionHandler]; return dataTask; }
我们注意到这个方法非常简单,就调用了一个url_session_manager_create_task_safely()函数,传了一个Block进去,Block里就是iOS原生生成dataTask的方法。此外,还调用了一个addDelegateForDataTask的方法。
1. create_task_safely() 我们到这先到这个函数里去看看:
1
2
3
4
5
6
7
8
9
10
11
12
13
14
15
16
17
18
19
20
21
22
23
24
static void url_session_manager_create_task_safely(dispatch_block_t block) { if (NSFoundationVersionNumber < NSFoundationVersionNumber_With_Fixed_5871104061079552_bug ) { dispatch_sync (url_session_manager_creation_queue(), block); } else { block(); } } static dispatch_queue_t url_session_manager_creation_queue() { static dispatch_queue_t af_url_session_manager_creation_queue; static dispatch_once_t onceToken; dispatch_once (&onceToken, ^{ af_url_session_manager_creation_queue = dispatch_queue_create("com.alamofire.networking.session.manager.creation" , DISPATCH_QUEUE_SERIAL); }); return af_url_session_manager_creation_queue; }
方法非常简单,关键是理解这么做的目的:为什么我们不直接去调用 dataTask = [self.session dataTaskWithRequest:request]; 非要绕这么一圈,我们点进去bug日志里看看,原来这是为了适配iOS8的以下,创建session的时候,偶发的情况会出现session的属性taskIdentifier这个值不唯一 ,而这个taskIdentifier是我们后面来映射delegate的key,所以它必须是唯一的。
具体原因应该是NSURLSession内部去生成task的时候是用多线程并发去执行的。 想通了这一点,我们就很好解决了,我们只需要在iOS8以下同步串行 的去生成task就可以防止这一问题发生(如果还是不理解同步串行的原因,可以看看注释)。
题外话:很多同学都会抱怨为什么sync我从来用不到,看,有用到的地方了吧,很多东西不是没用,而只是你想不到怎么用 。
2. addDelegateForDataTask: 我们接着看到:
1 [self addDelegateForDataTask:dataTask uploadProgress:uploadProgressBlock downloadProgress:downloadProgressBlock completionHandler:completionHandler];
一起来看一下主要的调用流程:
1
2
3
addDelegateForDataTask:uploadProgress:downloadProgress:completionHandler: ﹂setDelegate:forTask: ﹂setupProgressForTask:
1
2
3
4
5
6
7
8
9
10
11
12
13
14
15
16
17
18
19
20
21
22
- (void )addDelegateForDataTask:(NSURLSessionDataTask *)dataTask uploadProgress:(nullable void (^)(NSProgress *uploadProgress)) uploadProgressBlock downloadProgress:(nullable void (^)(NSProgress *downloadProgress)) downloadProgressBlock completionHandler:(void (^)(NSURLResponse *response, id responseObject, NSError *error))completionHandler { AFURLSessionManagerTaskDelegate *delegate = [[AFURLSessionManagerTaskDelegate alloc] init]; delegate.manager = self ; delegate.completionHandler = completionHandler; dataTask.taskDescription = self .taskDescriptionForSessionTasks; [self setDelegate:delegate forTask:dataTask]; delegate.uploadProgressBlock = uploadProgressBlock; delegate.downloadProgressBlock = downloadProgressBlock; }
1 2 3 4 5 6 7 8 9 10 11 12 13 14 15 16 17 18 19 20 21 22 23 - (void )setDelegate:(AFURLSessionManagerTaskDelegate *)delegate forTask:(NSURLSessionTask *)task { NSParameterAssert (task); NSParameterAssert (delegate); [self .lock lock]; self .mutableTaskDelegatesKeyedByTaskIdentifier[@(task.taskIdentifier)] = delegate; [delegate setupProgressForTask:task]; [self addNotificationObserverForTask:task]; [self .lock unlock]; }
1 2 3 4 5 6 7 8 9 10 11 12 13 14 15 16 17 18 19 20 21 22 23 24 25 26 27 28 29 30 31 32 33 34 35 36 37 38 39 40 41 42 43 44 45 46 47 48 49 50 51 52 53 54 55 56 57 58 59 60 61 62 63 64 65 66 67 68 69 70 71 72 73 74 75 76 77 78 79 80 81 82 - (void )setupProgressForTask:(NSURLSessionTask *)task { __weak __typeof__(task) weakTask = task; self .uploadProgress.totalUnitCount = task.countOfBytesExpectedToSend; self .downloadProgress.totalUnitCount = task.countOfBytesExpectedToReceive; [self .uploadProgress setCancellable:YES ]; [self .uploadProgress setCancellationHandler:^{ __typeof__(weakTask) strongTask = weakTask; [strongTask cancel]; }]; [self .uploadProgress setPausable:YES ]; [self .uploadProgress setPausingHandler:^{ __typeof__(weakTask) strongTask = weakTask; [strongTask suspend]; }]; if ([self .uploadProgress respondsToSelector:@selector (setResumingHandler:)]) { [self .uploadProgress setResumingHandler:^{ __typeof__(weakTask) strongTask = weakTask; [strongTask resume]; }]; } [self .downloadProgress setCancellable:YES ]; [self .downloadProgress setCancellationHandler:^{ __typeof__(weakTask) strongTask = weakTask; [strongTask cancel]; }]; [self .downloadProgress setPausable:YES ]; [self .downloadProgress setPausingHandler:^{ __typeof__(weakTask) strongTask = weakTask; [strongTask suspend]; }]; if ([self .downloadProgress respondsToSelector:@selector (setResumingHandler:)]) { [self .downloadProgress setResumingHandler:^{ __typeof__(weakTask) strongTask = weakTask; [strongTask resume]; }]; } [task addObserver:self forKeyPath:NSStringFromSelector (@selector (countOfBytesReceived)) options:NSKeyValueObservingOptionNew context:NULL ]; [task addObserver:self forKeyPath:NSStringFromSelector (@selector (countOfBytesExpectedToReceive)) options:NSKeyValueObservingOptionNew context:NULL ]; [task addObserver:self forKeyPath:NSStringFromSelector (@selector (countOfBytesSent)) options:NSKeyValueObservingOptionNew context:NULL ]; [task addObserver:self forKeyPath:NSStringFromSelector (@selector (countOfBytesExpectedToSend)) options:NSKeyValueObservingOptionNew context:NULL ]; [self .downloadProgress addObserver:self forKeyPath:NSStringFromSelector (@selector (fractionCompleted)) options:NSKeyValueObservingOptionNew context:NULL ]; [self .uploadProgress addObserver:self forKeyPath:NSStringFromSelector (@selector (fractionCompleted)) options:NSKeyValueObservingOptionNew context:NULL ]; }
KVO 触发的监听方法:
1
2
3
4
5
6
7
8
9
10
11
12
13
14
15
16
17
18
19
20
21
22
23
24
25
26
27
- (void )observeValueForKeyPath:(NSString *)keyPath ofObject:(id )object change:(NSDictionary <NSString *,id > *)change context:(void *)context { if ([object isKindOfClass:[NSURLSessionTask class ]] || [object isKindOfClass:[NSURLSessionDownloadTask class ]]) { if ([keyPath isEqualToString:NSStringFromSelector (@selector (countOfBytesReceived))]) { self .downloadProgress.completedUnitCount = [change[NSKeyValueChangeNewKey ] longLongValue]; } else if ([keyPath isEqualToString:NSStringFromSelector (@selector (countOfBytesExpectedToReceive))]) { self .downloadProgress.totalUnitCount = [change[NSKeyValueChangeNewKey ] longLongValue]; } else if ([keyPath isEqualToString:NSStringFromSelector (@selector (countOfBytesSent))]) { self .uploadProgress.completedUnitCount = [change[NSKeyValueChangeNewKey ] longLongValue]; } else if ([keyPath isEqualToString:NSStringFromSelector (@selector (countOfBytesExpectedToSend))]) { self .uploadProgress.totalUnitCount = [change[NSKeyValueChangeNewKey ] longLongValue]; } } else if ([object isEqual:self .downloadProgress]) { if (self .downloadProgressBlock) { self .downloadProgressBlock(object); } } else if ([object isEqual:self .uploadProgress]) { if (self .uploadProgressBlock) { self .uploadProgressBlock(object); } } }
方法非常简单直观,主要就是如果task触发KVO,则给progress进度赋值,因为赋值了,所以会触发progress的KVO,也会调用到这里,然后去执行我们传进来的downloadProgressBlock和uploadProgressBlock。主要的作用就是为了让进度实时的传递。
主要是观摩一下大神的写代码的结构,这个解耦的编程思想,不愧是大神…
还有一点需要注意:我们之前的setProgress和这个KVO监听,都是在我们AF自定义的delegate内的,是有一个task就会有一个delegate的。所以说我们是每个task都会去监听这些属性,分别在各自的AF代理内。 看到这,可能有些小伙伴会有点乱,没关系。等整个讲完之后我们还会详细的去讲捋一捋manager、task、还有AF自定义代理三者之前的对应关系。
到这里我们整个对task的处理就完成了。
2.3 AFURLSessionManager中Session代理实现及转发 2.3.1 代理方法概览 接着task就开始请求网络了,还记得我们初始化方法中:
1 self .session = [NSURLSession sessionWithConfiguration:self .sessionConfiguration delegate:self delegateQueue:self .operationQueue];
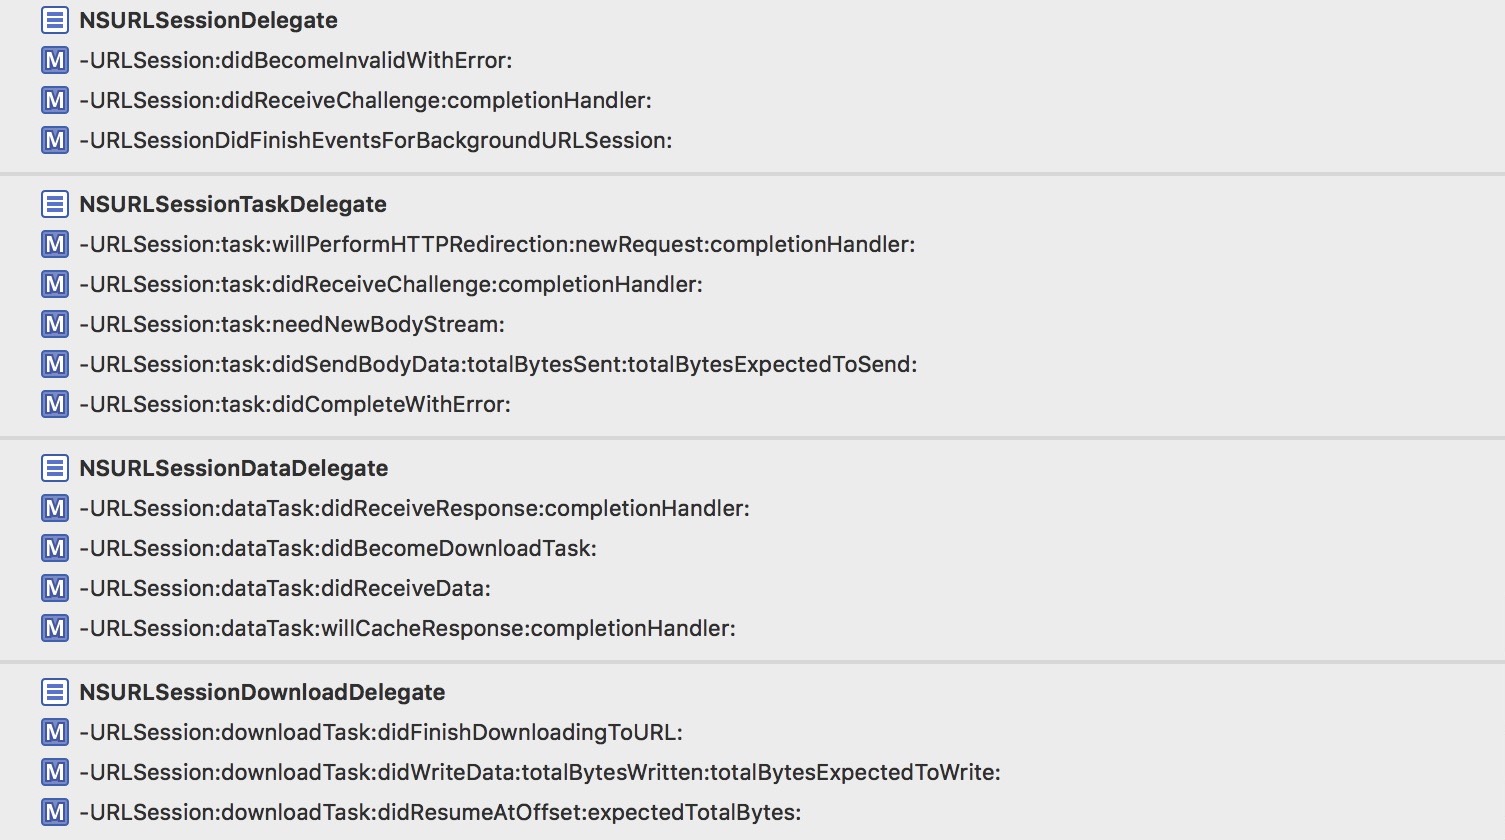
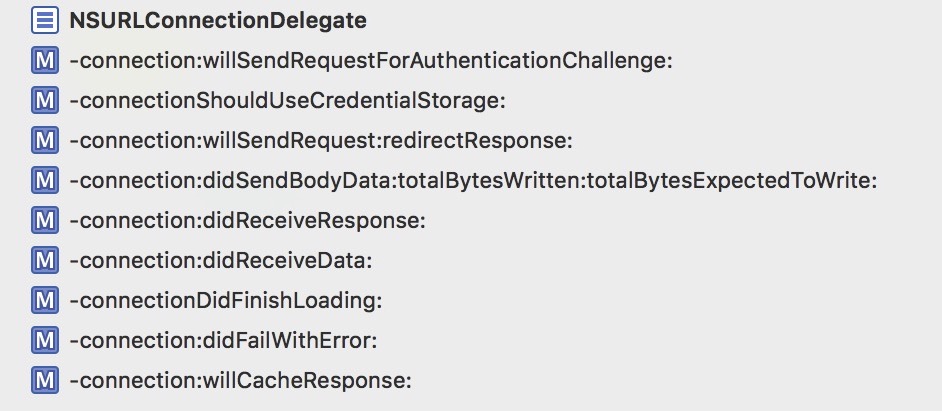
我们把AFUrlSessionManager作为了所有的task的delegate。当我们请求网络的时候,下图这些NSUrlSession的代理开始调用了:
AFUrlSessionManager一共实现了如上图所示这么一大堆NSUrlSession相关的代理。(小伙伴们的顺序可能不一样,楼主根据代理隶属重新排序了一下)
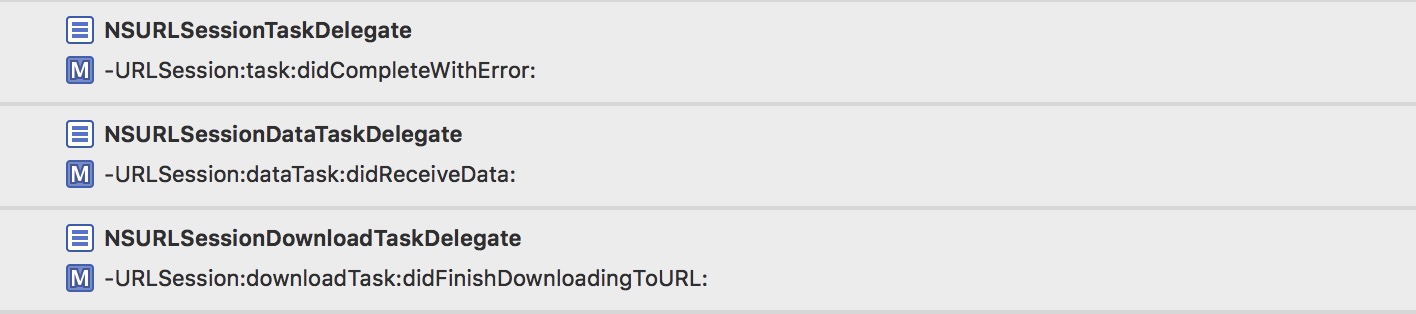
而只转发了其中3条到下图中AF自定义的delegate中:
这就是我们一开始说的,AFUrlSessionManager对这一大堆代理做了一些公共的处理,而转发到AF自定义代理的3条,则负责把每个task对应的数据回调出去。
又有小伙伴问了,我们设置的这个代理不是NSURLSessionDelegate吗?怎么能响应NSURLSession这么多代理呢?我们点到NSURLSession.h中去看看:
1
2
3
4
5
@protocol NSURLSessionDelegate <NSObject >@protocol NSURLSessionTaskDelegate <NSURLSessionDelegate >@protocol NSURLSessionDataDelegate <NSURLSessionTaskDelegate >@protocol NSURLSessionDownloadDelegate <NSURLSessionTaskDelegate >@protocol NSURLSessionStreamDelegate <NSURLSessionTaskDelegate >
我们可以看到这些代理都是继承关系,而在NSURLSession实现中,只要设置了这个代理,它会去判断这些所有的代理,是否respondsToSelector这些代理中的方法,如果响应了就会去调用。
而AF还重写了respondsToSelector方法:
1
2
3
4
5
6
7
8
9
10
11
12
13
14
- (BOOL)respondsToSelector:(SEL)selector { if (selector == @selector(URLSession:task:willPerformHTTPRedirection:newRequest:completionHandler:) ) { return self.taskWillPerformHTTPRedirection != nil; } else if (selector == @selector(URLSession:dataTask:didReceiveResponse:completionHandler:) ) { return self.dataTaskDidReceiveResponse != nil; } else if (selector == @selector(URLSession:dataTask:willCacheResponse:completionHandler:) ) { return self.dataTaskWillCacheResponse != nil; } else if (selector == @selector(URLSessionDidFinishEventsForBackgroundURLSession:) ) { return self.didFinishEventsForBackgroundURLSession != nil; } return [[self class ] instancesRespondToSelector :selector]; }
讲到这,我们顺便看看AFURLSessionManager的一些自定义Block:
1
2
3
4
5
6
7
8
9
10
11
12
13
14
15
@property (readwrite , nonatomic , copy ) AFURLSessionDidBecomeInvalidBlock sessionDidBecomeInvalid;@property (readwrite , nonatomic , copy ) AFURLSessionDidReceiveAuthenticationChallengeBlock sessionDidReceiveAuthenticationChallenge;@property (readwrite , nonatomic , copy ) AFURLSessionDidFinishEventsForBackgroundURLSessionBlock didFinishEventsForBackgroundURLSession;@property (readwrite , nonatomic , copy ) AFURLSessionTaskWillPerformHTTPRedirectionBlock taskWillPerformHTTPRedirection;@property (readwrite , nonatomic , copy ) AFURLSessionTaskDidReceiveAuthenticationChallengeBlock taskDidReceiveAuthenticationChallenge;@property (readwrite , nonatomic , copy ) AFURLSessionTaskNeedNewBodyStreamBlock taskNeedNewBodyStream;@property (readwrite , nonatomic , copy ) AFURLSessionTaskDidSendBodyDataBlock taskDidSendBodyData;@property (readwrite , nonatomic , copy ) AFURLSessionTaskDidCompleteBlock taskDidComplete;@property (readwrite , nonatomic , copy ) AFURLSessionDataTaskDidReceiveResponseBlock dataTaskDidReceiveResponse;@property (readwrite , nonatomic , copy ) AFURLSessionDataTaskDidBecomeDownloadTaskBlock dataTaskDidBecomeDownloadTask;@property (readwrite , nonatomic , copy ) AFURLSessionDataTaskDidReceiveDataBlock dataTaskDidReceiveData;@property (readwrite , nonatomic , copy ) AFURLSessionDataTaskWillCacheResponseBlock dataTaskWillCacheResponse;@property (readwrite , nonatomic , copy ) AFURLSessionDownloadTaskDidFinishDownloadingBlock downloadTaskDidFinishDownloading;@property (readwrite , nonatomic , copy ) AFURLSessionDownloadTaskDidWriteDataBlock downloadTaskDidWriteData;@property (readwrite , nonatomic , copy ) AFURLSessionDownloadTaskDidResumeBlock downloadTaskDidResume;
各自对应的还有一堆这样的set方法:
1
2
3
- (void )setSessionDidBecomeInvalidBlock:(void (^)(NSURLSession *session, NSError *error))block { self .sessionDidBecomeInvalid = block; }
方法都是一样的,就不重复粘贴占篇幅了。主要谈谈这个设计思路
作者用@property把这些Block属性在.m文件中声明,然后复写了set方法。
然后在.h中去声明这些set方法:
1 - (void )setSessionDidBecomeInvalidBlock:(nullable void (^)(NSURLSession *session, NSError *error))block;
为什么要绕这么一大圈呢?原来这是为了我们这些用户使用起来方便,调用set方法去设置这些Block,能很清晰的看到Block的各个参数与返回值。 大神的精髓的编程思想无处不体现…
接下来我们就讲讲这些代理方法做了什么(按照顺序来):
2.3.2 NSURLSessionDelegate实现 01. URLSession:didBecomeInvalidWithError 1 2 3 4 5 6 7 8 9 10 11 12 13 14 15 - (void )URLSession:(NSURLSession *)session didBecomeInvalidWithError:(NSError *)error { if (self .sessionDidBecomeInvalid) { self .sessionDidBecomeInvalid(session, error); } [[NSNotificationCenter defaultCenter] postNotificationName:AFURLSessionDidInvalidateNotification object:session]; }
方法调用时机注释写的很清楚,就调用了一下我们自定义的Block,还发了一个失效的通知,至于这个通知有什么用。很抱歉,AF没用它做任何事,只是发了…目的是用户自己可以利用这个通知做什么事吧。
其实AF大部分通知都是如此。当然,还有一部分通知AF还是有自己用到的,包括配合对UIKit的一些扩展来使用,后面我们会有单独篇幅展开讲讲这些UIKit的扩展类的实现。
02. URLSession:didReceiveChallenge 1 2 3 4 5 6 - (void )URLSession:(NSURLSession *)session didReceiveChallenge:(NSURLAuthenticationChallenge *)challenge completionHandler:(void (^)(NSURLSessionAuthChallengeDisposition disposition, NSURLCredential *credential))completionHandler { }
03. URLSessionDidFinishEventsForBackgro.. 1 2 3 4 5 6 7 8 - (void )URLSessionDidFinishEventsForBackgroundURLSession:(NSURLSession *)session { if (self .didFinishEventsForBackgroundURLSession) { dispatch_async (dispatch_get_main_queue(), ^{ self .didFinishEventsForBackgroundURLSession(session); }); } }
官方文档翻译:
函数讨论:
在iOS中,当一个后台传输任务完成或者后台传输时需要证书,而此时你的app正在后台挂起,那么你的app在后台会自动重新启动运行,并且这个app的UIApplicationDelegate会发送一个application:handleEventsForBackgroundURLSession:completionHandler: 消息。该消息包含了对应后台的session的identifier,而且这个消息会导致你的app启动。你的app随后应该先存储completion handler,然后再使用相同的identifier创建一个background configuration,并根据这个background configuration创建一个新的session。这个新创建的session会自动与后台任务重新关联在一起。
当你的app获取了一个URLSessionDidFinishEventsForBackgroundURLSession:消息,这就意味着之前这个session中已经入队的所有消息都转发出去了,这时候再调用先前存取的completion handler是安全的,或者因为内部更新而导致调用completion handler也是安全的。
2.3.3 NSURLSessionTaskDelegate实现 1 2 3 4 5 6 7 8 9 10 11 12 13 14 15 16 17 18 19 20 - (void )URLSession:(NSURLSession *)session task:(NSURLSessionTask *)task willPerformHTTPRedirection:(NSHTTPURLResponse *)response newRequest:(NSURLRequest *)request completionHandler:(void (^)(NSURLRequest *))completionHandler { NSURLRequest *redirectRequest = request; if (self .taskWillPerformHTTPRedirection) { redirectRequest = self .taskWillPerformHTTPRedirection(session, task, response, request); } if (completionHandler) { completionHandler(redirectRequest); } }
一开始我以为这个方法是类似NSURLProtocol,可以在请求时自己主动的去重定向request,后来发现不是,这个方法是在服务器去重定向的时候,才会被调用。为此我写了段简单的PHP测了测:
1 2 3 4 5 6 7 8 9 <?php defined('BASEPATH' ) OR exit ('No direct script access allowed' ); class Welcome extends CI_Controller public function index ( { header("location: http://www.huixionghome.cn/" ); } }
证实确实如此,当我们服务器重定向的时候,代理就被调用了,我们可以去重新定义这个重定向的request。
关于这个代理还有一些需要注意的地方:此方法只会在default session或者ephemeral session中调用,而在background session中,session task会自动重定向。(这里指的模式是我们一开始初始化 session时的模式)。
05.URLSession:task:didReceiveChallenge 1 2 3 4 5 6 7 8 9 10 11 12 13 14 15 16 17 18 19 20 21 22 23 24 25 26 27 28 - (void )URLSession:(NSURLSession *)session task:(NSURLSessionTask *)task didReceiveChallenge:(NSURLAuthenticationChallenge *)challenge completionHandler:(void (^)(NSURLSessionAuthChallengeDisposition disposition, NSURLCredential *credential))completionHandler { NSURLSessionAuthChallengeDisposition disposition = NSURLSessionAuthChallengePerformDefaultHandling ; __block NSURLCredential *credential = nil ; if (self .taskDidReceiveAuthenticationChallenge) { disposition = self .taskDidReceiveAuthenticationChallenge(session, task, challenge, &credential); } else { if ([challenge.protectionSpace.authenticationMethod isEqualToString:NSURLAuthenticationMethodServerTrust ]) { if ([self .securityPolicy evaluateServerTrust:challenge.protectionSpace.serverTrust forDomain:challenge.protectionSpace.host]) { disposition = NSURLSessionAuthChallengeUseCredential ; credential = [NSURLCredential credentialForTrust:challenge.protectionSpace.serverTrust]; } else { disposition = NSURLSessionAuthChallengeCancelAuthenticationChallenge ; } } else { disposition = NSURLSessionAuthChallengePerformDefaultHandling ; } } if (completionHandler) { completionHandler(disposition, credential); } }
鉴于篇幅,就不去贴官方文档的翻译了,大概总结一下:
之前我们也有一个https认证,功能一样,执行的内容也完全一样。
区别在于这个是non-session-level级别的认证,而之前的是session-level级别的。
相对于它,多了一个参数task,然后调用我们自定义的Block会多回传这个task作为参数,这样我们就可以根据每个task去自定义我们需要的https认证方式。
06. URLSession:task:needNewBodyStream 1 2 3 4 5 6 7 8 9 10 11 12 13 14 15 16 17 18 19 - (void )URLSession:(NSURLSession *)session task:(NSURLSessionTask *)task needNewBodyStream:(void (^)(NSInputStream *bodyStream))completionHandler { NSInputStream *inputStream = nil ; if (self .taskNeedNewBodyStream) { inputStream = self .taskNeedNewBodyStream(session, task); } else if (task.originalRequest.HTTPBodyStream && [task.originalRequest.HTTPBodyStream conformsToProtocol:@protocol (NSCopying )]) inputStream = [task.originalRequest.HTTPBodyStream copy ]; } if (completionHandler) { completionHandler(inputStream); } }
该代理方法会在下面两种情况被调用:
如果task是由uploadTaskWithStreamedRequest:创建的,那么提供初始的request body stream时候会调用该代理方法。
因为认证挑战或者其他可恢复的服务器错误,而导致需要客户端重新发送一个含有body stream的request,这时候会调用该代理。
07. URLSession:task:didSendBodyData 1 2 3 4 5 6 7 8 9 10 11 12 13 14 15 16 17 18 19 20 21 22 23 - (void )URLSession:(NSURLSession *)session task:(NSURLSessionTask *)task didSendBodyData:(int64_t)bytesSent totalBytesSent:(int64_t)totalBytesSent totalBytesExpectedToSend:(int64_t)totalBytesExpectedToSend { int64_t totalUnitCount = totalBytesExpectedToSend; if (totalUnitCount == NSURLSessionTransferSizeUnknown ) { NSString *contentLength = [task.originalRequest valueForHTTPHeaderField:@"Content-Length" ]; if (contentLength) { totalUnitCount = (int64_t) [contentLength longLongValue]; } } if (self .taskDidSendBodyData) { self .taskDidSendBodyData(session, task, bytesSent, totalBytesSent, totalUnitCount); } }
就是每次发送数据给服务器,会回调这个方法,通知已经发送了多少,总共要发送多少。
代理方法里也就是仅仅调用了我们自定义的Block而已。
08. URLSession:task:didCompleteWithError 1 2 3 4 5 6 7 8 9 10 11 12 13 14 15 16 17 18 19 20 21 22 23 24 25 - (void )URLSession:(NSURLSession *)session task:(NSURLSessionTask *)task didCompleteWithError:(NSError *)error { AFURLSessionManagerTaskDelegate *delegate = [self delegateForTask:task]; if (delegate) { [delegate URLSession:session task:task didCompleteWithError:error]; [self removeDelegateForTask:task]; } if (self .taskDidComplete) { self .taskDidComplete(session, task, error); } }
这个代理就是task完成了的回调,方法内做了下面这几件事:
在这里我们拿到了之前和这个task对应绑定的AF的delegate:
1 2 3 4 5 6 7 8 9 10 - (AFURLSessionManagerTaskDelegate *)delegateForTask:(NSURLSessionTask *)task { NSParameterAssert (task); AFURLSessionManagerTaskDelegate *delegate = nil ; [self .lock lock]; delegate = self .mutableTaskDelegatesKeyedByTaskIdentifier[@(task.taskIdentifier)]; [self .lock unlock]; return delegate; }
去转发了调用了AF代理的方法。这个等我们下面讲完NSUrlSession的代理之后会详细说。
然后把这个AF的代理和task的绑定解除了,并且移除了相关的progress和通知:
1 2 3 4 5 6 7 8 9 10 - (void )removeDelegateForTask:(NSURLSessionTask *)task { NSParameterAssert (task); AFURLSessionManagerTaskDelegate *delegate = [self delegateForTask:task]; [self .lock lock]; [delegate cleanUpProgressForTask:task]; [self removeNotificationObserverForTask:task]; [self .mutableTaskDelegatesKeyedByTaskIdentifier removeObjectForKey:@(task.taskIdentifier)]; [self .lock unlock]; }
调用了自定义的Blcok:self.taskDidComplete(session, task, error);
代码还是很简单的,至于这个通知,我们等会再来补充吧。
2.3.4 NSURLSessionDataDelegate实现 09. URLSession:dataTask:didReceiveResponse 1 2 3 4 5 6 7 8 9 10 11 12 13 14 15 16 17 18 - (void )URLSession:(NSURLSession *)session dataTask:(NSURLSessionDataTask *)dataTask didReceiveResponse:(NSURLResponse *)response completionHandler:(void (^)(NSURLSessionResponseDisposition disposition))completionHandler { NSURLSessionResponseDisposition disposition = NSURLSessionResponseAllow ; if (self .dataTaskDidReceiveResponse) { disposition = self .dataTaskDidReceiveResponse(session, dataTask, response); } if (completionHandler) { completionHandler(disposition); } }
官方文档翻译如下:
函数作用:告诉代理,该data task获取到了服务器端传回的最初始回复(response)。注意其中的completionHandler这个block,通过传入一个类型为NSURLSessionResponseDisposition的变量来决定该传输任务接下来该做什么:
NSURLSessionResponseAllow 该task正常进行
NSURLSessionResponseCancel 该task会被取消
NSURLSessionResponseBecomeDownload 会调用URLSession:dataTask:didBecomeDownloadTask:方法来新建一个download task以代替当前的data task
NSURLSessionResponseBecomeStream 转成一个StreamTask
函数讨论:
该方法是可选的,除非你必须支持“multipart/x-mixed-replace”类型的content-type。因为如果你的request中包含了这种类型的content-type,服务器会将数据分片传回来,而且每次传回来的数据会覆盖之前的数据。每次返回新的数据时,session都会调用该函数,你应该在这个函数中合理地处理先前的数据,否则会被新数据覆盖。如果你没有提供该方法的实现,那么session将会继续任务,也就是说会覆盖之前的数据。
总结一下:
当你把添加content-type的类型为 multipart/x-mixed-replace 那么服务器的数据会分片的传回来。然后这个方法是每次接受到对应片响应的时候会调被调用。你可以去设置上述4种对这个task的处理。
如果我们实现了自定义Block,则调用一下,不然就用默认的NSURLSessionResponseAllow方式。
10. URLSession:dataTask:didBecomeDownloadTask 1 2 3 4 5 6 7 8 9 10 11 12 13 14 15 16 - (void )URLSession:(NSURLSession *)session dataTask:(NSURLSessionDataTask *)dataTask didBecomeDownloadTask:(NSURLSessionDownloadTask *)downloadTask { AFURLSessionManagerTaskDelegate *delegate = [self delegateForTask:dataTask]; if (delegate) { [self removeDelegateForTask:dataTask]; [self setDelegate:delegate forTask:downloadTask]; } if (self .dataTaskDidBecomeDownloadTask) { self .dataTaskDidBecomeDownloadTask(session, dataTask, downloadTask); } }
按照顺序来,其实还有个AF没有去实现的代理:
1 2 3 - (void )URLSession:(NSURLSession *)session dataTask:(NSURLSessionDataTask *)dataTask didBecomeStreamTask:(NSURLSessionStreamTask *)streamTask;
这个也是之前的那个代理,设置为NSURLSessionResponseBecomeStream则会调用到这个代理里来。会新生成一个NSURLSessionStreamTask来替换掉之前的dataTask。
11. URLSession:dataTask:didReceiveData 1 2 3 4 5 6 7 8 9 10 11 - (void )URLSession:(NSURLSession *)session dataTask:(NSURLSessionDataTask *)dataTask didReceiveData:(NSData *)data { AFURLSessionManagerTaskDelegate *delegate = [self delegateForTask:dataTask]; [delegate URLSession:session dataTask:dataTask didReceiveData:data]; if (self .dataTaskDidReceiveData) { self .dataTaskDidReceiveData(session, dataTask, data); } }
这个方法和上面didCompleteWithError算是NSUrlSession的代理中最重要的两个方法了。
我们转发了这个方法到AF的代理中去,所以数据的拼接都是在AF的代理中进行的。这也是情理中的,毕竟每个响应数据都是对应各个task,各个AF代理的。在AFURLSessionManager都只是做一些公共的处理。
12. URLSession:dataTask:willCacheResponse 1 2 3 4 5 6 7 8 9 10 11 12 13 14 15 16 - (void )URLSession:(NSURLSession *)session dataTask:(NSURLSessionDataTask *)dataTask willCacheResponse:(NSCachedURLResponse *)proposedResponse completionHandler:(void (^)(NSCachedURLResponse *cachedResponse))completionHandler { NSCachedURLResponse *cachedResponse = proposedResponse; if (self .dataTaskWillCacheResponse) { cachedResponse = self .dataTaskWillCacheResponse(session, dataTask, proposedResponse); } if (completionHandler) { completionHandler(cachedResponse); } }
官方文档翻译如下:
函数作用:
询问data task或上传任务(upload task)是否缓存response。
函数讨论:
当task接收到所有期望的数据后,session会调用此代理方法。如果你没有实现该方法,那么就会使用创建session时使用的configuration对象决定缓存策略。这个代理方法最初的目的是为了阻止缓存特定的URLs或者修改NSCacheURLResponse对象相关的userInfo字典。
该方法只会当request决定缓存response时候调用。作为准则,responses只会当以下条件都成立的时候返回缓存:
该request是HTTP或HTTPS URL的请求(或者你自定义的网络协议,并且确保该协议支持缓存)
确保request请求是成功的(返回的status code为200-299)
返回的response是来自服务器端的,而非缓存中本身就有的
提供的NSURLRequest对象的缓存策略要允许进行缓存
服务器返回的response中与缓存相关的header要允许缓存
该response的大小不能比提供的缓存空间大太多(比如你提供了一个磁盘缓存,那么response大小一定不能比磁盘缓存空间还要大5%)
总结一下就是一个用来缓存response的方法,方法中调用了我们自定义的Block,自定义一个response用来缓存。
2.3.5 NSURLSessionDownloadDelegate实现 13. URLSession:downloadTask:didFinishDown… 1 2 3 4 5 6 7 8 9 10 11 12 13 14 15 16 17 18 19 20 21 22 23 24 25 26 27 28 - (void )URLSession:(NSURLSession *)session downloadTask:(NSURLSessionDownloadTask *)downloadTask didFinishDownloadingToURL:(NSURL *)location { AFURLSessionManagerTaskDelegate *delegate = [self delegateForTask:downloadTask]; if (self .downloadTaskDidFinishDownloading) { NSURL *fileURL = self .downloadTaskDidFinishDownloading(session, downloadTask, location); if (fileURL) { delegate.downloadFileURL = fileURL; NSError *error = nil ; [[NSFileManager defaultManager] moveItemAtURL:location toURL:fileURL error:&error]; if (error) { [[NSNotificationCenter defaultCenter] postNotificationName:AFURLSessionDownloadTaskDidFailToMoveFileNotification object:downloadTask userInfo:error.userInfo]; } return ; } } if (delegate) { [delegate URLSession:session downloadTask:downloadTask didFinishDownloadingToURL:location]; } }
这个方法和之前的两个方法:
1 2 - (void )URLSession:(NSURLSession *)session task:(NSURLSessionTask *)taskdidCompleteWithError:(NSError *)error; - (void )URLSession:(NSURLSession *)session dataTask:(NSURLSessionDataTask *)dataTask didReceiveData:(NSData *)data;
总共就这3个方法,被转调到AF自定义delegate中。
方法做了什么看注释应该很简单,就不赘述了。
14. URLSession:downloadTask:didWriteData 1 2 3 4 5 6 7 8 9 10 11 - (void )URLSession:(NSURLSession *)session downloadTask:(NSURLSessionDownloadTask *)downloadTask didWriteData:(int64_t)bytesWritten totalBytesWritten:(int64_t)totalBytesWritten totalBytesExpectedToWrite:(int64_t)totalBytesExpectedToWrite { if (self .downloadTaskDidWriteData) { self .downloadTaskDidWriteData(session, downloadTask, bytesWritten, totalBytesWritten, totalBytesExpectedToWrite); } }
简单说一下这几个参数:
bytesWritten表示自上次调用该方法后,接收到的数据字节数
totalBytesWritten表示目前已经接收到的数据字节数
totalBytesExpectedToWrite表示期望收到的文件总字节数,是由Content-Length header提供。如果没有提供,默认是NSURLSessionTransferSizeUnknown。
15. URLSession:downloadTask:didResumeAtOffset 1 2 3 4 5 6 7 8 9 10 11 - (void )URLSession:(NSURLSession *)session downloadTask:(NSURLSessionDownloadTask *)downloadTask didResumeAtOffset:(int64_t)fileOffset expectedTotalBytes:(int64_t)expectedTotalBytes { if (self .downloadTaskDidResume) { self .downloadTaskDidResume(session, downloadTask, fileOffset, expectedTotalBytes); } }
官方文档翻译:
函数作用:
函数讨论:
如果一个正在下载任务被取消或者失败了,你可以请求一个resumeData对象(比如在userInfo字典中通过NSURLSessionDownloadTaskResumeData这个键来获取到resumeData)并使用它来提供足够的信息以重新开始下载任务。1 2 3 4 5 6 7 8 9 10 11 12 13 14 15 16 17 [self .downloadTask cancelByProducingResumeData:^(NSData * _Nullable resumeData) { [resumeData writeToFile:@"本地路径" atomically:YES ]; }]; - (void )URLSession:(NSURLSession *)session task:(NSURLSessionTask *)task didCompleteWithError:(NSError *)error { if (error) { if ([error.userInfo objectForKey:NSURLSessionDownloadTaskResumeData ]) { NSData *resumeData = [error.userInfo objectForKey:NSURLSessionDownloadTaskResumeData ]; self .downloadTask = [self .backgroundSession downloadTaskWithResumeData: resumeData]; [self .downloadTask resume]; } } }
随后,你可以使用resumeData作为downloadTaskWithResumeData:或downloadTaskWithResumeData:completionHandler:的参数。当你调用这些方法时,你将开始一个新的下载任务。一旦你继续下载任务,session会调用它的代理方法URLSession:downloadTask:didResumeAtOffset:expectedTotalBytes:其中的downloadTask参数表示的就是新的下载任务,这也意味着下载重新开始了。
总结一下:
其实这个就是用来做断点续传的代理方法。 可以在下载失败的时候,拿到我们失败的拼接的部分resumeData,然后用去调用downloadTaskWithResumeData:就会调用到这个代理方法来了。其中注意:fileOffset这个参数,如果文件缓存策略或者最后文件更新日期阻止重用已经存在的文件内容,那么该值为0。否则,该值表示当前已经下载data的偏移量。
方法中仅仅调用了downloadTaskDidResume自定义Block。
至此NSUrlSesssion的delegate讲完了。大概总结下:
每个代理方法对应一个我们自定义的Block,如果Block被赋值了,那么就调用它。
在这些代理方法里,我们做的处理都是相对于这个sessionManager所有的request的。是公用的处理。
转发了3个代理方法到AF的deleagate中去了,AF中的deleagate是需要对应每个task去私有化处理的 。
2.3.6 转发到AFURLSxxMxxTaskDelegate的方法 接下来我们来看从 AFURLSessionManager 中转发到 AFURLSessionManagerTaskDelegate 的deleagate,一共3个方法:
1. URLSession:task:didCompleteWithError 1 2 3 4 5 6 7 8 9 10 11 12 13 14 15 16 17 18 19 20 21 22 23 24 25 26 27 28 29 30 31 32 33 34 35 36 37 38 39 40 41 42 43 44 45 46 47 48 49 50 51 52 53 54 55 56 57 58 59 60 61 62 63 64 65 66 67 68 69 70 71 72 73 74 75 76 77 78 79 80 81 82 83 84 85 86 87 - (void )URLSession:(__unused NSURLSession *)session task:(NSURLSessionTask *)task didCompleteWithError:(NSError *)error { #pragma clang diagnostic push #pragma clang diagnostic ignored "-Wgnu" __strong AFURLSessionManager *manager = self .manager; __block id responseObject = nil ; __block NSMutableDictionary *userInfo = [NSMutableDictionary dictionary]; userInfo[AFNetworkingTaskDidCompleteResponseSerializerKey] = manager.responseSerializer; NSData *data = nil ; if (self .mutableData) { data = [self .mutableData copy ]; self .mutableData = nil ; } if (self .downloadFileURL) { userInfo[AFNetworkingTaskDidCompleteAssetPathKey] = self .downloadFileURL; } else if (data) { userInfo[AFNetworkingTaskDidCompleteResponseDataKey] = data; } if (error) { userInfo[AFNetworkingTaskDidCompleteErrorKey] = error; dispatch_group_async(manager.completionGroup ?: url_session_manager_completion_group(), manager.completionQueue ?: dispatch_get_main_queue(), ^{ if (self .completionHandler) { self .completionHandler(task.response, responseObject, error); } dispatch_async (dispatch_get_main_queue(), ^{ [[NSNotificationCenter defaultCenter] postNotificationName:AFNetworkingTaskDidCompleteNotification object:task userInfo:userInfo]; }); }); } else { dispatch_async (url_session_manager_processing_queue(), ^{ NSError *serializationError = nil ; responseObject = [manager.responseSerializer responseObjectForResponse:task.response data:data error:&serializationError]; if (self .downloadFileURL) { responseObject = self .downloadFileURL; } if (responseObject) { userInfo[AFNetworkingTaskDidCompleteSerializedResponseKey] = responseObject; } if (serializationError) { userInfo[AFNetworkingTaskDidCompleteErrorKey] = serializationError; } dispatch_group_async(manager.completionGroup ?: url_session_manager_completion_group(), manager.completionQueue ?: dispatch_get_main_queue(), ^{ if (self .completionHandler) { self .completionHandler(task.response, responseObject, serializationError); } dispatch_async (dispatch_get_main_queue(), ^{ [[NSNotificationCenter defaultCenter] postNotificationName:AFNetworkingTaskDidCompleteNotification object:task userInfo:userInfo]; }); }); }); } #pragma clang diagnostic pop }
这个方法是NSURLSession任务完成的代理方法中,主动调用过来的。配合注释,应该代码很容易读,这个方法大概做了以下几件事:
生成了一个存储这个task相关信息的字典:userInfo,这个字典是用来作为发送任务完成的通知的参数。
判断了参数error的值,来区分请求成功还是失败。
如果成功则在一个AF的并行queue中,去做数据解析等后续操作:
1 2 3 4 5 6 7 8 9 static dispatch_queue_t url_session_manager_processing_queue() { static dispatch_queue_t af_url_session_manager_processing_queue; static dispatch_once_t onceToken; dispatch_once (&onceToken, ^{ af_url_session_manager_processing_queue = dispatch_queue_create("com.alamofire.networking.session.manager.processing" , DISPATCH_QUEUE_CONCURRENT); }); return af_url_session_manager_processing_queue; }
注意AF的优化的点:虽然代理回调是串行的(参考2.1.2小节 maxConcurrentOperationCount属性)。但是数据解析这种费时操作,确是用并行线程来做的。
然后根据我们一开始设置的responseSerializer来解析data。如果解析成功,调用成功的回调,否则调用失败的回调。我们重点来看看返回数据解析这行:
1 responseObject = [manager.responseSerializer responseObjectForResponse:task.response data:data error:&serializationError];
我们点进去看看:
1 2 3 4 5 6 @protocol AFURLResponseSerialization <NSObject , NSSecureCoding , NSCopying >- (nullable id )responseObjectForResponse:(nullable NSURLResponse *)response data:(nullable NSData *)data error:(NSError * _Nullable __autoreleasing *)error NS_SWIFT_NOTHROW ; @end
原来就是这么一个协议方法,各种类型的responseSerializer类,都是遵守这个协议方法,实现了一个把我们请求到的data转换为我们需要的类型的数据的方法。至于各种类型的responseSerializer如何解析数据,我们到代理讲完再来补充。
这边还做了一个判断,如果自定义了GCD完成组completionGroup和完成队列的话completionQueue,会在加入这个组和在队列中回调Block。否则默认的是AF的创建的组:
1 2 3 4 5 6 7 8 9 static dispatch_group_t url_session_manager_completion_group() { static dispatch_group_t af_url_session_manager_completion_group; static dispatch_once_t onceToken; dispatch_once (&onceToken, ^{ af_url_session_manager_completion_group = dispatch_group_create(); }); return af_url_session_manager_completion_group; }
和主队列回调。AF没有用这个GCD组做任何处理,只是提供这个接口,让我们有需求的自行调用处理。 如果有对多个任务完成度的监听,可以自行处理。
回到主线程,发送了任务完成的通知:
1 2 3 dispatch_async (dispatch_get_main_queue(), ^{ [[NSNotificationCenter defaultCenter] postNotificationName:AFNetworkingTaskDidCompleteNotification object:task userInfo:userInfo]; });
这个通知这回AF有用到了,在我们对UIKit的扩展中,用到了这个通知。
2. URLSession:dataTask:didReceiveData 1 2 3 4 5 6 7 - (void )URLSession:(__unused NSURLSession *)session dataTask:(__unused NSURLSessionDataTask *)dataTask didReceiveData:(NSData *)data { [self .mutableData appendData:data]; }
同样被NSUrlSession代理转发到这里,拼接了需要回调的数据。
3. URLSession:downloadTask:didFinishDownload… 1 2 3 4 5 6 7 8 9 10 11 12 13 14 15 16 17 18 19 20 21 22 23 - (void )URLSession:(NSURLSession *)session downloadTask:(NSURLSessionDownloadTask *)downloadTask didFinishDownloadingToURL:(NSURL *)location { NSError *fileManagerError = nil ; self .downloadFileURL = nil ; if (self .downloadTaskDidFinishDownloading) { self .downloadFileURL = self .downloadTaskDidFinishDownloading(session, downloadTask, location); if (self .downloadFileURL) { [[NSFileManager defaultManager] moveItemAtURL:location toURL:self .downloadFileURL error:&fileManagerError]; if (fileManagerError) { [[NSNotificationCenter defaultCenter] postNotificationName:AFURLSessionDownloadTaskDidFailToMoveFileNotification object:downloadTask userInfo:fileManagerError.userInfo]; } } } }
下载成功了被NSUrlSession代理转发到这里,这里有个地方需要注意下:
之前的NSUrlSession代理和这里都移动了文件到下载路径,而NSUrlSession代理的下载路径是所有request公用的下载路径,一旦设置,所有的request都会下载到之前那个路径。
而这个是对应的每个task的,每个task可以设置各自下载路径,还记得AFHttpManager的download方法么
1 2 3 4 [manager downloadTaskWithRequest:resquest progress:nil destination:^NSURL * _Nonnull(NSURL * _Nonnull targetPath, NSURLResponse * _Nonnull response) { return path; } completionHandler:^(NSURLResponse * _Nonnull response, NSURL * _Nullable filePath, NSError * _Nullable error) { }];
这个地方return的path就是对应的这个代理方法里的path,我们调用最终会走到这么一个方法:
1 2 3 4 5 6 7 8 9 10 11 12 13 14 15 16 17 18 19 20 21 22 23 24 25 - (void )addDelegateForDownloadTask:(NSURLSessionDownloadTask *)downloadTask progress:(void (^)(NSProgress *downloadProgress)) downloadProgressBlock destination:(NSURL * (^)(NSURL *targetPath, NSURLResponse *response))destination completionHandler:(void (^)(NSURLResponse *response, NSURL *filePath, NSError *error))completionHandler { AFURLSessionManagerTaskDelegate *delegate = [[AFURLSessionManagerTaskDelegate alloc] init]; delegate.manager = self ; delegate.completionHandler = completionHandler; if (destination) { delegate.downloadTaskDidFinishDownloading = ^NSURL * (NSURLSession * __unused session, NSURLSessionDownloadTask *task, NSURL *location) { return destination(location, task.response); }; } downloadTask.taskDescription = self .taskDescriptionForSessionTasks; [self setDelegate:delegate forTask:downloadTask]; delegate.downloadProgressBlock = downloadProgressBlock; }
清楚的可以看到地址被赋值给AF的Block了。
至此AF的代理也讲完了,数据或错误信息随着AF代理成功失败回调,回到了用户的手中。
2.4 _AFURLSessionTaskSwizzling类 在AFURLSessionManager中,有这么一个类:_AFURLSessionTaskSwizzling。这个类大概的作用就是替换掉NSURLSession中的resume和suspend方法。正常处理原有逻辑的同时,多发送一个通知,以下是我们需要替换的新方法:
1 2 3 4 5 6 7 8 9 10 11 12 13 14 15 16 17 18 19 20 21 - (void )af_resume { NSAssert ([self respondsToSelector:@selector (state)], @"Does not respond to state" ); NSURLSessionTaskState state = [self state]; [self af_resume]; if (state != NSURLSessionTaskStateRunning ) { [[NSNotificationCenter defaultCenter] postNotificationName:AFNSURLSessionTaskDidResumeNotification object:self ]; } } - (void )af_suspend { NSAssert ([self respondsToSelector:@selector (state)], @"Does not respond to state" ); NSURLSessionTaskState state = [self state]; [self af_suspend]; if (state != NSURLSessionTaskStateSuspended ) { [[NSNotificationCenter defaultCenter] postNotificationName:AFNSURLSessionTaskDidSuspendNotification object:self ]; } }
这块知识是关于OC的Runtime:method swizzling的,如果有不清楚的地方,可以看看这里method swizzling–by冰霜 或者自行查阅。
1 2 3 4 5 6 7 8 9 10 11 12 13 14 15 16 17 18 19 20 21 22 23 24 25 26 27 28 29 30 31 32 33 34 35 36 37 38 39 40 41 42 + (void )load { if (NSClassFromString (@"NSURLSessionTask" )) { NSURLSessionConfiguration *configuration = [NSURLSessionConfiguration ephemeralSessionConfiguration]; NSURLSession * session = [NSURLSession sessionWithConfiguration:configuration]; #pragma GCC diagnostic push #pragma GCC diagnostic ignored "-Wnonnull" NSURLSessionDataTask *localDataTask = [session dataTaskWithURL:nil ]; #pragma clang diagnostic pop IMP originalAFResumeIMP = method_getImplementation(class_getInstanceMethod([self class ], @selector (af_resume))); Class currentClass = [localDataTask class ]; while (class_getInstanceMethod(currentClass, @selector (resume))) { Class superClass = [currentClass superclass]; IMP classResumeIMP = method_getImplementation(class_getInstanceMethod(currentClass, @selector (resume))); IMP superclassResumeIMP = method_getImplementation(class_getInstanceMethod(superClass, @selector (resume))); if (classResumeIMP != superclassResumeIMP && originalAFResumeIMP != classResumeIMP) { [self swizzleResumeAndSuspendMethodForClass:currentClass]; } currentClass = [currentClass superclass]; } [localDataTask cancel]; [session finishTasksAndInvalidate]; } }
原方法中有大量的英文注释,我把它翻译过来如下:
其余的一部分翻译在注释中,对应那一行代码。大概总结下这个注释:
其实这是被社区大量讨论的一个bug,之前AF因为这个替换方法,会导致偶发性的crash,如果不要这个swizzle则问题不会再出现,但是这样会导致AF中很多UIKit的扩展都不能正常使用。
原来这是因为iOS7和iOS8的NSURLSessionTask的继承链不同导致的, 而且在iOS7继承链中会有两个类都实现了resume和suspend方法。而且子类没有调用父类的方法,我们则需要对着两个类都进行方法替换。而iOS8只需要对一个类进行替换。对着注释看,上述方法代码不难理解,用一个while循环,一级一级去获取父类,如果实现了resume方法,则进行替换。
但是有几个点大家可能会觉得疑惑的,我们先把这个方法调用的替换的函数一块贴出来。
1 2 3 4 5 6 7 8 9 10 11 12 13 14 15 16 17 18 19 20 21 + (void )swizzleResumeAndSuspendMethodForClass:(Class)theClass { Method afResumeMethod = class_getInstanceMethod(self , @selector (af_resume)); Method afSuspendMethod = class_getInstanceMethod(self , @selector (af_suspend)); if (af_addMethod(theClass, @selector (af_resume), afResumeMethod)) { af_swizzleSelector(theClass, @selector (resume), @selector (af_resume)); } if (af_addMethod(theClass, @selector (af_suspend), afSuspendMethod)) { af_swizzleSelector(theClass, @selector (suspend), @selector (af_suspend)); } } static inline void af_swizzleSelector(Class theClass, SEL originalSelector, SEL swizzledSelector) { Method originalMethod = class_getInstanceMethod(theClass, originalSelector); Method swizzledMethod = class_getInstanceMethod(theClass, swizzledSelector); method_exchangeImplementations(originalMethod, swizzledMethod); } static inline BOOL af_addMethod(Class theClass, SEL selector, Method method) { return class_addMethod(theClass, selector, method_getImplementation(method), method_getTypeEncoding(method)); }
因为有小伙伴问到过,所以我们来分析分析大家可能会觉得疑惑的地方:
首先可以注意class_getInstanceMethod这个方法,它会获取到当前类继承链逐级往上,第一个实现的该方法。所以说它获取到的方法不能确定是当前类还是父类的。而且这里也没有用dispatch_once_t来保证一个方法只交换一次,那万一这是父类的方法,当前类换一次,父类又换一次,不是等于没交换么?…请注意这行判断:
1 2 3 4 5 if (classResumeIMP != superclassResumeIMP && originalAFResumeIMP != classResumeIMP) { [self swizzleResumeAndSuspendMethodForClass:currentClass]; }
这个条件就杜绝了这种情况的发生,只有当前类实现了这个方法,才可能进入这个if块。
那iOS7两个类都交换了af_resume,那岂不是父类换到子类方法了?…只能说又是没仔细看代码的…注意AF是去向当前类添加af_resume方法,然后去交换当前类的af_resume。所以说根本不会出现这种情况…
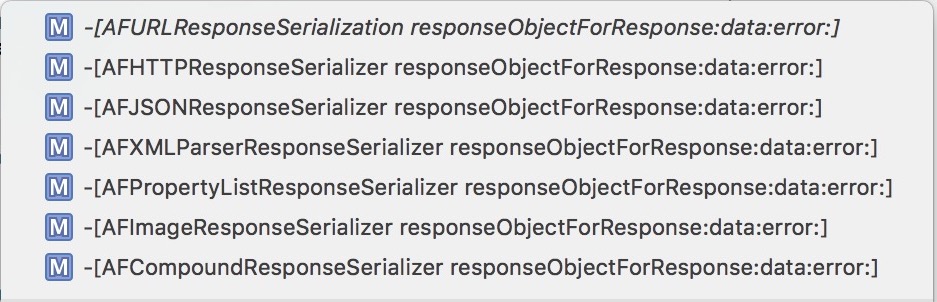
三、AFURLResponseSerialization 接下来我们来补充之前AFURLResponseSerialization这一块是如何解析数据的:
如图所示,AF用来解析数据的一共上述这些方法。第一个实际是一个协议方法,协议方法如下:
1 2 3 4 5 6 7 @protocol AFURLResponseSerialization <NSObject , NSSecureCoding , NSCopying >- (nullable id )responseObjectForResponse:(nullable NSURLResponse *)response data:(nullable NSData *)data error:(NSError * _Nullable __autoreleasing *)error; @end
而后面6个类都是遵守这个协议方法,去做数据解析。这地方可以再次感受一下AF的设计模式 ……,接下来我们就来主要看看这些类对这个协议方法的实现:
3.1 AFHTTPResponseSerializer 1 2 3 4 5 6 7 - (id )responseObjectForResponse:(NSURLResponse *)response data:(NSData *)data error:(NSError *__autoreleasing *)error { [self validateResponse:(NSHTTPURLResponse *)response data:data error:error]; return data; }
方法调用了一个另外的方法之后,就把data返回来了,我们继续往里看这个方法:
1 2 3 4 5 6 7 8 9 10 11 12 13 14 15 16 17 18 19 20 21 22 23 24 25 26 27 28 29 30 31 32 33 34 35 36 37 38 39 40 41 42 43 44 45 46 47 48 49 50 51 52 53 54 55 56 57 58 59 60 61 62 63 64 65 66 67 68 69 70 - (BOOL )validateResponse:(NSHTTPURLResponse *)response data:(NSData *)data error:(NSError * __autoreleasing *)error { BOOL responseIsValid = YES ; NSError *validationError = nil ; if (response && [response isKindOfClass:[NSHTTPURLResponse class ]]) { if (self .acceptableContentTypes && ![self .acceptableContentTypes containsObject:[response MIMEType]] && !([response MIMEType] == nil && [data length] == 0 )) { if ([data length] > 0 && [response URL]) { NSMutableDictionary *mutableUserInfo = [@{ NSLocalizedDescriptionKey : [NSString stringWithFormat:NSLocalizedStringFromTable (@"Request failed: unacceptable content-type: %@" , @"AFNetworking" , nil ), [response MIMEType]], NSURLErrorFailingURLErrorKey :[response URL], AFNetworkingOperationFailingURLResponseErrorKey: response, } mutableCopy]; if (data) { mutableUserInfo[AFNetworkingOperationFailingURLResponseDataErrorKey] = data; } validationError = AFErrorWithUnderlyingError([NSError errorWithDomain:AFURLResponseSerializationErrorDomain code:NSURLErrorCannotDecodeContentData userInfo:mutableUserInfo], validationError); } responseIsValid = NO ; } if (self .acceptableStatusCodes && ![self .acceptableStatusCodes containsIndex:(NSUInteger )response.statusCode] && [response URL]) { NSMutableDictionary *mutableUserInfo = [@{ NSLocalizedDescriptionKey : [NSString stringWithFormat:NSLocalizedStringFromTable (@"Request failed: %@ (%ld)" , @"AFNetworking" , nil ), [NSHTTPURLResponse localizedStringForStatusCode:response.statusCode], (long )response.statusCode], NSURLErrorFailingURLErrorKey :[response URL], AFNetworkingOperationFailingURLResponseErrorKey: response, } mutableCopy]; if (data) { mutableUserInfo[AFNetworkingOperationFailingURLResponseDataErrorKey] = data; } validationError = AFErrorWithUnderlyingError([NSError errorWithDomain:AFURLResponseSerializationErrorDomain code:NSURLErrorBadServerResponse userInfo:mutableUserInfo], validationError); responseIsValid = NO ; } } if (error && !responseIsValid) { *error = validationError; } return responseIsValid; }
看注释应该很容易明白这个方法有什么作用。简单来说,这个方法就是来判断返回数据与咱们使用的解析器是否匹配,需要解析的状态码是否匹配。 如果错误,则填充错误信息,并且返回NO,否则返回YES,错误信息为nil。
其中里面出现了两个属性值,一个acceptableContentTypes,一个acceptableStatusCodes,两者在初始化的时候有给默认值,我们也可以去自定义,但是如果给acceptableContentTypes定义了不匹配的类型,那么数据仍旧会解析错误。
而AFHTTPResponseSerializer仅仅是调用验证方法,然后就返回了data。
3.2 AFJSONResponseSerializer 1 2 3 4 5 6 7 8 9 10 11 12 13 14 15 16 17 18 19 20 21 22 23 24 25 26 27 28 29 30 31 32 33 34 35 36 37 38 39 40 - (id )responseObjectForResponse:(NSURLResponse *)response data:(NSData *)data error:(NSError *__autoreleasing *)error { if (![self validateResponse:(NSHTTPURLResponse *)response data:data error:error]) { if (!error || AFErrorOrUnderlyingErrorHasCodeInDomain(*error, NSURLErrorCannotDecodeContentData , AFURLResponseSerializationErrorDomain)) { return nil ; } } id responseObject = nil ; NSError *serializationError = nil ; BOOL isSpace = [data isEqualToData:[NSData dataWithBytes:" " length:1 ]]; if (data.length > 0 && !isSpace) { responseObject = [NSJSONSerialization JSONObjectWithData:data options:self .readingOptions error:&serializationError]; } else { return nil ; } if (self .removesKeysWithNullValues && responseObject) { responseObject = AFJSONObjectByRemovingKeysWithNullValues(responseObject, self .readingOptions); } if (error) { *error = AFErrorWithUnderlyingError(serializationError, *error); } return responseObject; }
注释写的很清楚,大概需要讲一下的是以下几个函数: (之前注释已经写清楚了这些函数的作用)
1 2 3 4 5 6 AFErrorOrUnderlyingErrorHasCodeInDomain(*error, NSURLErrorCannotDecodeContentData , AFURLResponseSerializationErrorDomain)) AFJSONObjectByRemovingKeysWithNullValues(responseObject, self .readingOptions); AFErrorWithUnderlyingError(serializationError, *error);
第一个:
1 2 3 4 5 6 7 8 9 10 11 12 13 14 static BOOL AFErrorOrUnderlyingErrorHasCodeInDomain(NSError *error, NSInteger code, NSString *domain) { if ([error.domain isEqualToString:domain] && error.code == code) { return YES ; } else if (error.userInfo[NSUnderlyingErrorKey ]) { return AFErrorOrUnderlyingErrorHasCodeInDomain(error.userInfo[NSUnderlyingErrorKey ], code, domain); } return NO ; }
这里可以注意,我们这里传过去的code和domain两个参数分别为NSURLErrorCannotDecodeContentData、AFURLResponseSerializationErrorDomain,这两个参数是我们之前判断response可接受类型和code时候自己去生成错误的时候填写的。
第二个:
1 2 3 4 5 6 7 8 9 10 11 12 13 14 15 16 17 18 19 20 21 22 23 24 25 26 27 28 29 30 31 static id AFJSONObjectByRemovingKeysWithNullValues(id JSONObject, NSJSONReadingOptions readingOptions) { if ([JSONObject isKindOfClass:[NSArray class ]]) { NSMutableArray *mutableArray = [NSMutableArray arrayWithCapacity:[(NSArray *)JSONObject count]]; for (id value in (NSArray *)JSONObject) { [mutableArray addObject:AFJSONObjectByRemovingKeysWithNullValues(value, readingOptions)]; } return (readingOptions & NSJSONReadingMutableContainers ) ? mutableArray : [NSArray arrayWithArray:mutableArray]; } else if ([JSONObject isKindOfClass:[NSDictionary class ]]) { NSMutableDictionary *mutableDictionary = [NSMutableDictionary dictionaryWithDictionary:JSONObject]; for (id <NSCopying > key in [(NSDictionary *)JSONObject allKeys]) { id value = (NSDictionary *)JSONObject[key]; if (!value || [value isEqual:[NSNull null]]) { [mutableDictionary removeObjectForKey:key]; } else if ([value isKindOfClass:[NSArray class ]] || [value isKindOfClass:[NSDictionary class ]]) { mutableDictionary[key] = AFJSONObjectByRemovingKeysWithNullValues(value, readingOptions); } } return (readingOptions & NSJSONReadingMutableContainers ) ? mutableDictionary : [NSDictionary dictionaryWithDictionary:mutableDictionary]; } return JSONObject; }
方法主要还是通过递归的形式实现。比较简单。
第三个:
1 2 3 4 5 6 7 8 9 10 11 12 13 static NSError * AFErrorWithUnderlyingError(NSError *error, NSError *underlyingError) { if (!error) { return underlyingError; } if (!underlyingError || error.userInfo[NSUnderlyingErrorKey ]) { return error; } NSMutableDictionary *mutableUserInfo = [error.userInfo mutableCopy]; mutableUserInfo[NSUnderlyingErrorKey ] = underlyingError; return [[NSError alloc] initWithDomain:error.domain code:error.code userInfo:mutableUserInfo]; }
方法主要是把json解析的错误,赋值给我们需要返回给用户的error上。比较简单,小伙伴们自己看看就好。
至此,AFJSONResponseSerializer就讲完了。而我们ResponseSerialize还有一些其他的类型解析,大家可以自行去阅读,代码还是很容易读的,在这里就不浪费篇幅去讲了。
至此我们AF3.X业务层的逻辑,基本上结束了。
四、AFSecurityPolicy 简单复习一下TLS的连接过程。至于单向认证/双向认证、证书信任链等概念,这里不再赘述了。
AF就是用AFSecurityPolicy这个类来满足我们各种https认证需求。在这之前我们来看看AF实现的 NSURLSessionDelegate 中用来做https认证的代理方法。
4.1 TLS的连接过程简述 发送HTTPS请求首先要进行SSL/TLS握手,握手过程大致如下:
客户端发起握手请求,携带随机数、支持算法列表等参数。
服务端收到请求,选择合适的算法,下发公钥证书和随机数。
客户端对服务端证书进行校验,并发送随机数信息,该信息使用公钥加密。校验内容如下:
服务器端证书是否过期;
服务器端证书是否被吊销;
服务器端证书是否可信;
服务器端证书域名和客户端请求域名是否一致。因此,只要服务器的证书是可信的且客户端不跳过“证书验证”这个步骤,https 能够防止域名劫持。
服务端通过私钥获取随机数信息。
双方根据以上交互的信息生成session ticket,用作该连接后续数据传输的加密密钥。
上述过程中,客户端较多干涉的是第三步,客户端需要验证服务端下发的证书,验证过程有以下两个要点:
客户端用本地保存的根证书解开证书链,确认服务端下发的证书是由可信任的机构颁发的。
AFSecurityPolicy的 pinnedCertificates 属性,可以更加严格的检查服务器下方的证书,只可以是集合中的证书对应CA或子CA签发的,或是集合中的证书本身,才信任该证书。
客户端需要检查证书的domain域和扩展域,看是否包含本次请求的host。
AFSecurityPolicy的 validatesDomainName 属性,可以避免服务器试图使用一个非本次请求的域名对应的TLS证书来建立连接。
如果上述两点都校验通过,就证明当前的服务端是可信任的,否则就是不可信任,应当中断当前连接。
4.2 session:didReceiveChallenge代理方法 这个方法就是做https认证的。把官方文档对这个方法的描述翻译一下:
函数作用:
web服务器接收到客户端请求时,有时候需要先验证客户端是否为正常用户,再决定是够返回真实数据。这种情况称之为服务端要求客户端接收挑战(NSURLAuthenticationChallenge *challenge)。
接收到挑战后,客户端要根据服务端传来的challenge来生成completionHandler所需的NSURLSessionAuthChallengeDisposition disposition和NSURLCredential *credential。
disposition是应对这个挑战的认证方式,而credential是客户端应对这个挑战生成的证书。
注意只有challenge中认证方法为NSURLAuthenticationMethodServerTrust的时候,才需要生成挑战证书。
最后调用completionHandler回应服务器端的挑战。
函数讨论:
该代理方法会在下面两种情况调用:
当服务器端要求客户端提供证书时或者进行NTLM认证(Windows NT LAN Manager,微软提出的WindowsNT挑战/响应验证机制)时,此方法允许你的app提供正确的挑战证书。
当某个session使用SSL/TLS协议,第一次和服务器端建立连接的时候,服务器会发送给iOS客户端一个证书,此方法允许你的app验证服务期端的证书链(certificate keychain)
注:如果你没有实现该方法,该session会调用其NSURLSessionTaskDelegate的代理方法URLSession:task:didReceiveChallenge:completionHandler: 。
1 2 3 4 5 6 7 8 9 10 11 12 13 14 15 16 17 18 19 20 21 22 23 24 25 26 27 28 29 30 31 32 33 34 35 36 37 38 39 40 41 42 43 44 45 46 47 48 49 50 51 52 53 54 55 - (void )URLSession:(NSURLSession *)session didReceiveChallenge:(NSURLAuthenticationChallenge *)challenge completionHandler:(void (^)(NSURLSessionAuthChallengeDisposition disposition, NSURLCredential *credential))completionHandler { NSURLSessionAuthChallengeDisposition disposition = NSURLSessionAuthChallengePerformDefaultHandling ; __block NSURLCredential *credential = nil ; if (self .sessionDidReceiveAuthenticationChallenge) { disposition = self .sessionDidReceiveAuthenticationChallenge(session, challenge, &credential); } else { if ([challenge.protectionSpace.authenticationMethod isEqualToString:NSURLAuthenticationMethodServerTrust ]) { if ([self .securityPolicy evaluateServerTrust:challenge.protectionSpace.serverTrust forDomain:challenge.protectionSpace.host]) { credential = [NSURLCredential credentialForTrust:challenge.protectionSpace.serverTrust]; if (credential) { disposition = NSURLSessionAuthChallengeUseCredential ; } else { disposition = NSURLSessionAuthChallengePerformDefaultHandling ; } } else { disposition = NSURLSessionAuthChallengeCancelAuthenticationChallenge ; } } else { disposition = NSURLSessionAuthChallengePerformDefaultHandling ; } } if (completionHandler) { completionHandler(disposition, credential); } }
总结一下这里 securityPolicy 存在的作用就是,使得在系统底层自己去验证之前,AF可以先去验证服务端的证书。 如果通不过,则直接越过系统的验证,取消https的网络请求。否则,继续去走系统根证书的验证。
4.3 AFSecurityPolicy内部 接下来我们看看AFSecurityPolicy内部是如何做https认证的:
4.3.1 五个属性
Certificate Pinning,或者有叫作SSL Pinning/TLS Pinning的,都是指的同一个东西,中文翻译成证书锁定,最大的作用就是用来抵御针对CA的攻击。在实际当中,它一般被用来阻止man-in-the-middle(中间人攻击)。
说起中间人攻击,可能不是那么直观,但是这一类工具我们可能经常会用到,如Mac平台的Charles和Windows平台的Fiddler。如果一个应用使用了Certificate Pinning技术,那么你使用前边说的工具是无法直接来调试/监控应用的网络流量的。
当应用通过HTTPS握手连接到Fidder/Charles时,应用会检查请求的response的证书,如果发现与预设的不一致,会拒绝后续的网络请求,从而增加应用与服务器的安全通信。
1 2 3 4 5 6 7 8 9 10 11 12 13 14 15 16 17 18 19 20 21 22 23 24 25 26 27 28 29 30 31 32 33 typedef NS_ENUM (NSUInteger , AFSSLPinningMode) { AFSSLPinningModeNone, AFSSLPinningModePublicKey, AFSSLPinningModeCertificate, }; @interface AFSecurityPolicy : NSObject <NSSecureCoding , NSCopying >@property (readonly , nonatomic , assign ) AFSSLPinningMode SSLPinningMode;@property (nonatomic , strong , nullable ) NSSet <NSData *> *pinnedCertificates;@property (nonatomic , assign ) BOOL allowInvalidCertificates;@property (nonatomic , assign ) BOOL validatesDomainName;@end
如下方式,我们可以创建一个securityPolicy:
1 2 3 4 5 6 7 AFSecurityPolicy *policy = [AFSecurityPolicy defaultPolicy]; + (instancetype )defaultPolicy { AFSecurityPolicy *securityPolicy = [[self alloc] init]; securityPolicy.SSLPinningMode = AFSSLPinningModeNone; return securityPolicy; }
AFSecurityPolicy 还有一个私有属性:
1 @property (readwrite , nonatomic , strong ) NSSet *pinnedPublicKeys;
AF复写了 pinnedCertificates 属性的setter方法,会同时把证书中每个公钥放在了self.pinnedPublicKeys中。
1 2 3 4 5 6 7 8 9 10 11 12 13 14 15 16 17 18 19 20 21 22 - (void )setPinnedCertificates:(NSSet *)pinnedCertificates { _pinnedCertificates = pinnedCertificates; if (self .pinnedCertificates) { NSMutableSet *mutablePinnedPublicKeys = [NSMutableSet setWithCapacity:[self .pinnedCertificates count]]; for (NSData *certificate in self .pinnedCertificates) { id publicKey = AFPublicKeyForCertificate(certificate); if (!publicKey) { continue ; } [mutablePinnedPublicKeys addObject:publicKey]; } self .pinnedPublicKeys = [NSSet setWithSet:mutablePinnedPublicKeys]; } else { self .pinnedPublicKeys = nil ; } }
4.3.2 evaluateServerTrust:方法 1. 参数SecTrustRef与源码实现解读 我们接着回到代理https认证的这行代码上:
1 [self.securityPolicy evaluateServerTrust:challenge.protectionSpace.serverTrust forDomain:challenge.protectionSpace.host]
我们传了两个参数进去,一个是SecTrustRef类型的serverTrust,这是什么呢?我们看到苹果的文档介绍如下:
CFType used for performing X.509 certificate trust evaluations.
大概意思是用于执行X.509证书信任评估,再讲简单点,其实就是一个容器,装了服务器端需要验证的证书的基本信息、公钥等等,不仅如此,它还可以装一些评估策略,还有客户端的锚点证书,这个客户端的证书,可以用来和服务端的证书去匹配验证的。
1 2 3 4 5 6 7 8 9 10 11 12 13 14 15 16 17 18 19 20 21 22 23 24 25 26 27 28 struct __SecTrust { CFRuntimeBase _base; CFArrayRef _certificates; CFArrayRef _anchors; CFTypeRef _policies; CFArrayRef _responses; CFArrayRef _SCTs; CFArrayRef _trustedLogs; CFDateRef _verifyDate; CFArrayRef _chain; SecKeyRef _publicKey; CFArrayRef _details; CFDictionaryRef _info; CFArrayRef _exceptions; SecTrustResultType _trustResult; bool _anchorsOnly; bool _keychainsAllowed; dispatch_queue_t _trustQueue; }; typedef struct __SecTrust *SecTrustRef ;
这个方法是AFSecurityPolicy最核心的方法,其他的都是为了配合这个方法。这个方法完成了服务端的证书的信任评估。代码如下:
1 2 3 4 5 6 7 8 9 10 11 12 13 14 15 16 17 18 19 20 21 22 23 24 25 26 27 28 29 30 31 32 33 34 35 36 37 38 39 40 41 42 43 44 45 46 47 48 49 50 51 52 53 54 55 56 57 58 59 60 61 62 63 64 65 66 67 68 69 70 71 72 73 74 75 76 77 78 79 80 81 82 83 84 85 86 87 88 89 90 91 92 93 94 95 96 97 98 99 100 101 102 103 104 105 106 107 108 109 110 111 112 113 114 115 116 117 118 119 120 121 122 123 124 125 126 127 128 129 130 - (BOOL )evaluateServerTrust:(SecTrustRef)serverTrust forDomain:(NSString *)domain { if (domain && self .allowInvalidCertificates && self .validatesDomainName && (self .SSLPinningMode == AFSSLPinningModeNone || [self .pinnedCertificates count] == 0 )) { NSLog (@"In order to validate a domain name for self signed certificates, you MUST use pinning." ); return NO ; } NSMutableArray *policies = [NSMutableArray array]; if (self .validatesDomainName) { [policies addObject:(__bridge_transfer id )SecPolicyCreateSSL(true , (__bridge CFStringRef )domain)]; } else { [policies addObject:(__bridge_transfer id )SecPolicyCreateBasicX509()]; } SecTrustSetPolicies(serverTrust, (__bridge CFArrayRef )policies); if (self .SSLPinningMode == AFSSLPinningModeNone) { return self .allowInvalidCertificates || AFServerTrustIsValid(serverTrust); } else if (!AFServerTrustIsValid(serverTrust) && !self .allowInvalidCertificates) { return NO ; } switch (self .SSLPinningMode) { case AFSSLPinningModeNone: default : return NO ; case AFSSLPinningModeCertificate: { NSMutableArray *pinnedCertificates = [NSMutableArray array]; for (NSData *certificateData in self .pinnedCertificates) { [pinnedCertificates addObject:(__bridge_transfer id )SecCertificateCreateWithData(NULL , (__bridge CFDataRef )certificateData)]; } SecTrustSetAnchorCertificates(serverTrust, (__bridge CFArrayRef )pinnedCertificates); if (!AFServerTrustIsValid(serverTrust)) { return NO ; } NSArray *serverCertificates = AFCertificateTrustChainForServerTrust(serverTrust); for (NSData *trustChainCertificate in [serverCertificates reverseObjectEnumerator]) { if ([self .pinnedCertificates containsObject:trustChainCertificate]) { return YES ; } } return NO ; } case AFSSLPinningModePublicKey: { NSUInteger trustedPublicKeyCount = 0 ; NSArray *publicKeys = AFPublicKeyTrustChainForServerTrust(serverTrust); for (id trustChainPublicKey in publicKeys) { for (id pinnedPublicKey in self .pinnedPublicKeys) { if (AFSecKeyIsEqualToKey((__bridge SecKeyRef)trustChainPublicKey, (__bridge SecKeyRef)pinnedPublicKey)) { trustedPublicKeyCount += 1 ; } } } return trustedPublicKeyCount > 0 ; } } return NO ; }
这个方法中关联了一系列的函数,我在这边按照调用顺序一一列出来(有些是系统函数,不在这里列出,会在下文集体描述作用):
2. 调用函数一: AFServerTrustIsValid 1 2 3 4 5 6 7 8 9 10 11 12 13 14 15 16 17 18 19 20 21 22 23 static BOOL AFServerTrustIsValid(SecTrustRef serverTrust) { BOOL isValid = NO ; SecTrustResultType result; __Require_noErr_Quiet(SecTrustEvaluate(serverTrust, &result), _out ); isValid = (result == kSecTrustResultUnspecified || result == kSecTrustResultProceed); _out : return isValid; }
这个方法用来验证serverTrust是否有效,其中主要是交由系统APISecTrustEvaluate来验证的,它验证完之后会返回一个SecTrustResultType枚举类型的result,然后我们根据这个result去判断是否证书是否有效。
其中比较有意思的是,它调用了一个系统定义的宏函数__Require_noErr_Quiet,函数定义如下:
1 2 3 4 5 6 7 8 9 10 #ifndef __Require_noErr_Quiet #define __Require_noErr_Quiet(errorCode, exceptionLabel) \ do \ { \ if ( __builtin_expect(0 != (errorCode), 0 ) ) \ { \ goto exceptionLabel; \ } \ } while ( 0 ) #endif
这个函数主要作用就是,判断errorCode是否为0,不为0则,程序用goto跳到exceptionLabel位置去执行。这个exceptionLabel就是一个代码位置标识,类似上面的_out。
3. 调用函数二、三获取证书链证书或公钥 函数二、三(两个函数类似,所以放在一起):
获取serverTrust证书链证书。如果 SSLPinningMode 是 AFSSLPinningModeCertificate,就获取证书,进行校验。
1 2 3 4 5 6 7 8 9 10 11 12 13 14 15 static NSArray * AFCertificateTrustChainForServerTrust(SecTrustRef serverTrust) { CFIndex certificateCount = SecTrustGetCertificateCount(serverTrust); NSMutableArray *trustChain = [NSMutableArray arrayWithCapacity:(NSUInteger )certificateCount]; for (CFIndex i = 0 ; i < certificateCount; i++) { SecCertificateRef certificate = SecTrustGetCertificateAtIndex(serverTrust, i); [trustChain addObject:(__bridge_transfer NSData *)SecCertificateCopyData(certificate)]; } return [NSArray arrayWithArray:trustChain]; }
获取serverTrust证书链公钥。如果 SSLPinningMode 是 AFSSLPinningModePublicKey,就只获取公钥,进行校验。
1 2 3 4 5 6 7 8 9 10 11 12 13 14 15 16 17 18 19 20 21 22 23 24 25 26 27 28 29 30 31 32 33 34 35 36 37 38 39 40 41 42 43 44 45 46 47 48 49 static NSArray * AFPublicKeyTrustChainForServerTrust(SecTrustRef serverTrust) { SecPolicyRef policy = SecPolicyCreateBasicX509(); CFIndex certificateCount = SecTrustGetCertificateCount(serverTrust); NSMutableArray *trustChain = [NSMutableArray arrayWithCapacity:(NSUInteger )certificateCount]; for (CFIndex i = 0 ; i < certificateCount; i++) { SecCertificateRef certificate = SecTrustGetCertificateAtIndex(serverTrust, i); SecCertificateRef someCertificates[] = {certificate}; CFArrayRef certificates = CFArrayCreate (NULL , (const void **)someCertificates, 1 , NULL ); SecTrustRef trust; __Require_noErr_Quiet(SecTrustCreateWithCertificates(certificates, policy, &trust), _out ); SecTrustResultType result; __Require_noErr_Quiet(SecTrustEvaluate(trust, &result), _out ); [trustChain addObject:(__bridge_transfer id )SecTrustCopyPublicKey(trust)]; _out : if (trust) { CFRelease (trust); } if (certificates) { CFRelease (certificates); } continue ; } CFRelease (policy); return [NSArray arrayWithArray:trustChain]; }
两个方法功能类似,都是调用了一些系统的API,利用For循环,获取证书链上每一个证书或者公钥。具体内容看源码很好理解。唯一需要注意的是,这个获取的证书排序,是从证书链的叶节点,到根节点的。
4. 调用函数四: 判断公钥是否相同 1 2 3 4 5 6 7 8 9 10 static BOOL AFSecKeyIsEqualToKey (SecKeyRef key1, SecKeyRef key2) #if TARGET_OS_IOS || TARGET_OS_WATCH || TARGET_OS_TV return [(__bridge id)key1 isEqual:(__bridge id)key2]; #else return [AFSecKeyGetData (key1) isEqual:AFSecKeyGetData (key2)]; #endif }
方法适配了各种运行环境,做了匹配的判断。
5. 验证过程中调用的系统原生函数 接下来列出验证过程中调用过得系统原生函数:
1 2 3 4 5 6 7 8 9 10 11 12 13 14 15 16 17 18 19 20 21 22 23 24 25 26 27 28 29 30 31 32 33 34 35 36 37 38 39 40 41 42 43 44 45 46 47 48 49 50 51 52 53 54 55 56 57 58 59 60 61 62 63 64 65 66 SecPolicyCreateSSL(<#Boolean server#>, <#CFStringRef _Nullable hostname#>) SecPolicyCreateBasicX509(); SecPolicyCreateBasicX509(); SecTrustSetPolicies(<#SecTrustRef _Nonnull trust#>, <#CFTypeRef _Nonnull policies#>) SecTrustEvaluate(<#SecTrustRef _Nonnull trust#>, <#SecTrustResultType * _Nullable result#>) __Require_noErr(<#errorCode#>, <#exceptionLabel#>) SecCertificateCreateWithData(<#CFAllocatorRef _Nullable allocator#>, <#CFDataRef _Nonnull data#>) SecTrustSetAnchorCertificates(serverTrust, (__bridge CFArrayRef)pinnedCertificates); CFIndex certificateCount = SecTrustGetCertificateCount(serverTrust); CFIndex SecTrustGetCertificateCount (SecTrustRef trust) { if (!trust) { return 0 ; } SecTrustEvaluateIfNecessary(trust); __block CFIndex certCount = 1 ; dispatch_sync(trust->_trustQueue, ^{ if (trust->_chain) { certCount = CFArrayGetCount(trust->_chain); } }); return certCount; } SecTrustGetCertificateAtIndex(serverTrust, i) SecCertificateRef SecTrustGetCertificateAtIndex (SecTrustRef trust, CFIndex ix) if (!trust) { return NULL ; } __block SecCertificateRef cert = NULL ; if (ix == 0 ) { dispatch_sync(trust->_trustQueue, ^{ cert = (SecCertificateRef)CFArrayGetValueAtIndex(trust->_certificates, 0 ); }); return cert; } SecTrustEvaluateIfNecessary(trust); dispatch_sync(trust->_trustQueue, ^{ if (trust->_chain) { cert = (SecCertificateRef)CFArrayGetValueAtIndex(trust->_chain, ix); } }); return cert; } SecTrustCopyPublicKey(trust)
其功能如注释,大家可以对比着源码,去加以理解~
4.4 关于HTTPS, 开发者需要做什么 可能看到这,又有些小伙伴迷糊了,讲了这么多,那如果做https请求,真正需要我们自己做的到底是什么呢?
4.4.1 如果只想访问能通 分为以下两种情况:
如果你用的是付费的公信机构颁发的证书,标准的https,那么无论你用的是AF还是NSUrlSession,什么都不用做,代理方法也不用实现。 你的网络请求就能正常完成。
如果你用的是自签名的证书:
首先你需要在plist文件中,设置可以返回不安全的请求(关闭该域名的ATS)。
其次,如果是NSUrlSesion,那么需要在代理方法实现如下(其实就是AF的相对于自签证书的实现的简化版)
1 2 3 4 5 6 7 8 9 10 11 12 13 14 15 16 17 - (void )URLSession:(NSURLSession *)session didReceiveChallenge:(NSURLAuthenticationChallenge *)challenge completionHandler:(void (^)(NSURLSessionAuthChallengeDisposition disposition, NSURLCredential *credential))completionHandler { __block NSURLCredential *credential = nil ; credential = [NSURLCredential credentialForTrust:challenge.protectionSpace.serverTrust]; if (credential) { disposition = NSURLSessionAuthChallengeUseCredential ; } if (completionHandler) { completionHandler(disposition, credential); } }
1 2 3 4 5 policy.allowInvalidCertificates = YES ; policy.validatesDomainName = NO ;
4.4.2 如果想验证服务器来源 当然还可以根据需求,你可以去验证证书或者公钥,这一步的目的是实现:要求数据必须来自指定的服务器。
如果是自签证书,需要把自签的服务端证书,或者自签的CA根证书导入到项目中。
如果是付费的公信机构颁发的证书,那也要把证书导入到项目中。
并且如下设置证书:
1 2 3 4 NSString *certFilePath = [[NSBundle mainBundle] pathForResource:@"AFUse_server.cer" ofType:nil ];NSData *certData = [NSData dataWithContentsOfFile:certFilePath];NSSet *certSet = [NSSet setWithObjects:certData,certData, nil ]; policy.pinnedCertificates = certSet;
这样你就可以使用AF的不同AFSSLPinningMode去验证了。
这一步实现了防中间人攻击劫持,比如如果用 Charles 代理抓包,那么客户端中的请求 https 认证是无法通过的,报错:已取消。
4.5 总结: AF之于https到底做了什么 最后总结一下,AF之于https到底做了什么:
AF可以让你在系统验证证书之前,就去自主验证。 然后如果自己验证不正确,直接取消网络请求。否则验证通过则继续进行系统验证。讲到这,顺便提一下,系统验证的流程:首先是去系统的根证书找,看是否有能匹配服务端的证书,如果匹配,则验证成功,返回https的安全数据。
如果不匹配则去判断ATS是否关闭,如果关闭,则返回https不安全连接的数据。如果开启ATS,则拒绝这个请求,请求失败。
总之一句话:AF的验证方式不是必须的,但是对有特殊验证需求的用户确是必要的 。
写在结尾:
看完之后,有些小伙伴可能还是会比较迷惑,建议还是不清楚的小伙伴,可以自己生成一个自签名的证书或者用百度地址等做请求,然后设置AFSecurityPolicy不同参数,打断点,一步步的看AF是如何去调用函数作证书验证的。相信这样能加深你的理解。
最后关于自签名证书的问题,等2017年1月1日,也没多久了…一个月不到。除非有特殊原因说明,否则已经无法审核通过了。详细的可以看看这篇文章:iOS 10 适配 ATS(app支持https通过App Store审核) 。
苹果官网最新消息:原定于2017.1.1强制的https被延期了,具体延期到什么时候不确定,得等官方通知:
五、UIKit扩展与缓存实现 我们来看看AF对UIkit的扩展:
一共如上这个多类,下面我们开始着重讲其中两个UIKit的扩展:
一个是我们网络请求时状态栏的小菊花。
一个是我们几乎都用到过请求网络图片的如下一行方法:
1 - (void )setImageWithURL:(NSURL *)url ;
5.1 AFNetworkActivityIndicatorManager 这个类的作用相当简单,就是当网络请求的时候,状态栏上的小菊花就会开始转:
需要的代码也很简单,只需在你需要它的位置中(比如AppDelegate)导入类,并加一行代码即可:
1 2 3 #import "AFNetworkActivityIndicatorManager.h" [[AFNetworkActivityIndicatorManager sharedManager] setEnabled:YES ];
接下来我们来讲讲这个类的实现:
这个类的实现也非常简单,还记得我们之前讲的AF对NSURLSessionTask中做了一个Method Swizzling 吗?大意是把它的resume和suspend方法做了一个替换,在原有实现的基础上添加了一个通知的发送。
这个类就是基于这两个通知和task完成的通知来实现的。
5.1.1 初始化方法 首先我们来看看它的初始化方法:
1 2 3 4 5 6 7 8 9 10 11 12 13 14 15 16 17 18 19 20 21 22 23 24 25 26 27 28 29 30 31 32 33 34 35 36 37 38 39 40 41 42 43 44 45 46 47 48 49 50 51 52 53 54 55 56 57 58 59 typedef NS_ENUM (NSInteger , AFNetworkActivityManagerState) { AFNetworkActivityManagerStateNotActive, AFNetworkActivityManagerStateDelayingStart, AFNetworkActivityManagerStateActive, AFNetworkActivityManagerStateDelayingEnd }; static NSTimeInterval const kDefaultAFNetworkActivityManagerActivationDelay = 1.0 ;static NSTimeInterval const kDefaultAFNetworkActivityManagerCompletionDelay = 0.17 ;@implementation AFNetworkActivityIndicatorManager + (instancetype )sharedManager { static AFNetworkActivityIndicatorManager *_sharedManager = nil ; static dispatch_once_t oncePredicate; dispatch_once (&oncePredicate, ^{ _sharedManager = [[self alloc] init]; }); return _sharedManager; } - (instancetype )init { self = [super init]; if (!self ) { return nil ; } self .currentState = AFNetworkActivityManagerStateNotActive; [[NSNotificationCenter defaultCenter] addObserver:self selector:@selector (networkRequestDidStart:) name:AFNetworkingTaskDidResumeNotification object:nil ]; [[NSNotificationCenter defaultCenter] addObserver:self selector:@selector (networkRequestDidFinish:) name:AFNetworkingTaskDidSuspendNotification object:nil ]; [[NSNotificationCenter defaultCenter] addObserver:self selector:@selector (networkRequestDidFinish:) name:AFNetworkingTaskDidCompleteNotification object:nil ]; self .activationDelay = kDefaultAFNetworkActivityManagerActivationDelay; self .completionDelay = kDefaultAFNetworkActivityManagerCompletionDelay; return self ; } @end
5.1.2 通知触发调用的方法 接着我们来看看三个通知触发调用的方法:
1 2 3 4 5 6 7 8 9 10 11 12 13 14 15 16 - (void )networkRequestDidStart:(NSNotification *)notification { if ([AFNetworkRequestFromNotification(notification) URL]) { [self incrementActivityCount]; } } - (void )networkRequestDidFinish:(NSNotification *)notification { if ([AFNetworkRequestFromNotification(notification) URL]) { [self decrementActivityCount]; } }
方法很简单,就是开始的时候增加了请求活跃数,结束则减少。调用了如下两个方法进行加减:
1 2 3 4 5 6 7 8 9 10 11 12 13 14 15 16 17 18 19 20 21 22 23 24 25 26 27 28 29 30 31 - (void )incrementActivityCount { [self willChangeValueForKey:@"activityCount" ]; @synchronized (self ) { _activityCount++; } [self didChangeValueForKey:@"activityCount" ]; dispatch_async (dispatch_get_main_queue(), ^{ [self updateCurrentStateForNetworkActivityChange]; }); } - (void )decrementActivityCount { [self willChangeValueForKey:@"activityCount" ]; @synchronized (self ) { #pragma clang diagnostic push #pragma clang diagnostic ignored "-Wgnu" _activityCount = MAX(_activityCount - 1 , 0 ); #pragma clang diagnostic pop } [self didChangeValueForKey:@"activityCount" ]; dispatch_async (dispatch_get_main_queue(), ^{ [self updateCurrentStateForNetworkActivityChange]; }); }
方法做了什么应该很容易看明白,这里需要注意的是,task的几个状态的通知,是会在多线程的环境下发送过来的 。所以这里对活跃数的加减,都用了@synchronized这种方式的锁,进行了线程保护。然后回到主线程调用了updateCurrentStateForNetworkActivityChange
我们接着来看看这个方法:
1 2 3 4 5 6 7 8 9 10 11 12 13 14 15 16 17 18 19 20 21 22 23 24 25 26 27 28 29 30 - (void )updateCurrentStateForNetworkActivityChange { if (self .enabled) { switch (self .currentState) { case AFNetworkActivityManagerStateNotActive: if (self .isNetworkActivityOccurring) { [self setCurrentState:AFNetworkActivityManagerStateDelayingStart]; } break ; case AFNetworkActivityManagerStateDelayingStart: break ; case AFNetworkActivityManagerStateActive: if (!self .isNetworkActivityOccurring) { [self setCurrentState:AFNetworkActivityManagerStateDelayingEnd]; } break ; case AFNetworkActivityManagerStateDelayingEnd: if (self .isNetworkActivityOccurring) { [self setCurrentState:AFNetworkActivityManagerStateActive]; } break ; } } }
其中有这么一个属性self.isNetworkActivityOccurring:
1 2 3 4 5 6 - (BOOL )isNetworkActivityOccurring { @synchronized (self ) { return self .activityCount > 0 ; } }
5.1.3 重写currentState的setter 这个类复写了currentState的set方法,每当我们改变这个state,就会触发set方法,而怎么该转菊花也在该方法中:
1 2 3 4 5 6 7 8 9 10 11 12 13 14 15 16 17 18 19 20 21 22 23 24 25 26 27 28 29 30 31 32 33 34 35 36 37 - (void )setCurrentState:(AFNetworkActivityManagerState)currentState { @synchronized (self ) { if (_currentState != currentState) { [self willChangeValueForKey:@"currentState" ]; _currentState = currentState; switch (currentState) { case AFNetworkActivityManagerStateNotActive: [self cancelActivationDelayTimer]; [self cancelCompletionDelayTimer]; [self setNetworkActivityIndicatorVisible:NO ]; break ; case AFNetworkActivityManagerStateDelayingStart: [self startActivationDelayTimer]; break ; case AFNetworkActivityManagerStateActive: [self cancelCompletionDelayTimer]; [self setNetworkActivityIndicatorVisible:YES ]; break ; case AFNetworkActivityManagerStateDelayingEnd: [self startCompletionDelayTimer]; break ; } } [self didChangeValueForKey:@"currentState" ]; } }
这个set方法就是这个类最核心的方法了。它的作用如下:
这里根据当前状态,是否需要开始执行一个延迟开始或者延迟完成,又或者是否需要取消这两个延迟。
还判断了,是否需要去转状态栏的菊花,调用了setNetworkActivityIndicatorVisible:方法:
1 2 3 4 5 6 7 8 9 10 11 12 13 14 15 16 17 - (void )setNetworkActivityIndicatorVisible:(BOOL )networkActivityIndicatorVisible { if (_networkActivityIndicatorVisible != networkActivityIndicatorVisible) { [self willChangeValueForKey:@"networkActivityIndicatorVisible" ]; @synchronized (self ) { _networkActivityIndicatorVisible = networkActivityIndicatorVisible; } [self didChangeValueForKey:@"networkActivityIndicatorVisible" ]; if (self .networkActivityActionBlock) { self .networkActivityActionBlock(networkActivityIndicatorVisible); } else { [[UIApplication sharedApplication] setNetworkActivityIndicatorVisible:networkActivityIndicatorVisible]; } } }
这个方法就是用来控制菊花是否转。并且支持一个自定义的Block,我们可以自己去拿到这个菊花是否应该转的状态值,去做一些自定义的处理。
如果我们没有实现这个Block,则调用下面的方法去转菊花。
1 [[UIApplication sharedApplication] setNetworkActivityIndicatorVisible:networkActivityIndicatorVisible];
回到state的set方法中,我们除了控制菊花去转,还调用了以下4个方法:
1 2 3 4 5 6 7 8 9 10 11 12 13 14 15 16 17 18 19 20 21 22 23 24 25 - (void )startActivationDelayTimer { self .activationDelayTimer = [NSTimer timerWithTimeInterval:self .activationDelay target:self selector:@selector (activationDelayTimerFired) userInfo:nil repeats:NO ]; [[NSRunLoop mainRunLoop] addTimer:self .activationDelayTimer forMode:NSRunLoopCommonModes ]; } - (void )startCompletionDelayTimer { [self .completionDelayTimer invalidate]; self .completionDelayTimer = [NSTimer timerWithTimeInterval:self .completionDelay target:self selector:@selector (completionDelayTimerFired) userInfo:nil repeats:NO ]; [[NSRunLoop mainRunLoop] addTimer:self .completionDelayTimer forMode:NSRunLoopCommonModes ]; } - (void )cancelActivationDelayTimer { [self .activationDelayTimer invalidate]; } - (void )cancelCompletionDelayTimer { [self .completionDelayTimer invalidate]; }
这4个方法分别是开始延迟执行一个方法,和结束的时候延迟执行一个方法,和对应这两个方法的取消。其作用,注释应该很容易理解。
我们继续往下看,这两个延迟调用的到底是什么:
1 2 3 4 5 6 7 8 9 10 11 - (void )activationDelayTimerFired { if (self .networkActivityOccurring) { [self setCurrentState:AFNetworkActivityManagerStateActive]; } else { [self setCurrentState:AFNetworkActivityManagerStateNotActive]; } } - (void )completionDelayTimerFired { [self setCurrentState:AFNetworkActivityManagerStateNotActive]; }
一个开始,一个完成调用,都设置了不同的currentState的值,又回到之前state的set方法中了。
至此这个AFNetworkActivityIndicatorManager类就讲完了,代码还是相当简单明了的。
5.2 UIImageView+AFNetworking 接下来我们来讲一个我们经常用的方法,这个方法的实现类是:UIImageView+AFNetworking.h。
这是个类目,并且给UIImageView扩展了4个方法:
1 2 3 4 5 6 7 8 9 10 11 12 13 - (void )setImageWithURL:(NSURL *)url; - (void )setImageWithURL:(NSURL *)url placeholderImage:(nullable UIImage *)placeholderImage; - (void )setImageWithURLRequest:(NSURLRequest *)urlRequest placeholderImage:(nullable UIImage *)placeholderImage success:(nullable void (^)(NSURLRequest *request, NSHTTPURLResponse * _Nullable response, UIImage *image))success failure:(nullable void (^)(NSURLRequest *request, NSHTTPURLResponse * _Nullable response, NSError *error))failure; - (void )cancelImageDownloadTask;
SDWebImage、YYKit、AF都实现了这么个类目。AF关于这个类目UIImageView+AFNetworking的实现,依赖于这么两个类:AFImageDownloader,AFAutoPurgingImageCache。
当然AFImageDownloader中,关于图片数据请求的部分,还是使用AFURLSessionManager来实现的。
5.2.1 AFImageDownloader 1. 先看初始化方法 1 2 3 4 5 6 7 8 9 10 11 12 13 14 15 16 17 18 19 20 21 22 23 24 25 26 27 28 29 30 31 32 33 34 35 36 37 38 39 40 41 42 43 44 45 46 47 48 49 50 + (instancetype )defaultInstance { static AFImageDownloader *sharedInstance = nil ; static dispatch_once_t onceToken; dispatch_once (&onceToken, ^{ sharedInstance = [[self alloc] init]; }); return sharedInstance; } - (instancetype )init { NSURLSessionConfiguration *defaultConfiguration = [self .class defaultURLSessionConfiguration]; AFHTTPSessionManager *sessionManager = [[AFHTTPSessionManager alloc] initWithSessionConfiguration:defaultConfiguration]; sessionManager.responseSerializer = [AFImageResponseSerializer serializer]; return [self initWithSessionManager:sessionManager downloadPrioritization:AFImageDownloadPrioritizationFIFO maximumActiveDownloads:4 imageCache:[[AFAutoPurgingImageCache alloc] init]]; } + (NSURLSessionConfiguration *)defaultURLSessionConfiguration { NSURLSessionConfiguration *configuration = [NSURLSessionConfiguration defaultSessionConfiguration]; configuration.HTTPShouldSetCookies = YES ; configuration.HTTPShouldUsePipelining = NO ; configuration.requestCachePolicy = NSURLRequestUseProtocolCachePolicy ; configuration.allowsCellularAccess = YES ; configuration.timeoutIntervalForRequest = 60.0 ; configuration.URLCache = [AFImageDownloader defaultURLCache]; return configuration; }
在上面我们看到除了[[AFAutoPurgingImageCache alloc] init],还创建了一个cache:[AFImageDownloader defaultURLCache]
1 2 3 4 5 6 7 + (NSURLCache *)defaultURLCache { return [[NSURLCache alloc] initWithMemoryCapacity:20 * 1024 * 1024 diskCapacity:150 * 1024 * 1024 diskPath:@"com.alamofire.imagedownloader" ]; }
大家看到这可能迷惑了,怎么这么多cache,那AF做图片缓存到底用哪个呢?答案是AF自己控制的图片缓用 AFAutoPurgingImageCache,而 NSUrlRequest 的缓存由它自己内部根据策略去控制,用的是NSURLCache,不归AF处理,只需在configuration中设置上即可。
那么看到这有些小伙伴又要问了,为什么不直接用NSURLCache,还要自定义一个AFAutoPurgingImageCache呢?原来是因为NSURLCache的诸多限制,例如只支持get请求等等。而且因为是系统维护的,我们自己的可控度不强,并且如果需要做一些自定义的缓存处理,无法实现。
更多关于NSURLCache的内容,大家可以自行查阅。
接着上面的方法调用到这个最终的初始化方法中:
1 2 3 4 5 6 7 8 9 10 11 12 13 14 15 16 17 18 19 20 21 22 23 24 25 26 27 28 29 30 31 32 33 34 - (instancetype )initWithSessionManager:(AFHTTPSessionManager *)sessionManager downloadPrioritization:(AFImageDownloadPrioritization)downloadPrioritization maximumActiveDownloads:(NSInteger )maximumActiveDownloads imageCache:(id <AFImageRequestCache>)imageCache { if (self = [super init]) { self .sessionManager = sessionManager; self .downloadPrioritizaton = downloadPrioritization; self .maximumActiveDownloads = maximumActiveDownloads; self .imageCache = imageCache; self .queuedMergedTasks = [[NSMutableArray alloc] init]; self .mergedTasks = [[NSMutableDictionary alloc] init]; self .activeRequestCount = 0 ; NSString *name = [NSString stringWithFormat:@"com.alamofire.imagedownloader.synchronizationqueue-%@" , [[NSUUID UUID] UUIDString]]; self .synchronizationQueue = dispatch_queue_create([name cStringUsingEncoding:NSASCIIStringEncoding ], DISPATCH_QUEUE_SERIAL); name = [NSString stringWithFormat:@"com.alamofire.imagedownloader.responsequeue-%@" , [[NSUUID UUID] UUIDString]]; self .responseQueue = dispatch_queue_create([name cStringUsingEncoding:NSASCIIStringEncoding ], DISPATCH_QUEUE_CONCURRENT); } return self ; }
这边初始化了一些属性,这些属性跟着注释看应该很容易明白其作用。主要需要注意的就是,这里创建了两个queue:一个串行的请求queue,和一个并行的响应queue。
这个串行queue,是用来做内部生成task等等一系列业务逻辑的。它保证了我们在这些逻辑处理中的线程安全问题(迷惑的接着往下看)。
这个并行queue,被用来做网络请求完成的数据回调。
2. 再看创建请求task的方法 1 2 3 4 5 6 7 8 9 10 11 12 13 14 15 16 17 18 19 20 21 22 23 24 25 26 27 28 29 30 31 32 33 34 35 36 37 38 39 40 41 42 43 44 45 46 47 48 49 50 51 52 53 54 55 56 57 58 59 60 61 62 63 64 65 66 67 68 69 70 71 72 73 74 75 76 77 78 79 80 81 82 83 84 85 86 87 88 89 90 91 92 93 94 95 96 97 98 99 100 101 102 103 104 105 106 107 108 109 110 111 112 113 114 115 116 117 118 119 120 121 122 123 124 125 126 127 128 129 130 131 132 133 134 135 136 137 138 139 140 141 142 143 144 145 146 147 148 149 - (nullable AFImageDownloadReceipt *)downloadImageForURLRequest:(NSURLRequest *)request success:(void (^)(NSURLRequest * , NSHTTPURLResponse * , UIImage * ))success failure:(void (^)(NSURLRequest * , NSHTTPURLResponse * , NSError * ))failure { return [self downloadImageForURLRequest:request withReceiptID:[NSUUID UUID] success:success failure:failure]; } - (nullable AFImageDownloadReceipt *)downloadImageForURLRequest:(NSURLRequest *)request withReceiptID:(nonnull NSUUID *)receiptID success:(nullable void (^)(NSURLRequest *request, NSHTTPURLResponse * _Nullable response, UIImage *responseObject))success failure:(nullable void (^)(NSURLRequest *request, NSHTTPURLResponse * _Nullable response, NSError *error))failure { __block NSURLSessionDataTask *task = nil ; dispatch_sync (self .synchronizationQueue, ^{ NSString *URLIdentifier = request.URL.absoluteString; if (URLIdentifier == nil ) { if (failure) { NSError *error = [NSError errorWithDomain:NSURLErrorDomain code:NSURLErrorBadURL userInfo:nil ]; dispatch_async (dispatch_get_main_queue(), ^{ failure(request, nil , error); }); } return ; } AFImageDownloaderMergedTask *existingMergedTask = self .mergedTasks[URLIdentifier]; if (existingMergedTask != nil ) { AFImageDownloaderResponseHandler *handler = [[AFImageDownloaderResponseHandler alloc] initWithUUID:receiptID success:success failure:failure]; [existingMergedTask addResponseHandler:handler]; task = existingMergedTask.task; return ; } switch (request.cachePolicy) { case NSURLRequestUseProtocolCachePolicy : case NSURLRequestReturnCacheDataElseLoad : case NSURLRequestReturnCacheDataDontLoad : { UIImage *cachedImage = [self .imageCache imageforRequest:request withAdditionalIdentifier:nil ]; if (cachedImage != nil ) { if (success) { dispatch_async (dispatch_get_main_queue(), ^{ success(request, nil , cachedImage); }); } return ; } break ; } default : break ; } NSUUID *mergedTaskIdentifier = [NSUUID UUID]; NSURLSessionDataTask *createdTask; __weak __typeof__(self ) weakSelf = self ; createdTask = [self .sessionManager dataTaskWithRequest:request completionHandler:^(NSURLResponse * _Nonnull response, id _Nullable responseObject, NSError * _Nullable error) { dispatch_async (self .responseQueue, ^{ __strong __typeof__(weakSelf) strongSelf = weakSelf; AFImageDownloaderMergedTask *mergedTask = self .mergedTasks[URLIdentifier]; if ([mergedTask.identifier isEqual:mergedTaskIdentifier]) { mergedTask = [strongSelf safelyRemoveMergedTaskWithURLIdentifier:URLIdentifier]; if (error) { for (AFImageDownloaderResponseHandler *handler in mergedTask.responseHandlers) { if (handler.failureBlock) { dispatch_async (dispatch_get_main_queue(), ^{ handler.failureBlock(request, (NSHTTPURLResponse *)response, error); }); } } } else { [strongSelf.imageCache addImage:responseObject forRequest:request withAdditionalIdentifier:nil ]; for (AFImageDownloaderResponseHandler *handler in mergedTask.responseHandlers) { if (handler.successBlock) { dispatch_async (dispatch_get_main_queue(), ^{ handler.successBlock(request, (NSHTTPURLResponse *)response, responseObject); }); } } } } [strongSelf safelyDecrementActiveTaskCount]; [strongSelf safelyStartNextTaskIfNecessary]; }); }]; AFImageDownloaderResponseHandler *handler = [[AFImageDownloaderResponseHandler alloc] initWithUUID:receiptID success:success failure:failure]; AFImageDownloaderMergedTask *mergedTask = [[AFImageDownloaderMergedTask alloc] initWithURLIdentifier:URLIdentifier identifier:mergedTaskIdentifier task:createdTask]; [mergedTask addResponseHandler:handler]; self .mergedTasks[URLIdentifier] = mergedTask; if ([self isActiveRequestCountBelowMaximumLimit]) { [self startMergedTask:mergedTask]; } else { [self enqueueMergedTask:mergedTask]; } task = mergedTask.task; }); if (task) { return [[AFImageDownloadReceipt alloc] initWithReceiptID:receiptID task:task]; } else { return nil ; } }
就这么一个非常非常长的方法,这个方法执行的内容都是在我们之前创建的串行queue中,同步的执行的,这是因为这个方法绝大多数的操作都是需要线程安全的。可以对着源码和注释来看,我们在这讲下它做了什么:
1) 判断url是否为空 首先做了一个url的判断,如果为空则返回失败Block。
2) 判断是否是已生成task 判断这个需要请求的url,是不是已经被生成的task中,如果是的话,则多添加一个回调处理就可以。
2-1) AFImageDownloaderResponseHandler 回调处理对象为AFImageDownloaderResponseHandler。这个类非常简单,总共就如下3个属性:
1 2 3 4 5 6 7 8 9 10 11 12 13 14 15 16 17 @interface AFImageDownloaderResponseHandler : NSObject @property (nonatomic , strong ) NSUUID *uuid;@property (nonatomic , copy ) void (^successBlock)(NSURLRequest *, NSHTTPURLResponse *, UIImage *);@property (nonatomic , copy ) void (^failureBlock)(NSURLRequest *, NSHTTPURLResponse *, NSError *);@end @implementation AFImageDownloaderResponseHandler - (instancetype )initWithUUID:(NSUUID *)uuid success:(nullable void (^)(NSURLRequest *request, NSHTTPURLResponse * _Nullable response, UIImage *responseObject))success failure:(nullable void (^)(NSURLRequest *request, NSHTTPURLResponse * _Nullable response, NSError *error))failure { if (self = [self init]) { self .uuid = uuid; self .successBlock = success; self .failureBlock = failure; } return self ; }
当这个task完成的时候,会调用我们添加的回调。
2-2) AFImageDownloaderMergedTask 关于AFImageDownloaderMergedTask,我们在这里都用的是这种类型的task,其实这个task也很简单:
1 2 3 4 5 6 7 8 9 10 11 12 13 14 15 16 17 18 19 20 21 22 23 24 25 @interface AFImageDownloaderMergedTask : NSObject @property (nonatomic , strong ) NSString *URLIdentifier;@property (nonatomic , strong ) NSUUID *identifier;@property (nonatomic , strong ) NSURLSessionDataTask *task;@property (nonatomic , strong ) NSMutableArray <AFImageDownloaderResponseHandler*> *responseHandlers;@end @implementation AFImageDownloaderMergedTask - (instancetype )initWithURLIdentifier:(NSString *)URLIdentifier identifier:(NSUUID *)identifier task:(NSURLSessionDataTask *)task { if (self = [self init]) { self .URLIdentifier = URLIdentifier; self .task = task; self .identifier = identifier; self .responseHandlers = [[NSMutableArray alloc] init]; } return self ; } - (void )addResponseHandler:(AFImageDownloaderResponseHandler*)handler { [self .responseHandlers addObject:handler]; } - (void )removeResponseHandler:(AFImageDownloaderResponseHandler*)handler { [self .responseHandlers removeObject:handler]; } @end
其实就是除了NSURLSessionDataTask,多加了几个参数,URLIdentifier和identifier都是用来标识这个task的,responseHandlers是用来存储task完成后的回调的,里面可以存一组,当任务完成时候,里面的回调都会被调用。
3. 判断缓存是否存在 接着去根据缓存策略,去加载缓存,如果有缓存,从self.imageCache中返回缓存,否则继续往下走。
4. 创建NSURLSessionDataTask并设置完成回调 走到这说明没相同url的task,也没有cache,那么就开始一个新的task,调用的是AFUrlSessionManager里的请求方法生成了一个task(前面已经说过,不赘述)。
同时做了请求完成的处理。注意,这里处理是在我们一开始初始化的并行queue:self.responseQueue中的,这里的响应处理是多线程并发进行的。
完成后:
调用如下方法把这个task从全局字典中移除:
1 2 3 4 5 6 7 8 - (AFImageDownloaderMergedTask*)safelyRemoveMergedTaskWithURLIdentifier:(NSString *)URLIdentifier { __block AFImageDownloaderMergedTask *mergedTask = nil ; dispatch_sync (self .synchronizationQueue, ^{ mergedTask = [self removeMergedTaskWithURLIdentifier:URLIdentifier]; }); return mergedTask; }
根据task的成功或失败情况,去循环这个task的responseHandlers,分别调用它的成功或者失败的回调。
如果成功,把成功请求到的数据,加到AF自定义的cache中:
1 2 [strongSelf.imageCache addImage:responseObject forRequest:request withAdditionalIdentifier:nil ];
并且调用下面两个方法,去减少正在请求的任务数,和开启下一个任务:
1 2 3 4 5 6 7 8 9 10 11 12 13 14 15 16 17 18 19 20 21 22 23 24 25 26 27 - (void )safelyDecrementActiveTaskCount { dispatch_sync (self .synchronizationQueue, ^{ if (self .activeRequestCount > 0 ) { self .activeRequestCount -= 1 ; } }); } - (void )safelyStartNextTaskIfNecessary { dispatch_sync (self .synchronizationQueue, ^{ if ([self isActiveRequestCountBelowMaximumLimit]) { while (self .queuedMergedTasks.count > 0 ) { AFImageDownloaderMergedTask *mergedTask = [self dequeueMergedTask]; if (mergedTask.task.state == NSURLSessionTaskStateSuspended ) { [self startMergedTask:mergedTask]; break ; } } } }); }
这里需要注意的是,跟我们本类的一些数据相关的操作,都是在我们一开始的串行queue中同步进行的。
5. 创建ResponseHandler和MergedTask 用NSUUID生成的唯一标识,去生成AFImageDownloaderResponseHandler,然后生成一个AFImageDownloaderMergedTask,把之前第5步生成的createdTask和回调都绑定给这个AF自定义可合并回调的task,然后这个task加到全局的task映射字典中,key为url:
1 self .mergedTasks[URLIdentifier] = mergedTask;
6. 判断当前并行数是否超限 判断当前正在下载的任务是否超过最大并行数,如果没有则开始下载,否则先加到等待的数组中去:
1 2 3 4 5 6 7 if ([self isActiveRequestCountBelowMaximumLimit]) { [self startMergedTask:mergedTask]; } else { [self enqueueMergedTask:mergedTask]; }
1 2 3 4 - (BOOL )isActiveRequestCountBelowMaximumLimit { return self .activeRequestCount < self .maximumActiveDownloads; }
1 2 3 4 5 6 7 8 9 10 11 12 13 14 15 16 17 18 19 - (void )startMergedTask:(AFImageDownloaderMergedTask *)mergedTask { [mergedTask.task resume]; ++self .activeRequestCount; } - (void )enqueueMergedTask:(AFImageDownloaderMergedTask *)mergedTask { switch (self .downloadPrioritizaton) { case AFImageDownloadPrioritizationFIFO: [self .queuedMergedTasks addObject:mergedTask]; break ; case AFImageDownloadPrioritizationLIFO: [self .queuedMergedTasks insertObject:mergedTask atIndex:0 ]; break ; } }
先判断并行数限制,如果小于最大限制,则开始下载,把当前活跃的request数量+1。
如果暂时不能下载,被加到等待下载的数组中去的话,会根据我们一开始设置的下载策略,是先进先出,还是后进先出,去插入这个下载任务。
7. 创建AFImageDownloadReceipt 最后判断这个mergeTask是否为空。不为空,我们生成了一个AFImageDownloadReceipt,绑定了一个UUID,否则为空返回nil。这个AFImageDownloadReceipt仅仅是多封装了一个UUID:
1 2 3 4 5 6 7 8 9 10 11 12 @interface AFImageDownloadReceipt : NSObject @property (nonatomic , strong ) NSURLSessionDataTask *task;@property (nonatomic , strong ) NSUUID *receiptID;@end @implementation AFImageDownloadReceipt - (instancetype )initWithReceiptID:(NSUUID *)receiptID task:(NSURLSessionDataTask *)task { if (self = [self init]) { self .receiptID = receiptID; self .task = task; } return self ; }
这么封装是为了标识每一个task,我们后面可以根据这个AFImageDownloadReceipt来对task做取消操作。
3. 取消task 这个AFImageDownloader中最核心的方法基本就讲完了,还剩下一些方法没讲,像前面讲到的task的取消的方法:
1 2 3 4 5 6 7 8 9 10 11 12 13 14 15 16 17 18 19 20 21 22 23 24 25 26 27 28 29 30 31 32 33 34 35 36 - (void )cancelTaskForImageDownloadReceipt:(AFImageDownloadReceipt *)imageDownloadReceipt { dispatch_sync (self .synchronizationQueue, ^{ NSString *URLIdentifier = imageDownloadReceipt.task.originalRequest.URL.absoluteString; AFImageDownloaderMergedTask *mergedTask = self .mergedTasks[URLIdentifier]; NSUInteger index = [mergedTask.responseHandlers indexOfObjectPassingTest:^BOOL (AFImageDownloaderResponseHandler * _Nonnull handler, __unused NSUInteger idx, __unused BOOL * _Nonnull stop) { return handler.uuid == imageDownloadReceipt.receiptID; }]; if (index != NSNotFound ) { AFImageDownloaderResponseHandler *handler = mergedTask.responseHandlers[index]; [mergedTask removeResponseHandler:handler]; NSString *failureReason = [NSString stringWithFormat:@"ImageDownloader cancelled URL request: %@" ,imageDownloadReceipt.task.originalRequest.URL.absoluteString]; NSDictionary *userInfo = @{NSLocalizedFailureReasonErrorKey :failureReason}; NSError *error = [NSError errorWithDomain:NSURLErrorDomain code:NSURLErrorCancelled userInfo:userInfo]; if (handler.failureBlock) { dispatch_async (dispatch_get_main_queue(), ^{ handler.failureBlock(imageDownloadReceipt.task.originalRequest, nil , error); }); } } if (mergedTask.responseHandlers.count == 0 && mergedTask.task.state == NSURLSessionTaskStateSuspended ) { [mergedTask.task cancel]; [self removeMergedTaskWithURLIdentifier:URLIdentifier]; } }); }
1 2 3 4 5 6 - (AFImageDownloaderMergedTask *)removeMergedTaskWithURLIdentifier:(NSString *)URLIdentifier { AFImageDownloaderMergedTask *mergedTask = self .mergedTasks[URLIdentifier]; [self .mergedTasks removeObjectForKey:URLIdentifier]; return mergedTask; }
方法比较简单,大家自己看看就好。至此```AFImageDownloader``这个类讲完了。如果大家看的感觉比较绕,没关系,等到最后我们一起来总结一下,捋一捋。
5.2.2 AFAutoPurgingImageCache 我们之前讲到AFAutoPurgingImageCache这个类略过去了,现在我们就来补充一下这个类的相关内容:
首先来讲讲这个类的作用,它是AF自定义用来做图片缓存的。
1. 下文要用到的AFCachedImage 关于这个AFCachedImage,其实就是Image之外封装了几个关于这个缓存的参数,如下:
1 2 3 4 5 6 7 8 9 10 11 12 13 14 15 16 17 18 19 20 21 22 23 24 25 26 27 @interface AFCachedImage : NSObject @property (nonatomic , strong ) UIImage *image;@property (nonatomic , strong ) NSString *identifier; @property (nonatomic , assign ) UInt64 totalBytes; @property (nonatomic , strong ) NSDate *lastAccessDate; @property (nonatomic , assign ) UInt64 currentMemoryUsage; @end @implementation AFCachedImage -(instancetype )initWithImage:(UIImage *)image identifier:(NSString *)identifier { if (self = [self init]) { self .image = image; self .identifier = identifier; CGSize imageSize = CGSizeMake (image.size.width * image.scale, image.size.height * image.scale); CGFloat bytesPerPixel = 4.0 ; CGFloat bytesPerSize = imageSize.width * imageSize.height; self .totalBytes = (UInt64 )bytesPerPixel * (UInt64 )bytesPerSize; self .lastAccessDate = [NSDate date]; } return self ; } - (UIImage *)accessImage { self .lastAccessDate = [NSDate date]; return self .image; }
2. 初始化方法 1 2 3 4 5 6 7 8 9 10 11 12 13 14 15 16 17 18 19 20 21 22 23 24 25 26 27 28 29 30 31 32 33 34 35 36 37 38 39 40 41 42 43 44 - (instancetype )init { return [self initWithMemoryCapacity:100 * 1024 * 1024 preferredMemoryCapacity:60 * 1024 * 1024 ]; } - (instancetype )initWithMemoryCapacity:(UInt64 )memoryCapacity preferredMemoryCapacity:(UInt64 )preferredMemoryCapacity { if (self = [super init]) { self .memoryCapacity = memoryCapacity; self .preferredMemoryUsageAfterPurge = preferredMemoryCapacity; self .cachedImages = [[NSMutableDictionary alloc] init]; NSString *queueName = [NSString stringWithFormat:@"com.alamofire.autopurgingimagecache-%@" , [[NSUUID UUID] UUIDString]]; self .synchronizationQueue = dispatch_queue_create([queueName cStringUsingEncoding:NSASCIIStringEncoding ], DISPATCH_QUEUE_CONCURRENT); [[NSNotificationCenter defaultCenter] addObserver:self selector:@selector (removeAllImages) name:UIApplicationDidReceiveMemoryWarningNotification object:nil ]; } return self ; } - (BOOL )removeAllImages { __block BOOL removed = NO ; dispatch_barrier_sync(self .synchronizationQueue, ^{ if (self .cachedImages.count > 0 ) { [self .cachedImages removeAllObjects]; self .currentMemoryUsage = 0 ; removed = YES ; } }); return removed; }
注意这个类大量的使用了dispatch_barrier_sync与dispatch_barrier_async,小伙伴们如果对这两个方法有任何疑惑,可以看看这篇文章:dispatch_barrier_async与dispatch_barrier_sync异同 。
这里我们可以看到使用了dispatch_barrier_sync,这里没有用锁,但是因为使用了dispatch_barrier_sync,不仅同步了synchronizationQueue队列,而且阻塞了当前线程,所以保证了里面执行代码的线程安全问题。
在这里其实使用锁也可以,但是AF在这的处理却是使用同步的机制来保证线程安全,或许这跟图片的加载缓存的使用场景,高频次有关系 ,在这里使用sync,并不需要在去开辟新的线程,浪费性能,只需要在原有线程,提交到synchronizationQueue队列中,阻塞的执行即可。这样省去大量的开辟线程与使用锁带来的性能消耗。(当然这仅仅是我的一个猜测,有不同意见的朋友欢迎讨论~)
在这里用了dispatch_barrier_sync,因为synchronizationQueue是个并行queue,所以在这里不会出现死锁的问题。
关于保证线程安全的同时,同步还是异步,与性能方面的考量,可以参考这篇文章:Objc的底层并发API 。
3. 核心方法addImage: 接着我们来看看这个类最核心的一个方法:
1 2 3 4 5 6 7 8 9 10 11 12 13 14 15 16 17 18 19 20 21 22 23 24 25 26 27 28 29 30 31 32 33 34 35 36 37 38 39 40 41 42 43 44 45 46 47 48 49 50 - (void )addImage:(UIImage *)image withIdentifier:(NSString *)identifier { dispatch_barrier_async(self .synchronizationQueue, ^{ AFCachedImage *cacheImage = [[AFCachedImage alloc] initWithImage:image identifier:identifier]; AFCachedImage *previousCachedImage = self .cachedImages[identifier]; if (previousCachedImage != nil ) { self .currentMemoryUsage -= previousCachedImage.totalBytes; } self .cachedImages[identifier] = cacheImage; self .currentMemoryUsage += cacheImage.totalBytes; }); dispatch_barrier_async(self .synchronizationQueue, ^{ if (self .currentMemoryUsage > self .memoryCapacity) { UInt64 bytesToPurge = self .currentMemoryUsage - self .preferredMemoryUsageAfterPurge; NSMutableArray <AFCachedImage*> *sortedImages = [NSMutableArray arrayWithArray:self .cachedImages.allValues]; NSSortDescriptor *sortDescriptor = [[NSSortDescriptor alloc] initWithKey:@"lastAccessDate" ascending:YES ]; [sortedImages sortUsingDescriptors:@[sortDescriptor]]; UInt64 bytesPurged = 0 ; for (AFCachedImage *cachedImage in sortedImages) { [self .cachedImages removeObjectForKey:cachedImage.identifier]; bytesPurged += cachedImage.totalBytes; if (bytesPurged >= bytesToPurge) { break ; } } self .currentMemoryUsage -= bytesPurged; } }); }
看注释应该很容易明白,这个方法做了两件事:
设置缓存到字典里,并且把对应的缓存大小设置到当前已缓存的数量属性中。
判断是缓存超出了我们设置的最大缓存100M,如果是的话,则清除掉部分早时间的缓存,清除到缓存小于我们溢出后保留的内存60M以内。
当然在这里更需要说一说的是dispatch_barrier_async,这里整个类都没有使用dispatch_async,所以不存在是为了做一个栅栏,来同步上下文的线程。其实它在本类中的作用很简单,就是一个串行执行。
讲到这,小伙伴们又疑惑了,既然就是只是为了串行,那为什么我们不用一个串行queue就得了?非得用dispatch_barrier_async干嘛?其实小伙伴要是看的仔细,就明白了,上文我们说过,我们要用dispatch_barrier_sync来保证线程安全。如果我们使用串行queue,那么线程是极其容易死锁的。
4. 其他几个方法 1 2 3 4 5 6 7 8 9 10 11 12 13 14 15 16 17 18 19 20 21 22 23 24 25 26 27 28 29 30 31 32 33 34 35 - (nullable UIImage *)imageWithIdentifier:(NSString *)identifier { __block UIImage *image = nil ; dispatch_sync (self .synchronizationQueue, ^{ AFCachedImage *cachedImage = self .cachedImages[identifier]; image = [cachedImage accessImage]; }); return image; } - (void )addImage:(UIImage *)image forRequest:(NSURLRequest *)request withAdditionalIdentifier:(NSString *)identifier { [self addImage:image withIdentifier:[self imageCacheKeyFromURLRequest:request withAdditionalIdentifier:identifier]]; } - (BOOL )removeImageforRequest:(NSURLRequest *)request withAdditionalIdentifier:(NSString *)identifier { return [self removeImageWithIdentifier:[self imageCacheKeyFromURLRequest:request withAdditionalIdentifier:identifier]]; } - (nullable UIImage *)imageforRequest:(NSURLRequest *)request withAdditionalIdentifier:(NSString *)identifier { return [self imageWithIdentifier:[self imageCacheKeyFromURLRequest:request withAdditionalIdentifier:identifier]]; } - (NSString *)imageCacheKeyFromURLRequest:(NSURLRequest *)request withAdditionalIdentifier:(NSString *)additionalIdentifier { NSString *key = request.URL.absoluteString; if (additionalIdentifier != nil ) { key = [key stringByAppendingString:additionalIdentifier]; } return key; }
这几个方法都很简单,大家自己看看就好了,就不赘述了。至此AFAutoPurgingImageCache也讲完了,我们还是等到最后再来总结。
5.2.3 UIImageView+AFNetworking 我们绕了一大圈,总算回到了UIImageView+AFNetworking这个类,现在图片下载的方法,和缓存的方法都有了,实现这个类也是水到渠成的事了。
1. setImageWithURL: 我们来看下面我们绝大多数人很熟悉的方法,看看它的实现:
1 2 3 4 5 6 7 8 9 10 11 12 13 - (void )setImageWithURL:(NSURL *)url { [self setImageWithURL:url placeholderImage:nil ]; } - (void )setImageWithURL:(NSURL *)url placeholderImage:(UIImage *)placeholderImage { NSMutableURLRequest *request = [NSMutableURLRequest requestWithURL:url]; [request addValue:@"image/*" forHTTPHeaderField:@"Accept" ]; [self setImageWithURLRequest:request placeholderImage:placeholderImage success:nil failure:nil ]; }
上述方法按顺序往下调用,第二个方法给head的Accept类型设置为Image。接着调用到第三个方法,也是这个类目唯一一个重要的方法:
2. setImageWithURLRequest: 1 2 3 4 5 6 7 8 9 10 11 12 13 14 15 16 17 18 19 20 21 22 23 24 25 26 27 28 29 30 31 32 33 34 35 36 37 38 39 40 41 42 43 44 45 46 47 48 49 50 51 52 53 54 55 56 57 58 59 60 61 62 63 64 65 66 67 68 69 70 71 72 73 74 75 76 77 78 79 80 - (void )setImageWithURLRequest:(NSURLRequest *)urlRequest placeholderImage:(UIImage *)placeholderImage success:(void (^)(NSURLRequest *request, NSHTTPURLResponse * _Nullable response, UIImage *image))success failure:(void (^)(NSURLRequest *request, NSHTTPURLResponse * _Nullable response, NSError *error))failure { if ([urlRequest URL] == nil ) { [self cancelImageDownloadTask]; self .image = placeholderImage; return ; } if ([self isActiveTaskURLEqualToURLRequest:urlRequest]){ return ; } [self cancelImageDownloadTask]; AFImageDownloader *downloader = [[self class ] sharedImageDownloader]; id <AFImageRequestCache> imageCache = downloader.imageCache; UIImage *cachedImage = [imageCache imageforRequest:urlRequest withAdditionalIdentifier:nil ]; if (cachedImage) { if (success) { success(urlRequest, nil , cachedImage); } else { self .image = cachedImage; } [self clearActiveDownloadInformation]; } else { if (placeholderImage) { self .image = placeholderImage; } __weak __typeof (self )weakSelf = self ; NSUUID *downloadID = [NSUUID UUID]; AFImageDownloadReceipt *receipt; receipt = [downloader downloadImageForURLRequest:urlRequest withReceiptID:downloadID success:^(NSURLRequest * _Nonnull request, NSHTTPURLResponse * _Nullable response, UIImage * _Nonnull responseObject) { __strong __typeof (weakSelf)strongSelf = weakSelf; if ([strongSelf.af_activeImageDownloadReceipt.receiptID isEqual:downloadID]) { if (success) { success(request, response, responseObject); } else if (responseObject) { strongSelf.image = responseObject; } [strongSelf clearActiveDownloadInformation]; } } failure:^(NSURLRequest * _Nonnull request, NSHTTPURLResponse * _Nullable response, NSError * _Nonnull error) { __strong __typeof (weakSelf)strongSelf = weakSelf; if ([strongSelf.af_activeImageDownloadReceipt.receiptID isEqual:downloadID]) { if (failure) { failure(request, response, error); } [strongSelf clearActiveDownloadInformation]; } }]; self .af_activeImageDownloadReceipt = receipt; } }
这个方法,细节的地方可以关注注释,这里总结一下做了什么:
1) 判断url是否为空 如果为空则取消task,调用如下方法:
1 2 3 4 5 6 7 8 9 10 11 12 13 - (void )cancelImageDownloadTask { if (self .af_activeImageDownloadReceipt != nil ) { [[self .class sharedImageDownloader] cancelTaskForImageDownloadReceipt:self .af_activeImageDownloadReceipt]; [self clearActiveDownloadInformation]; } } - (void )clearActiveDownloadInformation { self .af_activeImageDownloadReceipt = nil ; }
这里注意cancelImageDownloadTask中,调用了self.af_activeImageDownloadReceipt这么一个属性,看看定义的地方:
1 2 3 4 5 6 7 8 9 10 11 12 13 @interface UIImageView (_AFNetworking )@property (readwrite , nonatomic , strong , setter = af_setActiveImageDownloadReceipt:) AFImageDownloadReceipt *af_activeImageDownloadReceipt;@end @implementation UIImageView (_AFNetworking ) - (AFImageDownloadReceipt *)af_activeImageDownloadReceipt { return (AFImageDownloadReceipt *)objc_getAssociatedObject(self , @selector (af_activeImageDownloadReceipt)); } - (void )af_setActiveImageDownloadReceipt:(AFImageDownloadReceipt *)imageDownloadReceipt { objc_setAssociatedObject(self , @selector (af_activeImageDownloadReceipt), imageDownloadReceipt, OBJC_ASSOCIATION_RETAIN_NONATOMIC); } @end
我们现在是给UIImageView添加的一个类目,所以我们无法直接添加属性,而是使用的是runtime的方式来生成set和get方法生成了一个AFImageDownloadReceipt类型的属性。看过上文应该知道这个对象里面就一个task和一个UUID。这个属性就是我们这次下载任务相关联的信息。
2) 做了一系列判断,见注释 3) 创建AFImageDownloader并判断缓存 然后生成了一个我们之前分析过得AFImageDownloader,然后去获取缓存,如果有缓存,则直接读缓存。还记得AFImageDownloader里也有一个读缓存的方法么?那个是和cachePolicy相关的,而这个是有缓存的话直接读取。不明白的可以回过头去看看。
4) 请求图片 走到这说明没缓存了,然后就去用AFImageDownloader,我们之前讲过的方法,去请求图片。完成后,则调用成功或者失败的回调,并且置空属性self.af_activeImageDownloadReceipt,成功则设置图片。
3. cancelImageDownloadTask 还有一个取消这次任务的方法:
1 2 3 4 5 6 7 8 9 - (void )cancelImageDownloadTask { if (self .af_activeImageDownloadReceipt != nil ) { [[self .class sharedImageDownloader] cancelTaskForImageDownloadReceipt:self .af_activeImageDownloadReceipt]; [self clearActiveDownloadInformation]; } }
其实也是去调用我们之前讲过的AFImageDownloader的取消方法。
这个类总共就这么几行代码,就完成了我们几乎没有人不用的,设置ImageView图片的方法。当然真正的难点在于AFImageDownloader和AFAutoPurgingImageCache。
5.2.4 总结 接下来我们来总结一下整个请求图片,缓存,然后设置图片的流程:
调用- (void)setImageWithURL:(NSURL *)url;时,我们生成 AFImageDownloader单例,并替我们请求数据。
而AFImageDownloader会生成一个AFAutoPurgingImageCache替我们缓存生成的数据。当然我们设置的时候,给session的configuration设置了一个系统级别的缓存NSUrlCache,这两者是互相独立工作的,互不影响的。
然后AFImageDownloader,就实现下载和协调AFAutoPurgingImageCache去缓存,还有一些取消下载的方法。然后通过回调把数据给到我们的类目UIImageView+AFNetworking,如果成功获取数据,则由类目设置上图片,整个流程结束。
经过这三个文件: UIImageView+AFNetworking、AFImageDownloader、AFAutoPurgingImageCache,至此整个设置网络图片的方法结束了。
写在最后:对于UIKit的总结,我们就到此为止了,其它部分的扩展,小伙伴们可以自行阅读,都很简单,基本上每个类200行左右的代码。核心功能基本上都是围绕AFURLSessionManager实现的。
六、AF2.x与AF3.x 以下是涉及AF2.x的核心实现,与AF3.x最新版本之间的对比,以及本系列的一个最终总结:AFNetworking到底做了什么?
6.1 源码结构 首先我们来看看AF2.x的项目目录:
除了UIKit扩展外,大概就是上述这么多类,其中最重要的有3个类:
AFURLConnectionOperation:大家都知道,AF2.x是基于NSURLConnection来封装的,而NSURLConnection的创建以及数据请求,就被封装在这个类中。所以这个类基本上是AF2.x最底层也是最核心的类。
AFHTTPRequestOperation:继承自AFURLConnectionOperation,对它父类一些方法做了些封装。
AFHTTPRequestOperationManager:则是一个管家,去管理这些这些operation。
我们接下来按照网络请求的流程去看看AF2.x的实现:
注:本文会涉及一些NSOperationQueue、NSOperation方面的知识,如果对这方面的内容不了解的话,可以先看看雷纯峰的这篇:iOS 并发编程之 Operation Queues
首先,我们来写一个get或者post请求:
1 2 3 4 5 6 7 AFHTTPRequestOperationManager *manager = [AFHTTPRequestOperationManager manager]; [manager GET:url parameters:params success:^(AFHTTPRequestOperation *operation, id responseObject) { } failure:^(AFHTTPRequestOperation *operation, NSError *error) { }];
就这么简单的几行代码,完成了一个网络请求。
6.2 AFHTTPRequestOperationManager 6.2.1 初始化方法 1 2 3 4 5 6 7 8 9 10 11 12 13 14 15 16 17 18 19 20 21 22 23 24 25 26 27 + (instancetype )manager { return [[self alloc] initWithBaseURL:nil ]; } - (instancetype )init { return [self initWithBaseURL:nil ]; } - (instancetype )initWithBaseURL:(NSURL *)url { self = [super init]; if (!self ) { return nil ; } if ([[url path] length] > 0 && ![[url absoluteString] hasSuffix:@"/" ]) { url = [url URLByAppendingPathComponent:@"" ]; } self .baseURL = url; self .requestSerializer = [AFHTTPRequestSerializer serializer]; self .responseSerializer = [AFJSONResponseSerializer serializer]; self .securityPolicy = [AFSecurityPolicy defaultPolicy]; self .reachabilityManager = [AFNetworkReachabilityManager sharedManager]; self .operationQueue = [[NSOperationQueue alloc] init]; self .shouldUseCredentialStorage = YES ; return self ; }
初始化方法很简单,基本和AF3.x类似,除了以下两点:
设置了一个operationQueue,这个队列,用来调度里面所有的operation,在AF2.x中,每一个operation就是一个网络请求。
设置shouldUseCredentialStorage为YES,这个后面会传给operation,operation会根据这个值,去返回给代理,系统是否做https的证书验证。
6.2.2 get方法及AFHTTPRequestOperation创建 1 2 3 4 5 6 7 8 9 10 11 12 13 14 - (AFHTTPRequestOperation *)GET:(NSString *)URLString parameters:(id )parameters success:(void (^)(AFHTTPRequestOperation *operation, id responseObject))success failure:(void (^)(AFHTTPRequestOperation *operation, NSError *error))failure { NSMutableURLRequest *request = [self .requestSerializer requestWithMethod:@"GET" URLString:[[NSURL URLWithString:URLString relativeToURL:self .baseURL] absoluteString] parameters:parameters error:nil ]; AFHTTPRequestOperation *operation = [self HTTPRequestOperationWithRequest:request success:success failure:failure]; [self .operationQueue addOperation:operation]; return operation; }
其中创建AFHTTPRequestOperation方法如下:
1 2 3 4 5 6 7 8 9 10 11 12 13 14 15 16 17 18 19 20 - (AFHTTPRequestOperation *)HTTPRequestOperationWithRequest:(NSURLRequest *)request success:(void (^)(AFHTTPRequestOperation *operation, id responseObject))success failure:(void (^)(AFHTTPRequestOperation *operation, NSError *error))failure { AFHTTPRequestOperation *operation = [[AFHTTPRequestOperation alloc] initWithRequest:request]; operation.responseSerializer = self .responseSerializer; operation.shouldUseCredentialStorage = self .shouldUseCredentialStorage; operation.credential = self .credential; operation.securityPolicy = self .securityPolicy; [operation setCompletionBlockWithSuccess:success failure:failure]; operation.completionQueue = self .completionQueue; operation.completionGroup = self .completionGroup; return operation; }
进入到AFHTTPRequestOperation的初始化方法
1 2 3 4 5 6 7 8 9 - (instancetype )initWithRequest:(NSURLRequest *)urlRequest { self = [super initWithRequest:urlRequest]; if (!self ) { return nil ; } self .responseSerializer = [AFHTTPResponseSerializer serializer]; return self ; }
可以看到除了设置了一个self.responseSerializer,实际上是调用了父类,也是我们最核心的类AFURLConnectionOperation的初始化方法。
6.3 AFURLConnectionOperation 6.3.1 初始化方法 首先我们要明确这个类是继承自NSOperation的 ,然后我们接着往下看:
1 2 3 4 5 6 7 8 9 10 11 12 13 14 15 16 17 18 19 20 21 22 23 24 25 - (instancetype )initWithRequest:(NSURLRequest *)urlRequest { NSParameterAssert (urlRequest); self = [super init]; if (!self ) { return nil ; } _state = AFOperationReadyState; self .lock = [[NSRecursiveLock alloc] init]; self .lock.name = kAFNetworkingLockName; self .runLoopModes = [NSSet setWithObject:NSRunLoopCommonModes ]; self .request = urlRequest; self .shouldUseCredentialStorage = YES ; self .securityPolicy = [AFSecurityPolicy defaultPolicy]; return self ; }
初始化方法中,初始化了一些属性,下面我们来简单的介绍一下这些属性:
6.3.2 成员变量和属性 1. 属性state和重写setter _state设置为AFOperationReadyState 准备就绪状态,这是个枚举:
1 2 3 4 5 6 typedef NS_ENUM (NSInteger , AFOperationState) { AFOperationPausedState = -1 , AFOperationReadyState = 1 , AFOperationExecutingState = 2 , AFOperationFinishedState = 3 , };
本类重写了state的setter方法,在改变state的时候,同时会发送KVO。
1 2 3 4 5 6 7 8 9 10 11 12 13 14 15 16 17 18 19 20 21 - (void )setState:(AFOperationState)state { if (!AFStateTransitionIsValid(self .state, state, [self isCancelled])) { return ; } [self .lock lock]; NSString *oldStateKey = AFKeyPathFromOperationState(self .state); NSString *newStateKey = AFKeyPathFromOperationState(state); [self willChangeValueForKey:newStateKey]; [self willChangeValueForKey:oldStateKey]; _state = state; [self didChangeValueForKey:oldStateKey]; [self didChangeValueForKey:newStateKey]; [self .lock unlock]; }
这个_state标志着这个网络请求的状态,一共如上4种状态。这些状态其实对应着operation如下的状态:
1 2 3 4 5 6 7 8 9 10 11 12 13 14 15 16 17 18 19 static inline NSString * AFKeyPathFromOperationState (AFOperationState state) switch case AFOperationReadyState: return @"isReady" ; case AFOperationExecutingState: return @"isExecuting" ; case AFOperationFinishedState: return @"isFinished" ; case AFOperationPausedState: return @"isPaused" ; default : { #pragma clang diagnostic push #pragma clang diagnostic ignored "-Wunreachable-code" return @"state" ; #pragma clang diagnostic pop } } }
2. 重写父类NSOperation的属性getter 复写了这些属性的get方法,用来和自定义的state一一对应:
1 2 3 4 5 6 7 8 9 10 - (BOOL )isReady { return self .state == AFOperationReadyState && [super isReady]; } - (BOOL )isExecuting { return self .state == AFOperationExecutingState; } - (BOOL )isFinished { return self .state == AFOperationFinishedState; }
3. 属性lock self.lock这个锁是用来提供给本类一些数据操作的线程安全,至于为什么要用递归锁,是因为有些方法可能会存在递归调用的情况,例如有些需要锁的方法可能会在一个大的操作环中,形成递归。而AF使用了递归锁,避免了这种情况下死锁的发生 。
4. 属性runLoopModes 初始化了self.runLoopModes,默认为NSRunLoopCommonModes。
5. 属性securityPolicy 生成了一个默认的 self.securityPolicy,关于这个policy执行的https认证,可以见楼主之前的文章。
6.3.3 复写operation的start方法 这个类为了自定义operation的各种状态,而且更好的掌控它的生命周期,复写了operation的start方法。
1. 源码实现 当这个operation在一个新线程被调度执行的时候,首先就调入这个start方法中,接下来我们它的实现看看:
1 2 3 4 5 6 7 8 9 10 11 12 13 14 15 16 17 18 - (void )start { [self .lock lock]; if ([self isCancelled]) { [self performSelector:@selector (cancelConnection) onThread:[[self class ] networkRequestThread] withObject:nil waitUntilDone:NO modes:[self .runLoopModes allObjects]]; } else if ([self isReady]) { self .state = AFOperationExecutingState; [self performSelector:@selector (operationDidStart) onThread:[[self class ] networkRequestThread] withObject:nil waitUntilDone:NO modes:[self .runLoopModes allObjects]]; } [self .lock unlock]; }
这个方法判断了当前的状态,是取消还是准备就绪,然后去调用了各自对应的方法。
2. 开辟新线程 注意这些方法都是在另外一个线程中去调用的,我们来看看这个线程:
1 2 3 4 5 6 7 8 9 10 11 12 13 14 15 16 17 18 19 20 21 + (void )networkRequestThreadEntryPoint:(id )__unused object { @autoreleasepool { [[NSThread currentThread] setName:@"AFNetworking" ]; NSRunLoop *runLoop = [NSRunLoop currentRunLoop]; [runLoop addPort:[NSMachPort port] forMode:NSDefaultRunLoopMode ]; [runLoop run]; } } + (NSThread *)networkRequestThread { static NSThread *_networkRequestThread = nil ; static dispatch_once_t oncePredicate; dispatch_once (&oncePredicate, ^{ _networkRequestThread = [[NSThread alloc] initWithTarget:self selector:@selector (networkRequestThreadEntryPoint:) object:nil ]; [_networkRequestThread start]; }); return _networkRequestThread; }
这两个方法基本上是被许多人举例用过无数次了…
这是一个单例,用NSThread创建了一个线程,并且为这个线程添加了一个runloop,并且加了一个NSMachPort,来防止runloop直接退出。
这条线程就是AF用来发起网络请求,并且接受网络请求回调的线程,仅仅就这一条线程 (到最后我们来讲为什么要这么做)。和我们之前讲的AF3.x发起请求,并且接受请求回调时的处理方式,遥相呼应。
3. start调用流程 我们接着来看如果准备就绪,start调用的方法:
1 2 3 self .state = AFOperationExecutingState;[self performSelector:@selector (operationDidStart) onThread:[[self class ] networkRequestThread] withObject:nil waitUntilDone:NO modes:[self .runLoopModes allObjects]];
接着在常驻线程中,并且不阻塞的方式,在我们self.runLoopModes的模式下调用:
1 2 3 4 5 6 7 8 9 10 11 12 13 14 15 16 17 18 19 20 21 22 23 - (void )operationDidStart { [self .lock lock]; if (![self isCancelled]) { self .connection = [[NSURLConnection alloc] initWithRequest:self .request delegate:self startImmediately:NO ]; NSRunLoop *runLoop = [NSRunLoop currentRunLoop]; for (NSString *runLoopMode in self .runLoopModes) { [self .connection scheduleInRunLoop:runLoop forMode:runLoopMode]; [self .outputStream scheduleInRunLoop:runLoop forMode:runLoopMode]; } [self .outputStream open]; [self .connection start]; } [self .lock unlock]; dispatch_async (dispatch_get_main_queue(), ^{ [[NSNotificationCenter defaultCenter] postNotificationName:AFNetworkingOperationDidStartNotification object:self ]; }); }
这个方法做了以下几件事:
1) 创建NSURLConnection 首先这个方法创建了一个NSURLConnection,设置代理为自己,startImmediately为NO,至于这个参数干什么用的,我们来看看官方文档:
startImmediately
大意是,这个值默认为YES,而且任务完成的结果会在主线程的runloop中回调。如果我们设置为NO,则需要调用我们下面看到的:
1 [self.connection scheduleInRunLoop:runLoop forMode:runLoopMode ];
去注册一个runloop和mode,它会在我们指定的这个runloop所在的线程中回调结果。
2) outputStream的创建及注册 值得一提的是这里调用了:
1 [self.outputStream scheduleInRunLoop:runLoop forMode:runLoopMode ];
这个outputStream在getter方法中被初始化了:
1 2 3 4 5 6 7 - (NSOutputStream *)outputStream { if (!_outputStream) { self .outputStream = [NSOutputStream outputStreamToMemory]; } return _outputStream; }
这里数据请求和拼接并没有用NSMutableData,而是用了outputStream,而且把写入的数据,放到内存中。
其实讲道理来说outputStream的优势在于下载大文件的时候,可以以流的形式,将文件直接保存到本地,这样可以为我们节省很多的内存 ,调用如下方法设置:
1 [NSOutputStream outputStreamToFileAtPath:@"filePath" append:YES ];
但是这里是把流写入内存中,这样其实这个节省内存的意义已经不存在了。那为什么还要用呢?这里我猜测的是就是为了用它这个可以注册在某一个runloop的指定mode下。 虽然AF使用这个outputStream是肯定在这个常驻线程中的,不会有线程安全的问题。但是要注意它是被声明在.h中的:
1 @property (nonatomic , strong ) NSOutputStream *outputStream;
难保外部不会在其他线程对这个数据做什么操作,所以它相对于NSMutableData作用就体现出来了,就算我们在外部其它线程中去操作它,也不会有线程安全的问题。
3) 开始执行connection 4) 到主线程发送任务开始执行的通知 6.3.4 实现NSURLConnectionDelegate 接下来网络请求开始执行了,就开始触发connection的代理方法了:
AF2.x一共实现了如上这么多代理方法,这些代理方法,作用大部分和我们之前讲的NSURLSession的代理方法类似,我们重点讲下面这四个代理:
注意,有一点需要说明,我们之前是把connection注册在我们常驻线程的runloop中了,所以以下所有的代理方法,都是在这仅有的一条常驻线程中回调。
1. connection:didReceiveResponse 1 2 3 4 5 6 - (void )connection:(NSURLConnection __unused *)connection didReceiveResponse:(NSURLResponse *)response { self .response = response; }
没什么好说的,就是收到响应后,把response赋给自己的属性。
2. connection:didReceiveData 1 2 3 4 5 6 7 8 9 10 11 12 13 14 15 16 17 18 19 20 21 22 23 24 25 26 27 28 29 30 31 32 33 34 35 36 37 38 39 40 41 42 43 44 45 46 47 48 49 - (void )connection:(NSURLConnection __unused *)connection didReceiveData:(NSData *)data { NSUInteger length = [data length]; while (YES ) { NSInteger totalNumberOfBytesWritten = 0 ; if ([self .outputStream hasSpaceAvailable]) { const uint8_t *dataBuffer = (uint8_t *)[data bytes]; NSInteger numberOfBytesWritten = 0 ; while (totalNumberOfBytesWritten < (NSInteger )length) { numberOfBytesWritten = [self .outputStream write:&dataBuffer[(NSUInteger )totalNumberOfBytesWritten] maxLength:(length - (NSUInteger )totalNumberOfBytesWritten)]; if (numberOfBytesWritten == -1 ) { break ; } totalNumberOfBytesWritten += numberOfBytesWritten; } break ; } if (self .outputStream.streamError) { [self .connection cancel]; [self performSelector:@selector (connection:didFailWithError:) withObject:self .connection withObject:self .outputStream.streamError]; return ; } } dispatch_async (dispatch_get_main_queue(), ^{ self .totalBytesRead += (long long )length; if (self .downloadProgress) { self .downloadProgress(length, self .totalBytesRead, self .response.expectedContentLength); } }); }
这个方法看起来长,其实容易理解而且简单,它只做了3件事:
给outputStream拼接数据,具体如果拼接,大家可以读注释自行理解下。
如果出错则调用:connection:didFailWithError:也就是网络请求失败的代理,我们一会下面就会讲。
在主线程中回调下载进度。
3. connectionDidFinishLoading 1 2 3 4 5 6 7 8 9 10 11 12 13 14 15 16 17 - (void )connectionDidFinishLoading:(NSURLConnection __unused *)connection { self .responseData = [self .outputStream propertyForKey:NSStreamDataWrittenToMemoryStreamKey ]; [self .outputStream close]; if (self .responseData) { self .outputStream = nil ; } self .connection = nil ; [self finish]; }
这个代理是任务完成之后调用。我们从outputStream拿到了最后下载数据,然后关闭置空了outputStream。并且清空了connection。调用了finish:
1 2 3 4 5 6 7 8 9 10 11 - (void )finish { [self .lock lock]; self .state = AFOperationFinishedState; [self .lock unlock]; dispatch_async (dispatch_get_main_queue(), ^{ [[NSNotificationCenter defaultCenter] postNotificationName:AFNetworkingOperationDidFinishNotification object:self ]; }); }
把当前任务状态改为已完成,并且到主线程发送任务完成的通知。这里我们设置状态为已完成。注意上面已经讲过:本类是复写了state的setter方法的 ,在改变state的时候,同时会发送KVO。
大家了解NSOperationQueue就知道,如果对应的operation的属性finnished被设置为YES,则代表当前operation结束了,会把operation从队列中移除,并且调用operation的completionBlock。这点很重要,因为我们请求到的数据就是从这个completionBlock中传递回去的 (下面接着讲这个完成Block,就能从这里对接上了)。
4. connection:didFailWithError 1 2 3 4 5 6 7 8 9 10 11 12 13 14 15 - (void )connection:(NSURLConnection __unused *)connection didFailWithError:(NSError *)error { self .error = error; [self .outputStream close]; if (self .responseData) { self .outputStream = nil ; } self .connection = nil ; [self finish]; }
唯一需要说一下的就是这里给self.error赋值,之后完成Block会根据这个error,去判断这次请求是成功还是失败。
至此我们把AFURLConnectionOperation的业务主线讲完了。
我们此时数据请求完了,数据在self.responseData中,那它是怎么回到我们手里的呢。需要回到AFURLConnectionOperation子类AFHTTPRequestOperation,有这么一个方法:setCompletionBlockWithSuccess:failure:
6.4 AFHTTPRequestOperation 6.4.1 初始化方法 前面已经看过这个AFHTTPRequestOperation的初始化方法,这里再整合一下
1 2 3 4 5 6 7 8 9 - (instancetype )initWithRequest:(NSURLRequest *)urlRequest { self = [super initWithRequest:urlRequest]; if (!self ) { return nil ; } self .responseSerializer = [AFHTTPResponseSerializer serializer]; return self ; }
除了设置了一个self.responseSerializer,实际上是调用了父类,也是我们最核心的类AFURLConnectionOperation的初始化方法。
6.4.2 设置completionBlock 1 2 3 4 5 6 7 8 9 10 11 12 13 14 15 16 17 18 19 20 21 22 23 24 25 26 27 28 29 30 31 32 33 34 35 36 37 38 39 40 41 42 43 - (void )setCompletionBlockWithSuccess:(void (^)(AFHTTPRequestOperation *operation, id responseObject))success failure:(void (^)(AFHTTPRequestOperation *operation, NSError *error))failure { #pragma clang diagnostic push #pragma clang diagnostic ignored "-Warc-retain-cycles" #pragma clang diagnostic ignored "-Wgnu" self .completionBlock = ^{ if (self .completionGroup) { dispatch_group_enter(self .completionGroup); } dispatch_async (http_request_operation_processing_queue(), ^{ if (self .error) { if (failure) { dispatch_group_async(self .completionGroup ?: http_request_operation_completion_group(), self .completionQueue ?: dispatch_get_main_queue(), ^{ failure(self , self .error); }); } } else { id responseObject = self .responseObject; if (self .error) { if (failure) { dispatch_group_async(self .completionGroup ?: http_request_operation_completion_group(), self .completionQueue ?: dispatch_get_main_queue(), ^{ failure(self , self .error); }); } } else { if (success) { dispatch_group_async(self .completionGroup ?: http_request_operation_completion_group(), self .completionQueue ?: dispatch_get_main_queue(), ^{ success(self , responseObject); }); } } } if (self .completionGroup) { dispatch_group_leave(self .completionGroup); } }); }; #pragma clang diagnostic pop }
一开始我们在AFHTTPRequestOperationManager中是调用过这个方法的:
1 [operation setCompletionBlockWithSuccess:success failure:failure];
我们在把成功和失败的Block传给了这个方法。
这个方法也很好理解,就是设置我们之前提到过得completionBlock,当自己数据请求完成,就会调用这个Block。然后我们在这个Block中调用传过来的成功或者失败的Block。 如果error为空,说明请求成功,把数据传出去,否则为失败,把error信息传出。
这里也类似AF3.x,可以自定义一个完成组和完成队列。数据可以在我们自定义的完成组和队列中回调出去。
除此之外,还有一个有意思的地方:
1 2 3 4 #pragma clang diagnostic push #pragma clang diagnostic ignored "-Warc-retain-cycles" #pragma clang diagnostic ignored "-Wgnu" #pragma clang diagnostic pop
之前我们说过,这是在忽略编译器的一些警告。
-Wgnu就不说了,是忽略 ?: 。值得提下的是-Warc-retain-cycles,这里忽略了循环引用的警告。我们仔细看看就知道self持有了completionBlock,而completionBlock内部持有self。这里确实循环引用了。那么AF是如何解决这个循环引用的呢?
我们在回到AFURLConnectionOperation,还有一个方法我们之前没讲到,它复写了setCompletionBlock这个方法。
1 2 3 4 5 6 7 8 9 10 11 12 13 14 15 16 17 18 19 20 21 22 23 24 25 26 27 28 29 30 31 - (void )setCompletionBlock:(void (^)(void ))block { [self .lock lock]; if (!block) { [super setCompletionBlock:nil ]; } else { __weak __typeof (self )weakSelf = self ; [super setCompletionBlock:^ { __strong __typeof (weakSelf)strongSelf = weakSelf; #pragma clang diagnostic push #pragma clang diagnostic ignored "-Wgnu" dispatch_group_t group = strongSelf.completionGroup ?: url_request_operation_completion_group(); dispatch_queue_t queue = strongSelf.completionQueue ?: dispatch_get_main_queue(); #pragma clang diagnostic pop dispatch_group_async(group, queue, ^{ block(); }); dispatch_group_notify(group, url_request_operation_completion_queue(), ^{ [strongSelf setCompletionBlock:nil ]; }); }]; } [self .lock unlock]; }
注意,它在我们设置的block调用结束的时候,主动的调用:
1 [strongSelf setCompletionBlock:nil ];
把Block置空,这样循环引用不复存在了。
6.4.3 数据解析的调用 1 2 3 4 5 6 7 8 9 10 11 12 13 - (id )responseObject { [self .lock lock]; if (!_responseObject && [self isFinished] && !self .error) { NSError *error = nil ; self .responseObject = [self .responseSerializer responseObjectForResponse:self .response data:self .responseData error:&error]; if (error) { self .responseSerializationError = error; } } [self .lock unlock]; return _responseObject; }
AFHTTPRequestOperation 复写了 responseObject 的getter方法,并且把数据按照我们需要的类型(json、xml等等)进行解析。
6.5 ResponseSerializer与SecurityPolicy 关于数据的序列化、SecurityPolicy,前面已经详细的讲过,AF2.x与AF3.x基本差不多,不再赘述。AFSecurityPolicy 在 AFURLConnectionOperation中https认证的代理中被调用
至此,AF2.x整个业务流程就结束了。
6.6 总结 接下来,我们来总结总结AF2.x整个业务请求的流程:
如上图,我们来梳理一下整个流程:
最上层的是AFHTTPRequestOperationManager,我们调用它进行get、post等等各种类型的网络请求
然后它去调用AFURLRequestSerialization做request参数拼装。然后生成了一个AFHTTPRequestOperation实例,并把request交给它。然后把AFHTTPRequestOperation添加到一个NSOperationQueue中。
接着AFHTTPRequestOperation拿到request后,会去调用它的父类AFURLConnectionOperation的初始化方法,并且把相关参数交给它,除此之外,当父类完成数据请求后,它调用了AFURLResponseSerialization把数据解析成我们需要的格式(json、XML等等)。
最后就是我们AF最底层的类AFURLConnectionOperation,它去数据请求,并且如果是https请求,会在请求的相关代理中,调用AFSecurityPolicy做https认证。最后请求到的数据返回。
这就是AF2.x整个做网络请求的业务流程。
6.7 遗留问题:一条常驻线程 我们来解决解决之前遗留下来的问题:为什么AF2.x需要一条常驻线程?
首先如果我们用NSURLConnection,我们为了获取请求结果有以下三种选择:
在主线程调异步接口
每一个请求用一个线程,对应一个runloop,然后等待结果回调。
只用一条线程,一个runloop,所有结果回调在这个线程上。
很显然AF选择的是第3种方式,创建了一条常驻线程专门处理所有请求的回调事件,这个模型跟nodejs有点类似,我们来讨论讨论不选择另外两种方式的原因:
先说第一种。试想如果我们所有的请求都在主线程中异步调用,好像没什么不可以?那为什么AF不这么做呢…在这里有两点原因(楼主个人总结的,有不同意见,欢迎讨论):
第一,如果我们放到主线程去做,势必要这么写:
1 [[NSURLConnection alloc] initWithRequest:request delegate:self startImmediately:YES ]
这样NSURLConnection的回调会被放在主线程中NSDefaultRunLoopMode中,这样我们在其它类似UITrackingRunLoopMode模式下,我们是得不到网络请求的结果的,这显然不是我们想要的,那么我们势必需要调用:
1 [connection scheduleInRunLoop:[NSRunLoop currentRunLoop] forMode:NSRunLoopCommonModes ];
把它加入 NSRunLoopCommonModes 中,试想如果有大量的网络请求,同时回调回来,就会影响我们的UI体验了。
另外一点原因是,如果我们请求数据返回,势必要进行数据解析,解析成我们需要的格式,那么这些解析都在主线程中做,给主线程增加额外的负担。又或者我们回调回来开辟一个新的线程去做数据解析,那么我们有n个请求回来开辟n条线程带来的性能损耗,以及线程间切换带来的损耗,是不是一笔更大的开销。
所以综述两点原因,我们并不适合在主线程中回调。
再说第二种。我们一开始就开辟n条线程去做请求,然后设置runloop保活住线程,等待结果回调。其实看到这,大家想想都觉得这个方法很傻,为了等待不确定的请求结果,阻塞住线程,白白浪费n条线程的开销。
综上所述,这就是AF2.x需要一条常驻线程的原因了 。
至此我们把AF2.x核心流程分析完了。
七、总结AFNetworking到底做了什么? 接着到我们本系列一个最终总结了: AFNetworking到底做了什么?
相信如果从头看到尾的小伙伴,心里都有了一个属于自己的答案。其实在楼主心里,实在不想去总结它,因为AFNetworking中凝聚了太多大牛的思想,根本不是你看完几遍源码所能去议论的。但是想想也知道,如果我说不总结,估计有些看到这的朋友杀人的心都有…所以我还是赶鸭子上架,来总结总结它。
AFNetworking的作用总结:
一、首先我们需要明确一点的是:相对于AFNetworking2.x,AFNetworking3.x确实没那么有用了。 AFNetworking之前的核心作用就是为了帮我们去调度所有的请求。但是最核心地方却被苹果的NSURLSession给借鉴过去了,嗯…是借鉴。这些请求的调度,现在完全由NSURLSession给做了,AFNetworking3.x的作用被大大的削弱了。
二、但是除此之外,其实它还是很有用的:
首先它帮我们做了各种请求方式request的拼接。 想想如果我们用NSURLSession,我们去做请求,是不是还得自己去考虑各种请求方式下,拼接参数的问题。它还帮我们做了一些公用参数(session级别的),和一些私用参数(task级别的)的分离 。它用Block的形式,支持我们自定义一些代理方法,如果没有实现的话,AF还帮我们做了一些默认的处理。而如果我们用NSURLSession的话,还得参照AF这么一套代理转发的架构模式去封装。它帮我们做了自定义的https认证处理 。看过楼主之前那篇AFNetworking之于https认证 的朋友就知道,如果我们自己用NSURLSession实现那几种自定义认证,需要多写多少代码…对于请求到的数据,AF帮我们做了各种格式的数据解析,并且支持我们设置自定义的code范围,自定义的数据方式 。如果不在这些范围中,则直接调用失败block。如果用NSURLSession呢?这些都自己去写吧…(你要是做过各种除json外其他的数据解析,就会知道这里面坑有多少…)对于成功和失败的回调处理。 AF帮我们在数据请求到,到回调给用户之间,做了各种错误的判断,保证了成功和失败的回调,界限清晰。在这过程中,AF帮我们做了太多的容错处理,而NSURLSession呢?只给了一个完成的回调,我们得多做多少判断,才能拿到一个确定能正常显示的数据?……
…
光是这些网络请求的业务逻辑,AF帮我们做的就太多太多,当然还远不仅于此。它用凝聚着许多大牛的经验方式,帮我在有些处理中做了最优的选择,比如我们之前说到的,回调线程数设置为1的问题…帮我们绕开了很多的坑,比如系统内部并行创建task导致id不唯一等等…
三、而如果我们需要一些UIKit的扩展,AF则提供了最稳定,而且最优化实现方式:
就比如之前说到过得那个状态栏小菊花,如果是我们自己去做,得多写多少代码,而且实现的还没有AF那样质量高。
又或者AFImageDownloader,它对于组图片之间的下载协调,以及缓存使用的之间线程调度。对于线程,锁,以及性能各方面权衡,找出最优化的处理方式,试问小伙伴们自己基于NSURLSession去写,能到做几分…
所以最后的结论是:AFNetworking虽然变弱了,但是它还是很有用的。 用它真的不仅仅是习惯,而是因为它确实帮我们做了太多。