Tenloy's Blog

iOS的持续集成

Word count: 11.2kReading time: 47 min
2021/04/27 Share

在iOS的开发过程中总是免不了要不停的打包,通常的打包方式是这样的 XCode->Archive->Export,期间还要选择对应的证书与pp文件,进行一次打包会花不少的时间,在打包的过程中我们是不能修改源代码的。

下面有几种方案,可以让我们简化我们的打包操作,以及使得我们可以在打包时,继续开发。

一、自动化打包/构建

1.1 xcodebuild

xcodebuild 指令是苹果官方提供的命令行打包工具,你可以使用此命令来进行clean、build、test、archive。

要查看官方的使用指南,可以通过命令 man xcodebuild来查看

1.1.1 project构建

要构建xcode项目需要在工程所在目录运行xcodebuild指令,如果目录中含有多个preoject的话,就需要使用-project指令来指定需要构建的工程。默认情况下xcodebuild会以工程里默认的configuration来build工程里的第一个target。

1.1.2 workspace构建

要构建workspce,需要设置-workspace与-scheme来定义构建,scheme用于指定要构建的targt以及怎样构建,也可以传递其他参数对scheme进行覆盖。

我们可以通过以下选项来查看工程中的环境

  • -list 查看当前工程的信息,如:target列表、configuration列表、scheme列表,同时能看到默认的configuration
  • -showBuildSettings 查看构建设置
  • -showdestinations 仅对workspace有效
  • -showsdks 查看SDK列表
  • -usage 使用示例
  • -version 查看当前版本

xcodebuild 所有指令默认的configuration都是Release

1.1.3 证书、描述文件

要用命令打包,但是证书一大堆的让人头疼,有一个比较简单的方法。

首先,把代码下载到要打包的电脑上,用xcode打开,使用xcode自动配置,然后先把ipa包用xcode打出来,最后导出来ipa包后,导出的文件夹下有一个ExportOptions.plist文件,把此文件复制到一个固定的文件夹下,供后面命令打包使用。

注意:不同的打包方式ad-hoc或者appstore生成的ExportOptions.plist不同,所以都要先生成一下。

1.1.4 常用子命令、选项

1. clean

1
2
3
4
# 清理构建目录 默认的configuration为Release
xcodebuild clean
# 也可以指定configuration
xcodebuild clean -configuration Debug

2. build

1
2
3
4
# 默认构建
xcodebuild build
# 指定configuration
xcodebuild build -configuration Debug

3. test

test指令需要指定scheme,同时还需要指定destination。 可以通过-showdestinations指令来获取可用的destination

1
2
xcodebuild -showdestinations -scheme demo_xocdebuild
xcodebuild test -scheme demo_xocdebuild -destination "platform=iOS Simulator,name=iPhone 8"

4. archive

需要注意的archive时要指定scheme才行

1
2
#project的archive
xcodebuild archive -scheme demo_xocdebuild -archivePath test

5. -exportArchive

此指令用于导出ipa包,必填参数archivePath、exportPath、exportOptionsPlist

1
2
# option.plist用于指定打包的method等,此文件可以通过用xcode打包后生成
xcodebuild -exportArchive -archivePath test.xcarchive -exportPath test -exportOptionsPlist 'ExportOptions.plist'

1.1.5 脚本示例

1
2
3
4
5
6
7
8
9
10
11
12
13
14
15
16
17
18
19
20
21
22
23
24
25
26
27
28
29
30
31
32
33
34
35
36
37
38
39
40
41
42
43
44
45
46
47
48
49
50
51
52
53
54
55
56
57
58
59
60
61
62
63
64
65
66
67
68
69
70
71
72
73
74
75
76
77
78
79
80
81
82
83
84
85
86
87
88
89
90
91
92
93
94
95
96
97
98
99
100
101
102
103
104
105
106
107
108
109
110
111
112
113
114
115
116
117
118
119
120
121
122
123
124
125
126
127
128
129
130
131
132
133
134
135
136
137
138
139
140
141
#!/bin/sh

# 注意事项
# 1、如果提示permission denied: ./package.sh , 则先附加权限,命令如下:chmod 777 package.sh
# 2、请根据自己项目的情况选择使用 workspace 还是 project 形式,目前默认为 workspace 形式

### 需要根据自己项目的情况进行修改,XXX都是需要进行修改的,可搜索进行修改 ###

# Project名称
PROJECT_NAME=XXX

## Scheme名
SCHEME_NAME=XXX

## 编译类型 Debug/Release二选一
BUILD_TYPE=XXX

## 项目根路径,xcodeproj/xcworkspace所在路径
PROJECT_ROOT_PATH=XXX

## 打包生成路径
PRODUCT_PATH=XXX

## ExportOptions.plist文件的存放路径,该文件描述了导出ipa文件所需要的配置
## 如果不知道如何配置该plist,可直接使用xcode打包ipa结果文件夹的ExportOptions.plist文件
EXPORTOPTIONSPLIST_PATH=XXX


## workspace路径
WORKSPACE_PATH=${PROJECT_ROOT_PATH}/${PROJECT_NAME}.xcworkspace

## project路径
PROJECT_PATH=${PROJECT_ROOT_PATH}/${PROJECT_NAME}.xcodeproj

### 编译打包过程 ###

echo "============Build Clean Begin============"

## 清理缓存

## project形式
# xcodebuild clean -project ${PROJECT_PATH} -scheme ${SCHEME_NAME} -configuration ${BUILD_TYPE} || exit

## workspace形式
xcodebuild clean -workspace ${WORKSPACE_PATH} -scheme ${SCHEME_NAME} -configuration ${BUILD_TYPE} || exit

echo "============Build Clean End============"

#获取Version
VERSION_NUMBER=`sed -n '/MARKETING_VERSION = /{s/MARKETING_VERSION = //;s/;//;s/^[[:space:]]*//;p;q;}' ${PROJECT_PATH}/project.pbxproj`
# 获取build
BUILD_NUMBER=`sed -n '/CURRENT_PROJECT_VERSION = /{s/CURRENT_PROJECT_VERSION = //;s/;//;s/^[[:space:]]*//;p;q;}' ${PROJECT_PATH}/project.pbxproj`

## 编译开始时间,注意不可以使用标点符号和空格
BUILD_START_DATE="$(date +'%Y-%m-%d_%H-%M')"

## IPA所在目录路径
IPA_DIR_NAME=${VERSION_NUMBER}_${BUILD_NUMBER}_${BUILD_START_DATE}

##xcarchive文件的存放路径
ARCHIVE_PATH=${PRODUCT_PATH}/IPA/${IPA_DIR_NAME}/${SCHEME_NAME}.xcarchive
## ipa文件的存放路径
IPA_PATH=${PRODUCT_PATH}/IPA/${IPA_DIR_NAME}

# 解锁钥匙串 -p后跟为电脑密码
security unlock-keychain -p XXX

echo "============Build Archive Begin============"
## 导出archive包

## project形式
# xcodebuild archive -project ${PROJECT_PATH} -scheme ${SCHEME_NAME} -archivePath ${ARCHIVE_PATH}

## workspace形式
xcodebuild archive -workspace ${WORKSPACE_PATH} -scheme ${SCHEME_NAME} -archivePath ${ARCHIVE_PATH} -quiet || exit

echo "============Build Archive Success============"


echo "============Export IPA Begin============"
## 导出IPA包
xcodebuild -exportArchive -archivePath $ARCHIVE_PATH -exportPath ${IPA_PATH} -exportOptionsPlist ${EXPORTOPTIONSPLIST_PATH} -quiet || exit

if [ -e ${IPA_PATH}/${SCHEME_NAME}.ipa ];
then
echo "============Export IPA SUCCESS============"
open ${IPA_PATH}
else
echo "============Export IPA FAIL============"
fi


# 删除Archive文件,可根据各自情况选择是否保留
# rm -r ${ARCHIVE_PATH}


### 上传过程 ###

## 上传app store

## 验证
## xcrun altool --validate-app -f ${IPA_PATH}/${SCHEME_NAME}.ipa -t ios --apiKey xxx --apiIssuer xxx --verbose

## 上传
## xcrun altool --upload-app -f ${IPA_PATH}/${SCHEME_NAME}.ipa -t ios --apiKey xxx --apiIssuer xxx --verbose

## 上传到蒲公英
echo "============Upload PGYER Begin============"

## 具体参数可见 http://www.pgyer.com/doc/view/api#uploadApp
PGYER_UPLOAD_RESULT=`curl \
-F "file=@${IPA_PATH}/${SCHEME_NAME}.ipa" \
-F "buildInstallType=XXX" \
-F "buildPassword=XXX" \
-F "buildUpdateDescription=XXX" \
-F "_api_key=XXX" \
https://www.pgyer.com/apiv2/app/upload`

echo "============Upload PGYER SUCCESS============"
## 返回结果码,其中0为成功上传,因为返回结果中带回来的有中文显示乱码,无法利用jq解析


## 如需上传到fim,可查阅 https://www.betaqr.com/docs/publish 文档


### 如需脚本在执行过程中给用户提供选择,可使用以下Demo ###

#echo "Place enter the number you want to export? [ 1:app-store 2:ad-hoc] "
#read number
# while([[ $number != 1 ]] && [[ $number != 2 ]])
# do
# echo "Error! Should enter 1 or 2"
# echo "Place enter the number you want to export ? [ 1:app-store 2:ad-hoc] "
# read number
# done
#if [ $number == 1 ];
# then
# ####
# else
# ####
#fi

1.2 fastlane

1.2.1 Fastlane是什么

fastlane 是让你的 iOS 和 Android 应用程序 测试版部署、发布 实现自动化的最简单方法。它处理所有繁琐的任务,例如生成屏幕截图、处理代码签名和发布您的应用程序。

Fastlane是一套非常实用而强大的组件,其目的主要是为了实现iOS和Android的发布流程的自动化,极大地节省在发布流程中需要花费的时间。

  • Fastlane实际上是一系列Ruby脚本的集合,里面的每一个工具实际就是一个Ruby脚本,用于执行特定的工作任务。
  • 开发者通过定制配置文件(类似ruby语法),组合不同的工具,将你的工作目标形成一个自动化流程。例如整个iOS应用的发布流程。

GitHub上Fastlane已经超过了2w个star。很多著名的软件均在使用fastlane或者开发对fastlane的支持。跟我们比较接近的就有Jenkins。

1.2.2 Fastlane能干什么

Fastlane 基本上涵盖了打包,签名,测试,部署,发布,库管理等等移动开发中涉及到的内容。 同时该套件也支持与 Jenkins 、CocoaPods、xctools 等其他第三方工具的集成。

简单来说,以iOS应用发布流程为例,整个流程的各部分工作Fastlane都能帮你完成,当然除了写代码以外。

fastlane 的大概流程和功能:

常用的action(都是别名,真实action name更能体现其功能):

  • scan(run_tests):自动运行测试工具,并且可以生成漂亮的HTML报告
  • cert(get_certificates):自动创建和管理iOS签名证书(Certificates)
  • sigh(get_provisioning_profile):创建、更新、下载、修复Provisioning Profiles 的工具
  • pem(get_push_certificate):自动生成、更新推送证书Push Services.
  • match(sync_code_signing): 一个新的自动创建和管理iOS签名证书和Provisioning Profiles工具(推荐团队使用)
    • 一般情况下,团队每个成员都各有一套P12证书文件、一个描述文件。每次添加新设备或证书过期时,每个人都必须手动更新和下载最新的 provisioning profiles 集。此外,如果是配置一台新机器时,花费的时间更多。
    • matchcodesigning.guide concept 的实现。match 创建所有必需的 certificates 和 provisioning profiles,并将它们存储在单独的 git 存储库、Google Cloud 或 Amazon S3 中。每个有权访问该存储库的团队成员都可以使用这些文件进行代码签名。 match 还会自动修复损坏和过期的证书/描述文件。这是跨团队共享签名凭据的最简单方法。
    • 从仓库获取cert与p12文件时,会根据指定类型比如 :type=enterprise,那么会遍历仓库的 /certs/enterprise/ 目录下的所有文件,将文件名符合 *.cer 格式的最后一个当做签名证书,将文件名符合 *.p12 格式的最后一个当做其对应私钥。Fastlane证书管理(二):match
    • match命令是结合了cert命令和sigh命令。
  • snapshot(capture_ios_screenshots):自动为每台设备上的 APP 截取本地化屏幕截图。(基于Xcode7推出的UI test
  • frameit(frame_screenshots):在屏幕截图周围放置一个iPhone设备框。
  • gym(build_app):构建和打包iOS程序
  • produce(create_app_online):需要很少的信息,就可以在iTunes Connect(iTC)或者Apple Developer Center(ADC)上创建新的 iOS 应用程序。
  • pilot(upload_to_testflight):将你的应用发布到TestFlight进行测试。功能:
    • 上传和分发构建
    • 添加和删除测试人员
    • 检索有关测试人员和设备的信息
    • 导入/导出所有可用的测试仪
  • deliver(upload_to_app_store):将你的应用的二进制文件、屏幕截图和元数据上传到iTunes Connect
    • 完全自动上传数百个本地化截图
    • 在将应用元数据和屏幕截图上传到 iTC 之前,可以得到一个获取到的元数据的 HTML 预览。
    • 自动使用预检查 precheck ,提高通过应用审核的几率。
  • WatchBuild:一个独立的iTC监控工具,开启WatchBuild可以监控iTC上的文件状态,弹出MacOS自带的Notification

…其实还有很多很突出也很实用的功能,几乎你能想到的正常的需求都做了,到目前为止已有共计超过210个actions。如果还不够,你还可以寻找额外的plugin,至少有超过250个额外的plugin你可以使用。

区分两个词语:

  • Apple Developer Portal(门户),有时也叫做Apple Developer Center(ADC),是我们管理账号、团队成员、开发证书、APPIDs、Profile文件等等的地方。
  • App Store Connect,是我们管理那些发布到App Store上的APP的地方。简称IDC

1.2.3 安装与配置

1. 安装

支持三种方式安装

  • 使用brew安装

    1
    brew install fastlane
  • 使用gem安装

    1
    sudo gem install fastlane
  • 下载安装包安装

    fastlane下载,下载完了之后打开install脚本即可安装

安装完成之后命令行输入fastlane -v,可以看到fastlane的版本信息说明安装成功了,接下来可以继续设置步骤

1
2
3
4
5
$ fastlane -v
fastlane installation at path:
/Users/aron/.rvm/gems/ruby-2.3.0@global/gems/fastlane-2.62.0/bin/fastlane
-----------------------------
fastlane 2.62.0

2. 初始化

cd 打开工程所在目录,执行fastlane init。(默认生成的Fastfile文件是Ruby编写的,如果想使用 Swift 编写,可以使用 fastlane init swift,目前还是 Beta, **Fastlane.swift docs**)

1
2
3
4
5
6
[14:19:14]: What would you like to use fastlane for?
1. 📸 Automate screenshots -- 自动化截图 (基于UITests)
2. 👩‍✈️ Automate beta distribution to TestFlight -- 将测试版分发到TestFlight
3. 🚀 Automate App Store distribution -- 自动上传、发布到App Store
4. 🛠 Manual setup - manually setup your project to automate your tasks -- 手动设置
# 如果选择4,生成的目录是最简的,如果是其他选项,那么会有一系列的设置,包含了登录apple账号,确认fastlane检测到的项目信息确认,登录iTunesConnect和从iTunesConnect拉取项目已存在的信息。

根据选择的设置类型,将设置不同的文件。如果选择下载现有的应用元数据,最终会得到如下所示的新文件夹:

1
2
3
4
5
6
7
8
9
10
11
12
13
14
15
16
17
18
19
20
21
22
23
24
25
26
27
28
29
30
31
32
$ fastlane tree
.
├── Appfile
├── Deliverfile
├── Fastfile
├── metadata
│   ├── app_icon.jpg
│   ├── copyright.txt
│   └── zh-Hans
│   ├── description.txt
│   ├── keywords.txt
│   ├── marketing_url.txt
│   ├── name.txt
│   ├── privacy_url.txt
│   ├── promotional_text.txt
│   ├── release_notes.txt
│   ├── subtitle.txt
│   └── support_url.txt
└── screenshots
├── README.txt
└── zh-Hans
├── 1_iphone58_1.X1_1.jpg
├── 1_iphone6Plus_1.1.png
├── 2_iphone58_2.X2_1.jpg
├── 2_iphone6Plus_2.2.png
├── 3_iphone58_3.X3_1.jpg
├── 3_iphone6Plus_3.3.png
├── 4_iphone58_4.X5_1.jpg
├── 4_iphone6Plus_4.4.png
└── 5_iphone6Plus_5.5.png

8 directories, 62 files

最重要的是Appfile文件、Fastfile文件和Deliverfile文件

  • Appfile文件保存了APP相关的信息

    1
    2
    3
    4
    5
    6
    7
    8
    9
    10
    11
    12
    13
    app_identifier "com.XX.XX" # The bundle identifier of your app
    apple_id "appid" # Your Apple email address

    # You can uncomment the lines below and add your own
    # team selection in case you're in multiple teams
    # team_name "Felix Krause"
    # team_id "Q2CBPJ58CA"

    # To select a team for App Store Connect use 如果你拥有多个team,在配置中会选择team,以及itc_team_name
    # itc_team_name "Company Name"
    # itc_team_id "18742801"

    # For more information about the Appfile, see: https://docs.fastlane.tools/advanced/#appfile
  • Deliverfile文件保存了apple账号信息和teamid信息,该文件的信息用于上传appStore使用

  • Fastfile文件定义了一些列的action,包含了项目打包设置、项目打包、项目截图、项目上传测试平台、项目发布、项目打包完成后期的一些操作。(我们主要是编写这个文件内容)

    1
    2
    3
    4
    5
    6
    7
    8
    default_platform(:ios)

    platform :ios do
    desc "Description of what the lane does"
    lane :custom_lane do
    # add actions here: https://docs.fastlane.tools/actions
    end
    end

Fastline的使用:

1
2
$ cd project_path      # 进入项目主目录
$ fastlane custom_lane # lane名称(可以理解为任务名)

3. 简单的Fastlane书写

1
2
3
4
5
6
7
8
9
10
11
12
default_platform :ios

desc "打包" # 该任务的描述
lane :build do | options | # option用于接收我们的外部参数,这里可以传入参数
gym(export_method: 'enterprise')
end

lane :to_appStore do | options |
customLane # 调用其他自定义的lane
gym(workspace: "expample.xcworkspace", scheme: "example") # 构建App
deliver # 上传到appstore
end

把证书设置好,然后在终端执行 cd project_path 进入项目主目录,执行 fastlane build,如果一切顺利,打包完成后你会在项目主目录得到一个ipa文件。

gym的常用参数:

1
2
3
4
5
6
7
8
9
10
11
12
13
14
15
16
17
18
19
lane :build do | options |
gym(
clean: true,
output_directory: './fastlane/build',
output_name:"RS.ipa",
scheme: 'RS',
configuration: 'Debug',###########
# sdk:"iOS 12.0",
# archive_path:"./fastlane/Archive", #如果不指定,会存储在Xcode默认路径中
# include_symbols:true,
export_options: {
method: 'development',#测试包
provisioningProfiles: {
"com.shuqu.by" => "iOS-DEV", #测试打包描述文件
"com.shuqu.by.jpush" => "JPUSH_DEV"
},
}
)
end

4. .env文件

我们可以在Fastlane的同级目录下手动创建一个名为.env 的文件,自定义所需的环境变量。(这些环境变量通过 dotenv 这个Ruby Gem(工具包)来加载)

1
2
WORKSPACE=YourApp.xcworkspace
HOCKEYAPP_API_TOKEN=your-hockey-api-token
  • 执行时默认会读取 .env.env.default 文件里的配置。
  • fastlane 有一个 --env 选项,允许在加载上面两个文件之后,加载环境特定的 dotenv 文件。文件的命名约定是 .env.<environment>
  • 相同的变量名会被后面的覆盖。
1
fastlane <lane-name> --env development # will load .env, .env.default, and .env.development

想在Appfile、Deliverfile、Fastfile等调用,直接使用 ENV['keyName'] 即可。

设置环境变量的其他方式:

1
2
3
4
5
6
7
8
9
# 方式一:
DELIVER_USER="felix@krausefx.com" fastlane test

# 方式二:
export DELIVER_USER="felix@krausefx.com";
fastlane test

# 方式三:在 Fastfile 中设置。但这违背了环境变量的初衷(不在任何其它文件中包含它们的内容)
ENV["DELIVER_USER"] = "felix@krausefx.com"

1.2.4 块、lane、action

1. 块类型

Fastfile里面包含的块类型有以下几种:

  • before_all块:用于执行任务之前的操作,比如使用cocopods更新pod库,只执行一次
  • before_each块:每次执行 lane 之前都会执行一次
  • lane块:定义用户的主要任务流程。例如打包ipa,执行测试等等
  • after_each块:每次执行 lane 之后都会执行一次
  • after_all块:用于执行任务之后的操作,比如发送邮件,通知之类的
  • error块:在执行上述情况,任意环境报错都会中止并执行一次

2. lane与platform

我们通俗的把一个lane理解为一个任务,每个任务都负责一个功能。 然后我们调用不同的任务,来实现打包、上传到testFlight、上传到app store等功能。

lane里可以调用action(可以理解为封装好的功能模块/函数)。fastlane预定义了很多很有用的action,如果不够还可以使用第三方提供的插件调用第三方的action。

lane之间,可以相互调用,与action的调用相似,直接输入名字即可。注意,在fastlane中,并不是所有lane都能相互调用,需要满足下面两个条件之一:

  • 两个lane同属于同一个platform
  • 被调用的lane不属于任何platform。(这种lane叫做通用lane,可以被所有的lane调用)

platform的作用和lane的作用类似,lane的作用是绑定多个action,而platform则是绑定多个lane。

由于fastlane目前可以在iOS、android和Mac这三个平台使用,所以可能在同一个Fastfile中存在不同平台的lane,使用platform可以使得lane的使用范围更加明确。

1
2
3
4
5
6
7
8
9
10
11
12
13
14
15
16
17
18
19
20
21
22
23
24
lane :lane0 do
puts "\nlane0"
end

platform :ios do
lane :lane1 do
puts "\nlane1"
lane2 # lane1中调用了lane2
end

lane :lane2 do
puts "\nlane2"
end
end

platform :android do
lane :lane3 do
puts "\nlane3"
end

lane :lane4 do
puts "\nlane4"
end
end

这个时候,如果在终端执行fastlane lane1,fastlane会告诉你它找不到lane1

1
[!] Could not find 'lane1'. Available lanes: lane0, ios lane1, ios lane2, android lane3, android lane4

但是,fastlane在错误信息里面指出可用的lanes有这些:lane0, ios lane1, ios lane2, android lane3, android lane4

经过多次试验,可以发现:

  • 当lane被定义在platform之内时,需要使用类似fastlane platform_name lane_name的命令结构来调用。比如调用lane1,则需要执行fastlane ios lane1;调用lane3,则需要执行fastlane android lane3
  • 对于定义在platform之外的lane0,可以直接执行fastlane lane0

在实际使用中,很少有人会去执行带platform的命令,一般是执行命令fastlane lane_name,这是因为fastlane还提供了另一个方法:default_platform

1
default_platform :ios

3. action

下面介绍几个fastlane中预定的action:

  • scan:自动运行测试工具,并且可以生成漂亮的HTML报告
  • cert:自动创建和管理iOS签名证书(Certificates)
  • sigh:创建、更新、下载、修复Provisioning Profiles的工具
  • pem:自动生成、更新推送配置文件
  • match:一个新的自动创建和管理iOS签名证书和Provisioning Profiles工具(推荐团队使用) 🌟
  • snapshot:用Xcode7推出的UI test功能实现自动化截图
  • frameit:给截屏套上一层外边框
  • gym:编译打包生成ipa文件,又名build_ios_app或build_app。常用的配置项:
    • workspace:如果项目是一个workspace,则是该项目的workspace路径
    • project:项目的project路径
    • scheme:项目的scheme,注意指定的scheme需要被指定为shared,/->Manage Schemes->Shared复选框需要打钩
    • output_directory:打包保存路径
    • output_name:打包保存的文件名
    • clean:每次执行前是否清空工程;
    • configuration:The configuration to use when building the app. Defaults to ‘Release’
    • export_options:导出时配置项,及发布证书相关;
  • set_info_plist_value:是设置修改info.plist文件的 action,一次调用该action只能设置一个值,可以多次调用该命令来设置多个值,他有以下常用的参数:
    • path:info.plist文件路径
    • key:info.plist文件中的key
    • value:key对应的值
    • 可以动态配置info.plist中的内容,以实现动态配置ipa包的一些信息。
  • produce:如果你的产品还没在iTunes Connect(iTC)或者Apple Developer Center(ADC)建立,produce可以自动帮你完成这些工作
  • pilot:是上传到TestFlight的 action,是 upload_to_testflight action的别名,没有特殊需求可以不指定参数
  • deliver:自动上传截图,APP的元数据,二进制(ipa)文件到iTunes Connect。是 upload_to_app_store action的别名,没有特殊需求可以不指定参数,会从Deliverfile文件读取账号信息登录到ITunesConnect从./fastlane/metadata ./fastlane/screenshots 文件夹中读取配置的App信息元数据然后上传
  • WatchBuild:一个独立的iTC监控工具,开启WatchBuild可以监控iTC上的文件状态,弹出MacOS自带的Notification

更多Action的使用可以参考 fastlane actions Doc

使用 fastlane action <action_name> 命令查找某个action的使用方法和参数。

1.2.5 Fastfile调用shell

如果您的操作需要运行 shell 命令,有几种方法。您可以轻松确定命令的退出状态并捕获命令的所有终端输出。

  • 使用 Ruby system方法调用来调用命令字符串。这不会重定向标准输入、标准输出或标准错误,因此输出格式将不受影响。它在子shell中执行命令。

    1
    2
    system "cat fastlane/Fastfile" 
    # 命令完成后,该方法返回 true 或 false 以指示完成状态。
  • 使用反引号,可以捕获命令的输出

    1
    2
    3
    pod_cmd = `which pod`
    UI.important "'pod' command not found" if pod_cmd.empty?
    # 因为您正在捕获标准输出,所以命令输出不会出现在终端上,除非您使用 `UI` 记录它。捕获命令输出时可能会丢失格式。
  • 使用内置的 sh 方法

    1
    sh "pwd"

使用 shellwords 将参数转义到 shell 命令。

1
2
3
`git commit -aqm #{Shellwords.escape commit_message}`

system "cat #{path.shellescape}"

更多详细信息,查看 Invoking shell commands

1.2.6 初始的Fastfile解读

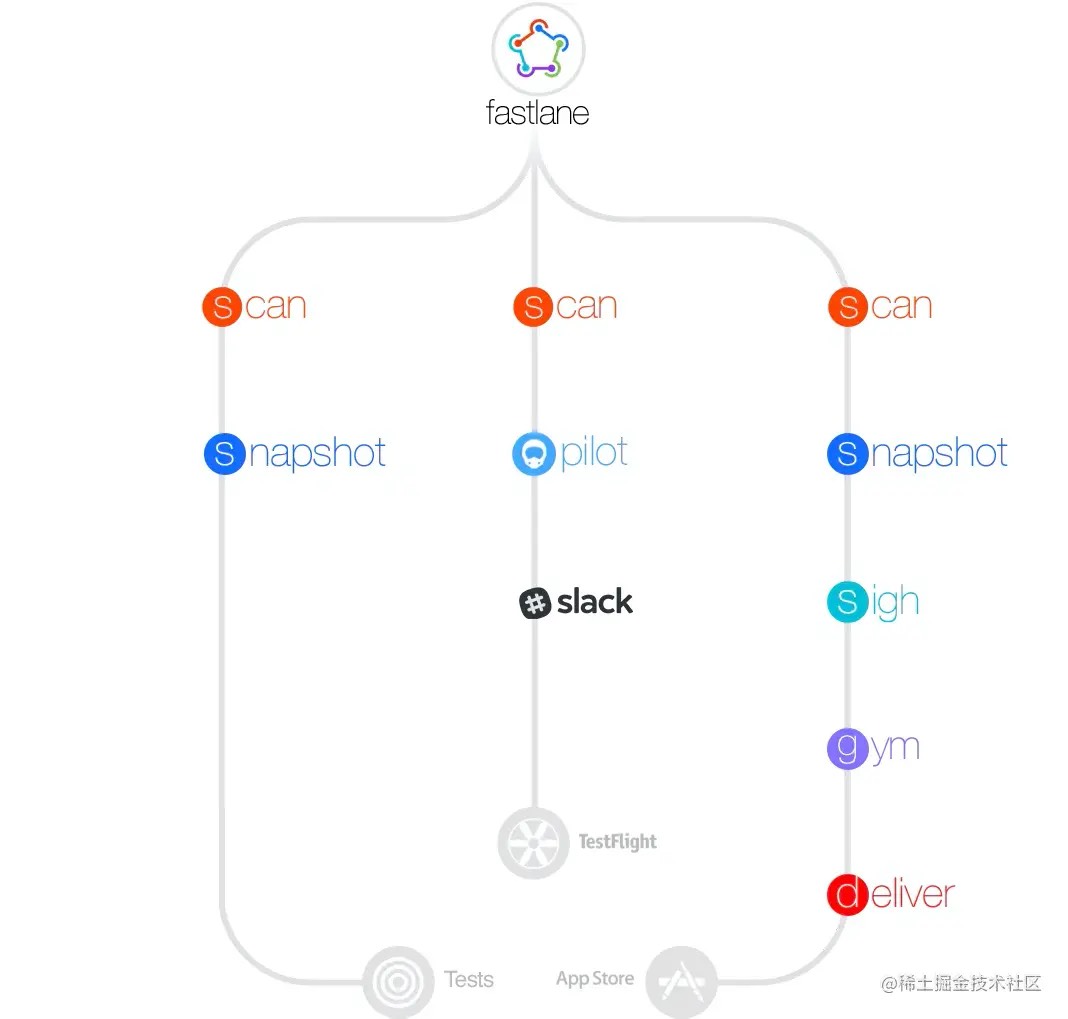
以初始的Fastfile文件为例,其大致如下,可以看到 lane :release 包含了

  • snapshot action用于截屏
  • gym action用于打包
  • deliver action用于上传到App Store
  • frameit action用于给截屏添加边框

after_all 块中的slack action 则是负责打包成功之后发送信息到slack

1
2
3
4
5
6
7
8
9
10
11
12
13
14
15
16
17
18
19
20
21
22
23
24
25
fastlane_version "2.62.0"

default_platform :ios

platform :ios do

desc "Deploy a new version to the App Store"
lane :release do
# match(type: "appstore")
# snapshot
gym(scheme: "PlushGame") # Build your app - more options available
deliver(force: true)
# frameit
end

# You can define as many lanes as you want

after_all do |lane|
# This block is called, only if the executed lane was successful

# slack(
# message: "Successfully deployed new App Update."
# )
end
end

接下来是为我们自己的项目编写符合业务需求的Fastfile了。

1.2.7 第三方插件、action

Fastlane的插件是一个或者一组action的打包,单独发布在fastlane之外。

1. 查找插件

使用fastlane search_plugins查找所有插件,使用fastlane search_plugins [query]查找指定插件

1
2
3
4
5
6
7
8
9
10
11
12
13
14
15
16
17
$ fastlane search_plugins pgyer
...
+----------------+----------------------+-----------+
| fastlane plugins 'pgyer' |
+----------------+----------------------+-----------+
| Name | Description | Downloads |
+----------------+----------------------+-----------+
| pgyer | distribute app to | 18497 |
| | pgyer beta testing | |
| | service | |
| pgyer-password | distribute app to | 1065 |
| | pgyer beta testing | |
| | service | |
| ding_talk | Auto send the pgyer | 659 |
| | app qr code to the | |
| | ding talk. | |
+----------------+----------------------+-----------+

2. 安装插件

使用fastlane add_plugin [name]安装插件

下面会用到的两个插件:

  • fastlane-plugin-versioning:用来修改build版本号和version版本号。
  • fastlane-plugin-pgyer:用来上传ipa包到蒲公英。

安装成功后在fastlane目录下会多出一个.Pluginfile文件

1
2
3
4
5
6
# Autogenerated by fastlane
#
# Ensure this file is checked in to source control!

gem 'fastlane-plugin-pgyer'
gem 'fastlane-plugin-versioning' //删除这一行就是删除了此插件

1.2.8 Fastfile案例

案例一:打包+钉钉

实现效果:一行命令自动打包、发布到蒲公英、然后自动发钉钉消息通知测试。(钉钉,建立的开发测试群,每次自动打包发版后,系统机器人就会自动提示)

iOS+Fastlane自动打包发布测试、消息通知,完美结合!

1
2
3
4
5
6
7
8
9
10
11
12
13
14
15
16
17
18
19
20
21
22
23
24
25
26
27
28
29
default_platform(:iOS)
platform :iOS do
lane :hs_test do
# add actions here: https://docs.fastlane.tools/actions
gym(
clean: true,
output_directory: './fastlane/build',
output_name:"XX.ipa",
scheme: 'XXX',
configuration: 'Debug',###########
# sdk:"iOS 12.0",
# archive_path:"./fastlane/Archive",
include_symbols:true,
export_options: {
method: 'development',#测试包
provisioningProfiles: {
"com.xxxx.xxx" => "20210906_dev" #测试打包描述文件
},
}
)

updateVersionDes = "提到蒲公英的版本更新信息;"
pgyer(
api_key: "蒲公英API Key",
user_key: "蒲公英user_key"
update_description: updateVersionDes
)
end
end

案例二:多渠道打包

业务场景要求多渠道打包,并且不同渠道对应的配置有差异(info.plist文件配置不同和图标不同),打包支持上传到fir测试平台,不同渠道打包的命名方式是【时间+渠道+名称.ipa】格式,最后还需要把对应的dsym文件和ipa文件压缩归档为一个zip包文件。

1
2
3
4
5
6
7
8
9
10
11
12
13
14
15
16
17
18
19
20
21
22
23
24
25
26
27
28
29
30
31
32
33
34
35
36
37
38
39
40
41
42
43
44
45
46
47
48
49
50
51
52
53
54
55
56
57
58
59
60
61
62
63
64
65
66
67
68
69
70
71
72
73
74
75
76
77
78
79
80
81
82
83
84
85
86
87
88
89
90
91
92
93
94
95
96
97
98
99
100
101
102
103
104
105
106
107
108
109
110
111
112
113
114
115
116
117
118
119
120
121
122
123
124
125
126
127
128
129
130
131
132
133
134
135
136
137
138
139
140
141
142
143
144
145
146
147
148
149
150
151
152
153
154
155
156
157
158
159
160
161
162
163
164
165
166
167
168
169
170
171
172
173
174
175
176
177
178
# Customise this file, documentation can be found here:
# https://docs.fastlane.tools/actions/
# All available actions: https://docs.fastlane.tools/actions
# can also be listed using the `fastlane actions` command

# Change the syntax highlighting to Ruby
# All lines starting with a # are ignored when running `fastlane`

# If you want to automatically update fastlane if a new version is available:
# update_fastlane

# This is the minimum version number required.
# Update this, if you use features of a newer version
fastlane_version "2.62.0"

default_platform :ios

platform :ios do
before_all do
# ENV["SLACK_URL"] = "https://hooks.slack.com/services/..."
# cocoapods
# carthage
end

desc "Runs all the tests"
lane :test do
scan
end

# 定义全局参数:项目名称
projName = "Plush"
# 定义全局参数:Assets路径
projAssetsPath = "../#{projName}/Resources/Assets.xcassets"
# 定义全局参数:Info.plist路径
plistPath = "./#{projName}/Resources/Info.plist"
# 定义全局参数:包名(接收之后压缩使用)
pkgName = ""
# 定义全局参数:基本包名
basePkgName = "Plush"
# 定义全局参数:输出目录,对应output_directory配置
outputBaseDir = "output"

desc "自定义的渠道打包"
desc "使用方式:苹果助手:`bundle exec fastlane customChannelBeta ch:pgzs shouldUp:0`"
desc "使用方式:91助手:`bundle exec fastlane customChannelBeta ch:91zs shouldUp:0`"
desc "op 支持参数: ch:渠道类型[pgzs, 91zs, AppStore(默认)]"
desc "op 支持参数: shouldUp:是否需要上传[0, 1]"
desc "op 支持参数: up:上传类型[testflight, fir]"
desc "op 支持参数: exportMethod: export_method 配置[app-store, ad-hoc, package, enterprise, development(默认), developer-id] ** up为testflight需要制定为app-store **"
desc "op 支持参数: version:版本(可选)"
desc "op 支持参数: build:构建版本(可选,testflight和appstore这个参数需要制定一个不重复的)"
lane :customChannelBeta do |op|

# 渠道
channel = op[:ch]
if channel.nil? || channel.empty?
channel = "AppStore"
end

# 打包名字
time = Time.new
dateTimeStr = "#{time.year}-#{time.month}-#{time.day}_#{time.hour}-#{time.min}"
pkgName = "#{dateTimeStr}_#{channel}_#{basePkgName}.ipa"

# match(type: "appstore") # more information: https://codesigning.guide
#设置plist,此处传入plist路径,可以用来做环境配置
set_info_plist_value(path: plistPath, key: "pt_channel", value: channel)


# # 设置AppIcon
# iconPath = op[:iconPath]
# if iconPath.nil? || iconPath.empty?
# iconPath = "channel_config/#{channel}/icon1024.png"
# iconPath = "channel_config/91zs/icon1024.png"
# end
# puts "iconPath = #{iconPath}"
# appicon(appicon_image_file: iconPath,
# appicon_devices: [:ipad, :iphone, :ios_marketing, :watch, :watch_marketing])

# 拷贝AppIcon.appiconset替换图标
iconAssetPath = op[:iconPath]
if iconAssetPath.nil? || iconAssetPath.empty?
iconAssetPath = "../channel_config/#{channel}/AppIcon.appiconset"
end
cpCmd = "cp -fRv #{iconAssetPath} #{projAssetsPath}"
`#{cpCmd}`
puts "cpCmd = #{cpCmd}"

# 设置显示版本和构建版本
version = op[:version]
build = op[:build]
if version.nil? || version.empty?
else
increment_version_number(version_number: version)
end
if build.nil? || build.empty?
else
increment_build_number(build_number: build)
end

exportMethod = op[:exportMethod]
if exportMethod.nil? || exportMethod.empty?
exportMethod = "development"
end

puts "exportMethod = #{exportMethod} pkgName = #{pkgName} outputBaseDir = #{outputBaseDir}"

# build_ios_app 参数配置
gym(
export_method: exportMethod, # 相当于配置 Archives->Export->mehtod:[app-store, ad-hoc, package, enterprise, development(默认), developer-id]
output_name: pkgName,
configuration: "Release", # 相当于配置Scheme->Build Configuration:[Release, Debug],Release会生成dsym文件,而Debug不会
output_directory: outputBaseDir,
scheme: "Plush",
)


# 是否需要上传配置,默认不上传
shouldUp = op[:shouldUp]
if shouldUp == "1"
# 上传测试包到测试平台类型,默认上传到fir,可以支持多种测试平台使用逗号分隔
# testflight, fir
upType = op[:up]
if upType.nil? || upType.empty?
upType = "fir"
end
if upType.include? "testflight"
pilot # 上传到testflight
elsif upType.include? "fir"
firim(firim_api_token: "xxxxxxxx")#上传fir,如果是新项目,fir会自动创建
end
end
end

desc "上传到 App Store"
lane :release do
# match(type: "appstore")
# snapshot
gym(
export_method: "app-store", # 相当于配置 Archives->Export->mehtod:[app-store, ad-hoc, package, enterprise, development, developer-id]
output_name: pkgName,
configuration: "Release", # 相当于配置Scheme->Build Configuration:[Release, Debug],Release会生成dsym文件,而Debug不会
output_directory: outputBaseDir,
scheme: "Plush",
)
deliver(force: true)
# frameit
end

# You can define as many lanes as you want

after_all do |lane, op|
# This block is called, only if the executed lane was successful

# slack(
# message: "Successfully deployed new App Update."
# )

if !pkgName.empty?
fileName = pkgName.gsub(".ipa", "")
dsymName = "#{fileName}.app.dSYM.zip"
zipFileName = "#{fileName}.zip"

# 使用zip命令压缩
zipCmd = "zip ../#{outputBaseDir}/#{zipFileName} ../#{outputBaseDir}/#{dsymName} ../#{outputBaseDir}/#{pkgName}"
puts "begin zip #{zipCmd}"
`#{zipCmd}`
end

end

error do |lane, exception|
# slack(
# message: exception.message,
# success: false
# )
end
end

案例三:UI模块实现交互

iOS开发fastlane从入门到入土(一):自动打包

下面使用了.env配置方式:

1
2
3
4
5
6
7
8
9
10
11
12
13
14
15
16
17
18
19
APP_IDENTIFIER = "com.xxx.xx" # APP唯一标识符
APPLE_ID = "xx@xxx.com" # 苹果开发者账号
TEAM_ID = "CN*****SEU" # ADC Team ID
ITC_TEAM_ID = "11*****89" # ITC Team ID

LANG = "en_US.UTF-8" # 设置shell的语言环境
LC_ALL = "en_US.UTF-8"

SCHEME_NAME = "YourProjectName" # 工程名称
METADATA_PATH = "./metadata" # App 元数据及截图存放路径
SCREENSHOTS_PATH = "./screenshots"
OUTPUT_DIRECTORY = "/Users/xx/Desktop/xxx/ipa" # ipa输出文件夹路径
DELIER_FORCE_OVERWRITE= true # App 元数据及截图下载时 直接覆盖 不询问
UPDATE_DESCRIPTION = "fastlane自动打包上传测试" # 更新描述
SUBMIT_FOR_REVIEW = false # 自动提交审核
AUTOMATIC_RELEASE = false # 审核通过后立刻发布

PP_ADHOC = "xxxxxx_ADHoc" # PP文件
PP_APPSTORE = "xxxxxx_Distribution"
1
2
3
4
5
6
7
8
9
10
11
12
13
14
15
16
17
18
19
20
21
22
23
24
25
26
27
28
29
30
31
32
33
34
35
36
37
38
39
40
41
42
43
44
45
46
47
48
49
50
51
52
53
54
55
56
57
58
59
60
61
62
63
64
65
66
67
68
69
70
71
72
73
74
75
76
77
78
79
80
81
82
83
84
85
86
87
88
89
90
91
92
93
94
95
96
97
98
99
100
101
102
103
104
105
106
107
108
109
110
111
112
113
114
115
116
117
118
119
120
121
122
123
124
125
126
127
128
129
130
131
132
133
134
135
136
137
138
139
140
141
142
143
144
145
146
147
148
149
150
151
152
153
154
155
156
157
158
159
160
161
162
163
164
165
166
167
168
169
170
171
172
173
174
175
176
177
178
179
180
181
182
183
184
185
186
187
188
189
190
191
192
193
194
195
196
197
198
199
200
201
202
203
204
205
206
207
208
209
210
211
212
213
214
215
216
217
218
219
220
221
222
223
224
225
226
227
228
229
230
231
232
233
234
235
236
237
238
239
240
241
242
243
244
245
246
247
248
249
250
251
252
253
254
255
256
257
258
259
260
261
262
263
264
265
266
267
268
269
270
271
272
default_platform(:ios)

# 定义全局参数 大写开头为常量,小写、_开头为变量,$开头为全局变量(直接用#访问)
SCHEME_NAME = ENV['SCHEME_NAME'] # scheme名
WORKSPACE_NAME = "#{SCHEME_NAME}.xcworkspace" # workspace名
APP_IDENTIFIER = ENV['APP_IDENTIFIER'] # Bundle ID
APP_NAME = 'FastLaneDemo' # app名
INFO_PLIST_PATH = "#{SCHEME_NAME}/Info.plist" # plist文件路径
$VERSION_NUMBER = "" # 版本号
$BUILD_NUMBER = "" # 构建版本号
$OUTPUT_DIRECTORY = ENV['OUTPUT_DIRECTORY'] # ipa导出路径
$IPA_PATH = "" # ipa安装包路径
$PREPARE_COMPLETED = false # 是否准备完成
PGYER_API_KEY = 'xxxxxxx' # 蒲公英 api_key user_key
PGYER_USER_KEY = 'xxxxxxx'

platform :ios do
before_all do
# ENV["SLACK_URL"] = "https://hooks.slack.com/services/..."
# 拉取远程最新代码
# git_pull
# 执行 pod instasll
# cocoapods
# carthage
end

desc '打包前的准备工作'
lane :prepare do |options|
if !$PREPARE_COMPLETED
puts "\033[32m====================即将开始打包====================\033[0m\n"
puts '您好,我是智能机器人邓逼逼,即将为你自动打包'
end

export_method = options[:export_method]
select_method = '-1'
# => 如果没有选择打包方式,提示选择打包方式
if export_method.nil? || export_method.empty?
puts "请选择打包方式 \033[33m1:上传appstore(默认) 2:打包adHoc上传蒲公英 3:打包Inhouse上传蒲公英 0:结束打包 回车表示使用默认打包\033[0m"
select_method = STDIN.gets.chomp
if select_method!='1' && select_method!='2' && select_method!='3' && !select_method.empty?
# supported [:select, :message, :verbose, :error, :password, :input, :success, :important, :command, :user_error!, :command_output, :deprecated, :header, :content_error, :interactive?, :confirm, :crash!, :not_implemented, :shell_error!, :build_failure!, :test_failure!, :abort_with_message!]
UI.user_error!("您已取消打包 🚀")
end
end

if !$PREPARE_COMPLETED
currentVersion = get_info_plist_value(path: "#{INFO_PLIST_PATH}", key: "CFBundleShortVersionString")
currentBuild = get_info_plist_value(path: "#{INFO_PLIST_PATH}", key: "CFBundleVersion")
puts "当前工程的版本号是:\033[33m#{currentVersion}\033[0m 构建版本号是:\033[33m#{currentBuild}\033[0m"
version = options[:version]
build = options[:build]
output_directory = options[:output_directory]

# => 如果没有选择版本号,提示是否需要输入版本号
if version.nil? || version.empty?
puts "请输入版本号,回车表示使用当前版本号\033[33m#{currentVersion}\033[0m"
version = STDIN.gets.chomp
if version == '' # 回车
$VERSION_NUMBER = currentVersion
else
$VERSION_NUMBER = version
end
else
$VERSION_NUMBER = version
end
# => 如果没有选择构建版本号,提示是否需要输入构建版本号
if build.nil? || build.empty?
puts "请输入构建版本号,回车表示使用默认自动生成构建版本号"
build = STDIN.gets.chomp
if build == '' # 回车
# $BUILD_NUMBER = AUTO_BUILD_NUMBER
else
$BUILD_NUMBER = build
end
else
$BUILD_NUMBER = build
end
# => 如果没有选择ipa输出目录,提示是否需要输入打包路径
if output_directory.nil? || output_directory.empty?
puts "请指定ipa包输出路径,回车表示使用默认输出路径:\033[33m#$OUTPUT_DIRECTORY\033[0m"
output_directory = STDIN.gets.chomp
if output_directory == '' # 回车
else
$OUTPUT_DIRECTORY = output_directory
end
else
$OUTPUT_DIRECTORY = output_directory
end
end

$PREPARE_COMPLETED = true

if select_method != '-1' # 已选择
case select_method
when '1',''
# 发布到appstore
release_appstore(options)
when '2'
puts "发布到蒲公英"
# 打包adhoc发布到蒲公英
release_adhoc(options)
when '3'
# 打包inhouse发布到蒲公英

end
next
end

# => 详细信息
summary(options)

end

desc "信息确认"
lane :summary do |options|
puts "\033[32m====================信息确认====================\033[0m\n"
puts "您设置的包输出路径为:"
# supported [:select, :message, :verbose, :error, :password, :input, :success, :important, :command, :user_error!, :command_output, :deprecated, :header, :content_error, :interactive?, :confirm, :crash!, :not_implemented, :shell_error!, :build_failure!, :test_failure!, :abort_with_message!]
UI.important "#$OUTPUT_DIRECTORY"
puts "您选择的打包方式为:"
UI.important "#{options[:export_method]}"
puts "指定的发布版本号为:"
UI.important "#$VERSION_NUMBER"
confirm = UI.confirm "确认信息是否正确,输入y继续打包"
if !confirm
UI.user_error!("您已取消打包 🚀")
end
puts "\033[32m====================信息确认====================\033[0m\n"
puts "3s后开始自动打包..."
sleep(3)
end

desc "更新版本号"
lane :update_version do
puts("*************| 更新version #$VERSION_NUMBER |*************")
increment_version_number_in_plist(
target: SCHEME_NAME,
version_number: $VERSION_NUMBER
)
puts("*************| 更新build #$BUILD_NUMBER |*************")
increment_build_number_in_plist(
target: SCHEME_NAME,
build_number: $BUILD_NUMBER
)
end

desc "打包发布"
lane :release do |options|
prepare(options)
end

desc "发布到appstore"
lane :release_appstore do |options|
options[:export_method] = "app-store"
prepare(options)
build(options)
deliver_appstore
end

desc "发布ad-hoc"
lane :release_adhoc do |options|
options[:export_method] = "ad-hoc"
prepare(options)
build(options)
deliver_pgyer
end

desc "上传到蒲公英"
lane :deliver_pgyer do |options|
pgyer(
api_key: PGYER_API_KEY, # 从蒲公英项目详情中获取的apikey
user_key: PGYER_USER_KEY, # 从蒲公英项目详情中获取的 userkey
ipa: $IPA_PATH, #ipa包路径
#password: "123456", #设置安装密码
#install_type: "2", #1:公开,2:密码安装,3:邀请安装,4:回答问题安装。默认为1公开
update_description: ENV['UPDATE_DESCRIPTION']
)
end

desc "上传到appstore"
lane :deliver_appstore do |options|
deliver(
username: ENV['APPLE_ID'], # 开发者账号
team_id: ENV['ITC_TEAM_ID'], # ITC Team ID
dev_portal_team_id: ENV['TEAM_ID'], # ADC Team ID
app_identifier: ENV['APP_IDENTIFIER'], # bundle ID
ipa: $IPA_PATH, # ipa包路径
app_version: $VERSION_NUMBER, # 更新版本号
release_notes: {
'zh-Hans' => "这是第一个版本哦"
},
force: true, # 设置true,会跳过预览页面,直接上架
skip_screenshots: true, # 不上传截图
skip_metadata: true, # 不上传元数据
)
end

desc "打包"
lane :build do |options|
# gym用来编译ipa
# 编译时间
build_time = Time.now.strftime("%Y-%m-%d %H-%M-%S")
# 自动生成的build版本号
auto_build_number = Time.now.strftime("%Y%m%d%H%M%S")
if $BUILD_NUMBER.empty?
$BUILD_NUMBER = auto_build_number
end

# 更新版本号
update_version

# 获取打包方式
export_method = options[:export_method]
# 配置项
configuration = 'Release'
# pp文件
provisioningProfiles = ENV['PP_APPSTORE']
# 输出目录
outputDir = ''
# 输出文件名
outputName = "#{SCHEME_NAME}_#$VERSION_NUMBER_#$BUILD_NUMBER_#{export_method}.ipa"
case export_method
when 'development'
configuration = 'Debug'
outputDir = "#$OUTPUT_DIRECTORY/Development/#{SCHEME_NAME}-#{build_time}"
when 'app-store'
outputDir = "#$OUTPUT_DIRECTORY/Appstore/#{SCHEME_NAME}-#{build_time}"
when 'ad-hoc'
provisioningProfiles = ENV['PP_ADHOC']
outputDir = "#$OUTPUT_DIRECTORY/Pgyer/#{SCHEME_NAME}-#{build_time}"
when 'enterprise'
provisioningProfiles = ENV['PP_ENTERPRISE']
outputDir = "#$OUTPUT_DIRECTORY/Pgyer/#{SCHEME_NAME}-#{build_time}"
end

$IPA_PATH = gym(
clean: 'true', # 在打包前是否先执行clean。
scheme: "#{SCHEME_NAME}", # 指定项目的scheme名称
workspace: "#{WORKSPACE_NAME}", # 指定.xcworkspace文件的路径。
configuration: "#{configuration}", # 指定打包时的配置项,默认为Release
output_name: "#{outputName}", # 指定生成的.ipa文件的名称,应包含文件扩展名。
output_directory: "#{outputDir}", # 指定.ipa文件的输出目录
include_symbols: 'true', # 是否导出符号表
# include_bitcode: 'false', # 是否使用bitcode打包
export_xcargs: "-allowProvisioningUpdates", #访问钥匙串
silent: true, # 是否隐藏打包时不需要的信息。
buildlog_path: "#{outputDir}", # 指定编译日志文件的输出目录
export_options: {
method: "#{export_method}", # 指定导出.ipa时使用的方法,可用选项:app-store,ad-hoc,enterprise,development
thinning: "<none>", # 是否瘦身
provisioningProfiles: { # 指定pp文件
"#{APP_IDENTIFIER}" => "#{provisioningProfiles}"
},
signingStyle: "manual" # 手动签名
}
)
end

after_all do |lane|
#slack(
# message: "Successfully deployed new App Update."
#)
end

error do |lane, exception|
#slack(
# message: exception.message,
# success: false
#)
end

end

二、CI CD

2.1 CI CD是什么

CI(Continuous integration) 指持续集成,它属于开发人员的自动化流程。

CD指持续交付(Continuous Delivery)和/或持续部署(continuous deployment),这些相关概念有时会交叉使用。两者都事关管道后续阶段的自动化,但它们有时也会单独使用,用于说明自动化程度。

2.1.1 持续集成

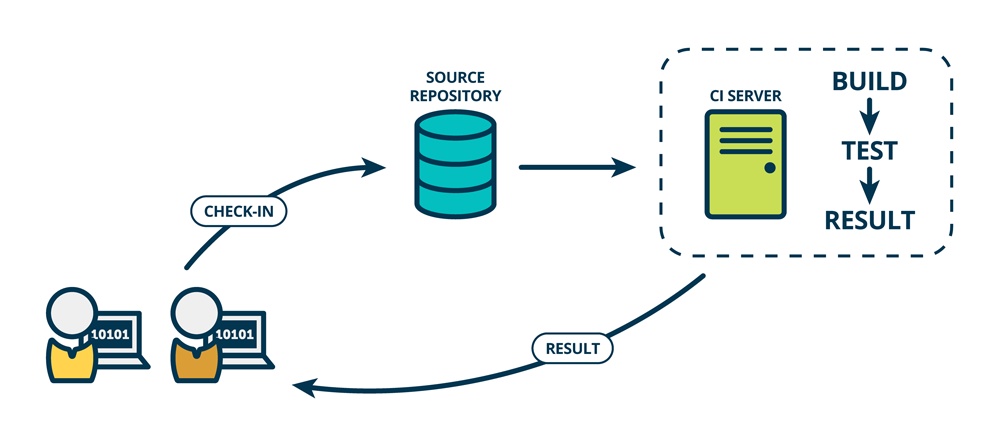
持续集成(Continuous integration)指的是,频繁地(一天多次)将代码集成到主干。持续集成强调开发人员提交了新代码之后,立刻进行构建、(单元)测试。根据测试结果,我们可以确定新代码和原有代码能否正确地集成在一起。

它的好处主要有两个。

  • 快速发现错误。每完成一点更新,就集成到主干,可以快速发现错误,定位错误也比较容易。
  • 防止分支大幅偏离主干。如果不是经常集成,主干又在不断更新,会导致以后集成的难度变大,甚至难以集成。

持续集成的目的,就是让产品可以快速迭代,同时还能保持高质量。它的核心措施是,代码集成到主干之前,必须通过自动化测试。只要有一个测试用例失败,就不能集成。

下图反应了CI的工作模式:

2.1.2 持续交付

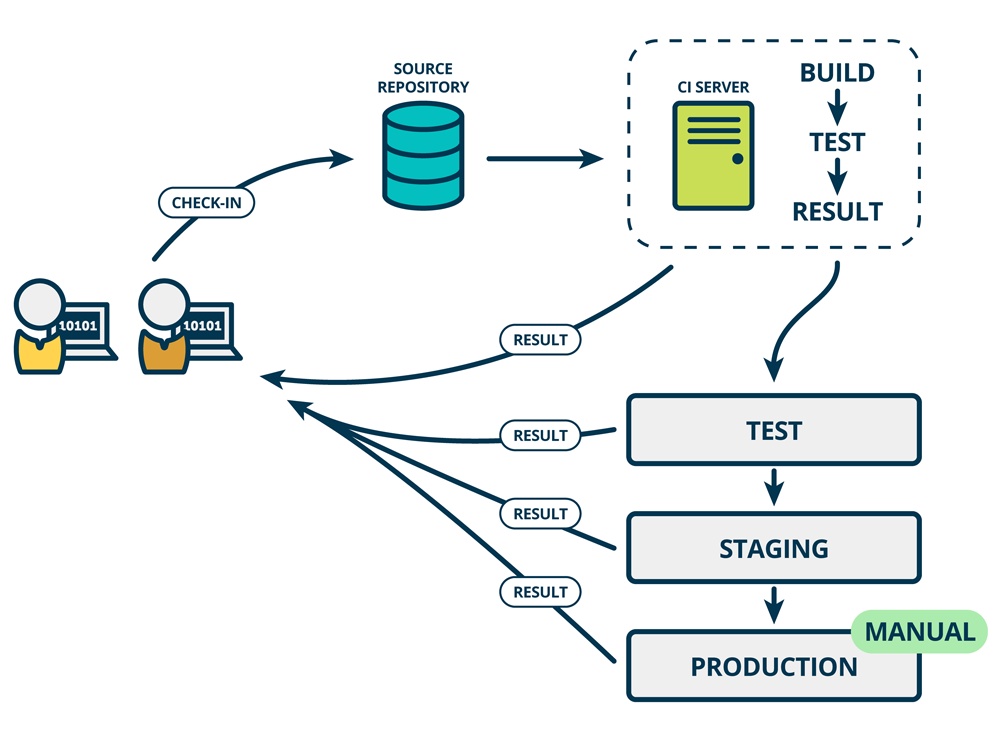
持续交付(Continuous delivery)指的是,频繁地将软件的新版本,交付给质量团队或者用户,以供评审。如果评审通过,代码就进入生产阶段。

持续交付可以看作持续集成的下一步。将集成后的代码部署到更贴近真实运行环境(类生产环境)中。比如,我们完成单元测试后,可以把代码部署到连接数据库的Staging环境中更多的测试。如果代码没有问题,可以继续手动部署到生产环境。

它强调的是,不管怎么更新,软件是随时随地可以交付的。

2.1.3 持续部署

持续部署(continuous deployment)是持续交付的下一步,指的是代码通过评审以后,自动部署到生产环境。

持续部署的目标是,代码在任何时刻都是可部署的,可以进入生产阶段。

持续部署的前提是能自动化完成测试、构建、部署等步骤。

它与持续交付的区别,可以参考下图。(持续交付是手动部署,持续部署是自动)

2.2 CI/CD的两种分类

参考链接:谁才是世界上最好的 CI/CD 工具?

  • On-Premise 需要用户搭建自己的服务器来运行 CI/CD 工具。
  • Hosted CI/CD 工具是一个 SaaS 服务,不需要用户搭建自己的服务器。

常见的 CI/CD 工具:

  • TeamCity 和 Jenkins 属于 “On-Premise” 阵营
  • Travis CI 属于 “Hosted” 阵营
  • AppVeyor 和 Azure Pipelines 则是既能 “On-Premise” 又能 “Hosted”

如果在 CI/CD 过程中,需要连接到不同的内网服务。那么 On-Premise 的 CI/CD 工具适合这样的使用场景,你可以把 Build Agent 部署在内网的机器上,这样可以轻松地连接内网资源。

如果你不需要连接内网资源,那么 Hosted CI/CD Service 就是你的最佳选择了,有以下几个优势:

  • 维护成本:Hosted CI/CD Service 可以说是零维护成本了,整个运行环境都由服务商托管。相比于 On-Premise 的CI/CD 工具,使用者需要自己花大量时间搭建与维护服务器,对于 Hosted CI/CD Service 来说,使用者完全不需要担心背后服务器的维护。
  • Clean的运行环境:假设你在为你的 Python 项目寻求一个 CI/CD 工具,而你的 Python 项目需要同时对 Python 2.7, 3.6, 3.7 进行持续集成,那么 Hosted CI/CD Service 完全可以满足你的需要。On-Premise 的机器上,你需要对不同的 Python 版本而烦恼,而 Hosted CI/CD Service 每次都会创建一个新的运行环境,想用哪个 Python 版本就用哪个。
  • 预装的软件和运行时:每一个项目在做持续集成时,往往会需要依赖不同的运行时和工具链,Hosted CI/CD Service 会帮你预装好许多常用的软件和运行时,大大减少了搭建环境的时间。
  • 价格:价格成本也是我们在技术选型要重点考虑的一点。
    • On-Premise 的 TeamCity 和 Jenkins:虽然他们都是免费使用的,但是使用者都需要搭建自己的服务器,不论是用自己的物理机还是使用 Azure 或是 AWS 上的虚拟机,这都是一个花费。特别是对于大规模的持续集成的需求下,这会是个很大的价格成本。
    • 对于开源项目,Hosted CI/CD Service 有着很大的优势,Travis CI、AppVeyor 和 Azure Pipelines 对于开源项目都是完全免费的。
    • 对于私有项目,Travis CI 和 AppVeyor 是收费的,而 Azure Pipelines 有一个月 1800 分钟的免费额度。可见,对于私有项目,Azure Pipelines 有很大的优势。

三、Fastlane + Jenkins

Jenkins是一个独立的开源软件项目,是基于Java开发的一种持续集成工具,前身是Hudson是一个可扩展的持续集成引擎。

主要功能是将项目中重复执行的工作,持续地、自动化地执行,如软件的构建、测试和部署、在配置文件下设置的job。

通常与版本管理工具(SCM)、构建工具结合使用。常用的版本控制工具有SVN、GIT,构建工具有Maven、Ant、Gradle。

Jenkins中的任务(Job)和构建(build):

任务(Job)是Jenkins的一个执行计划,是一系列操作的集合,构建是Jenkins的任务的一次运行。
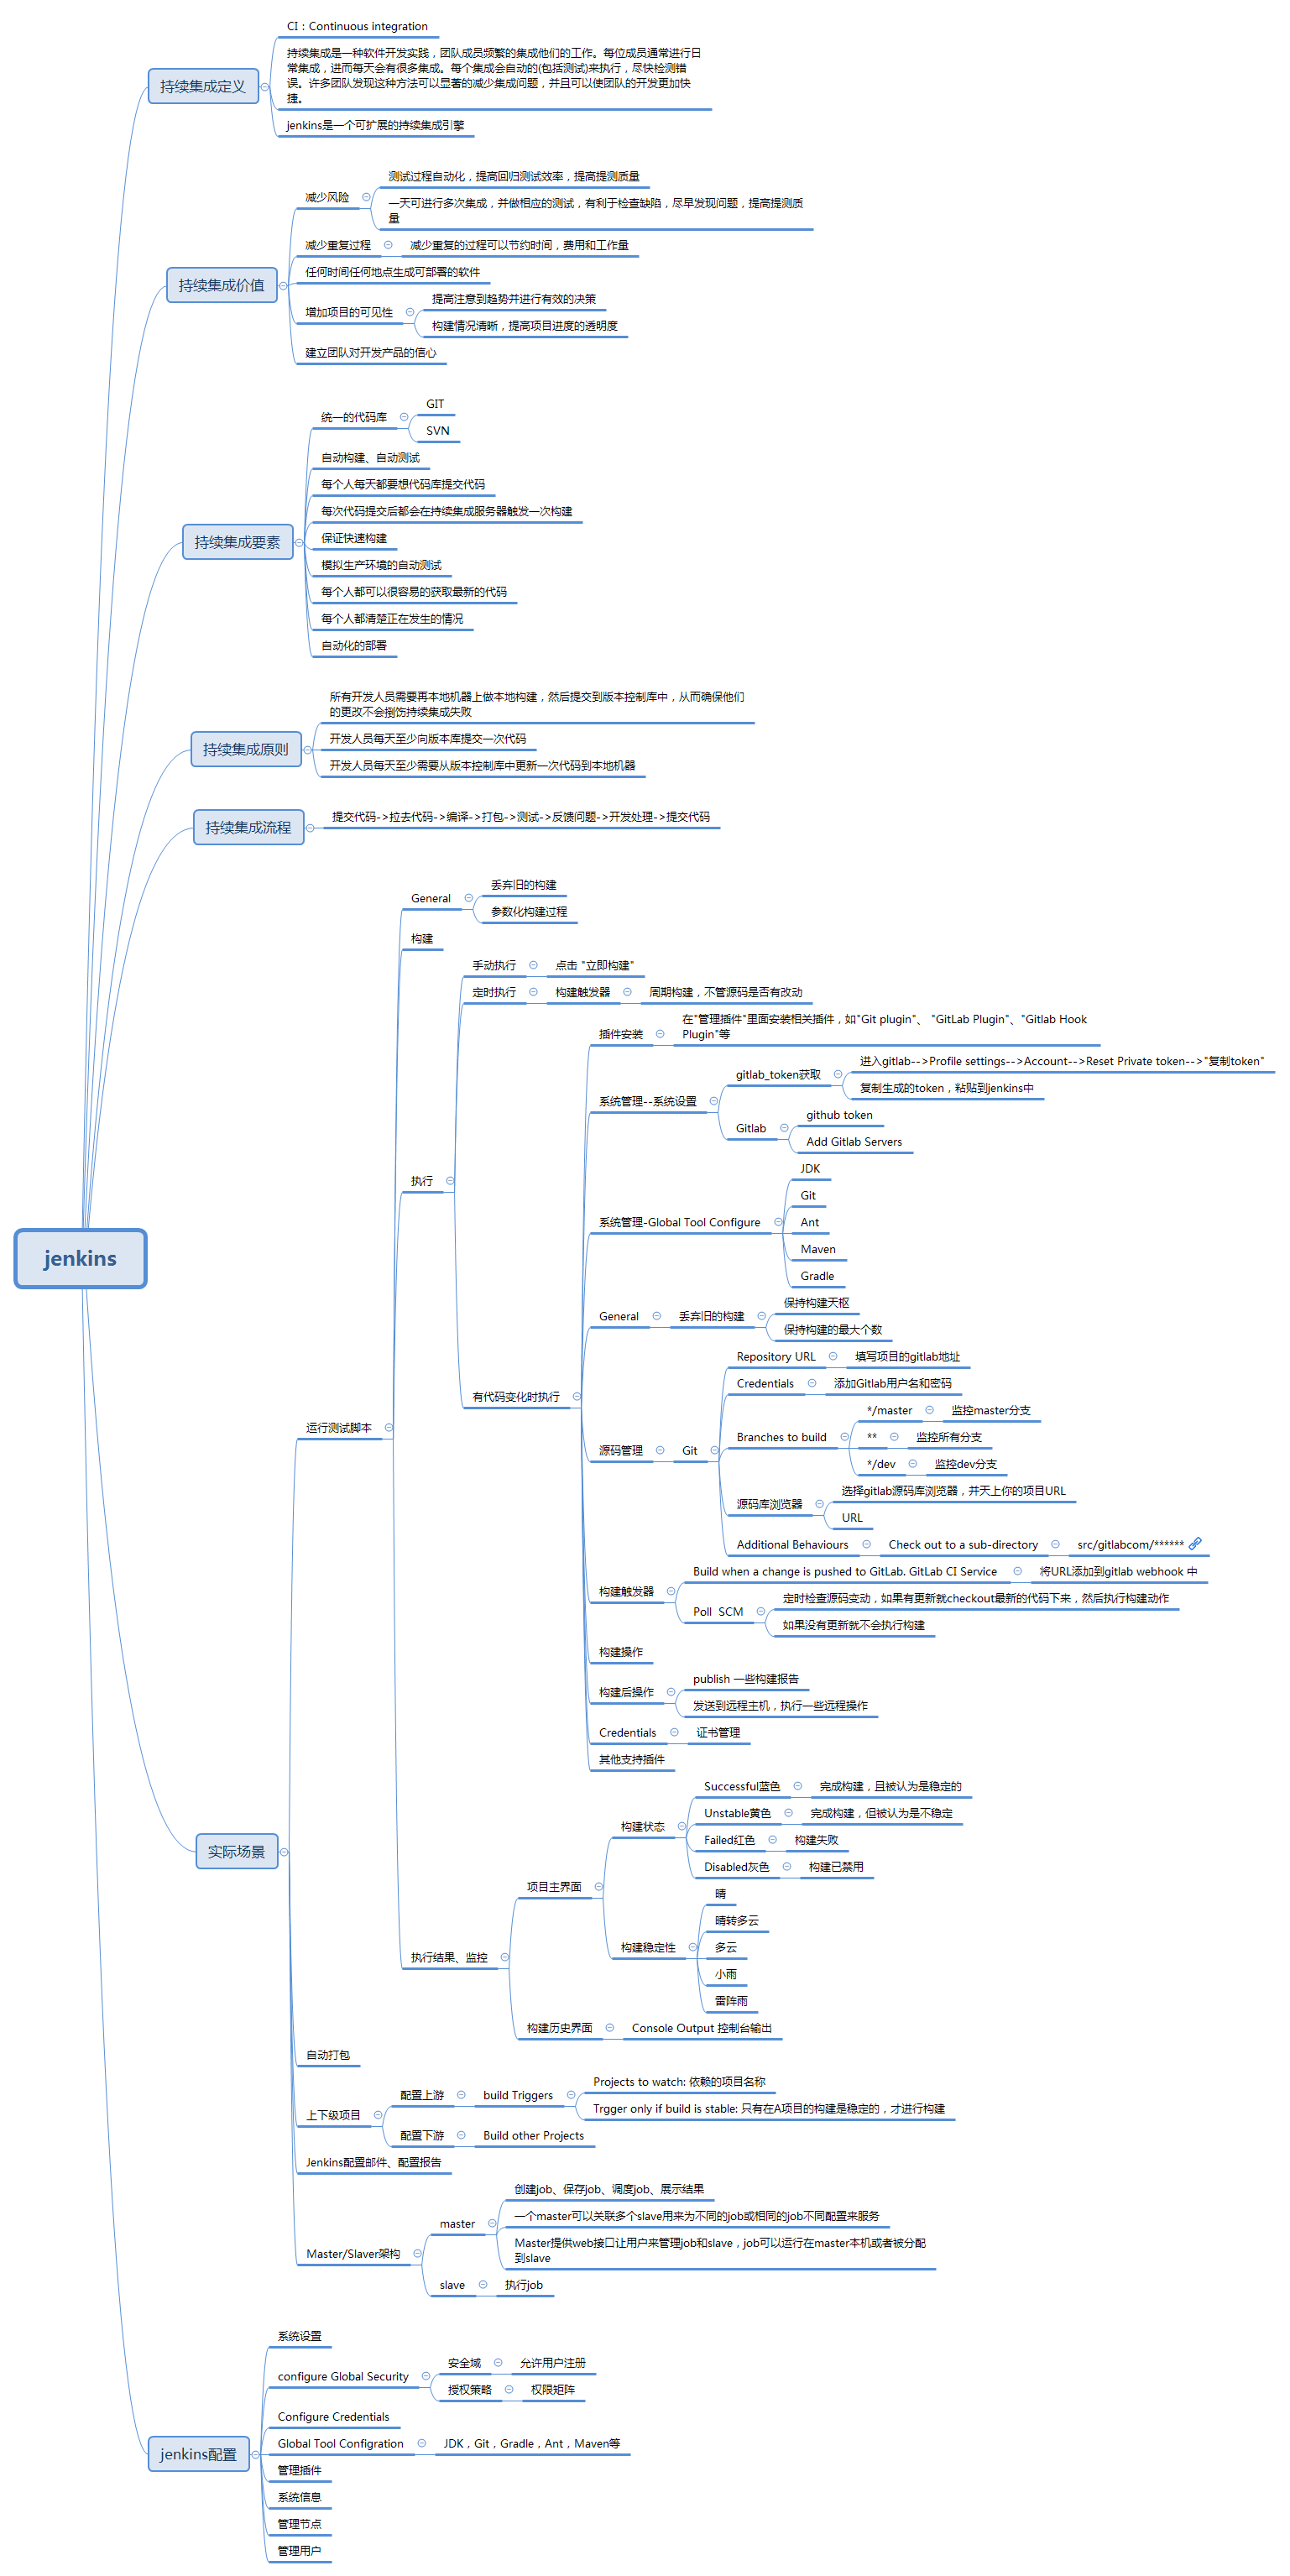
3.1 思维导图

Jenkins详细教程

3.2 安装

  • 方法一:Jenkins直接安装到Mac OS系统机器上
  • 方法二:Jenkins部署在Linux或者Windows机器上,添加一个MacOS构建节点。(这种Jenkins部署机器+节点的方式适用于构建任务较多的场景,大厂会有专门的打包集群)。

Mac OS系统的机器,可以选择一台 Mac,更多的是Mac Mini(主机盒子)。(不建议使用黑苹果,有可能出现Android没问题、iOS打包失败等一些奇怪的问题。

如果所在公司可能没有专门的MacOS打包机,感觉就没有必要在自己的机器上再安装 jenkins 了,直接在终端执行脚本就可以了。步骤如下:

  1. 建立新的打包目录,其中包含源代码、打包脚本以及打包生成文件等目录;(不要直接使用开发工程目录,否则打包的时候还是不可以修改代码)
  2. 代码提交后,执行打包目录下的打包脚本,脚本内部需要添加拉取最新代码操作,拉取之后进行打包。

3.3 构建方案的选择

Jenkins的重点是持续地、自动化的集成/部署,监听到某种行为后/定时执行某个工作流。但其中一些节点,比如构建节点,需要我们指定具体的操作命令。

  • 方案一:jenkins安装 xcode 相关插件,以构建出 xcode 打包环境,以及配置证书、认证文件、钥匙串的相关插件。
    • 管理本地的keychain和iOS证书的插件 Keychains and Provisioning Profiles Management
    • 用于xcode构建的插件 Xcode integration
    • 缺点:整体流程比较繁琐,稍有流程顺序和配置出错都会导致打包失败,而且听说 jenkins 的 xcode 插件更新频率极慢,可能不能满足最新版 xcode 的使用(打包测试版本,然后推送到托管平台还好,但是发布到 appstore 有些坑)。
  • 方案二:脚本构建 — xcode
  • 方案三:脚本构建 — fastlane(推荐)
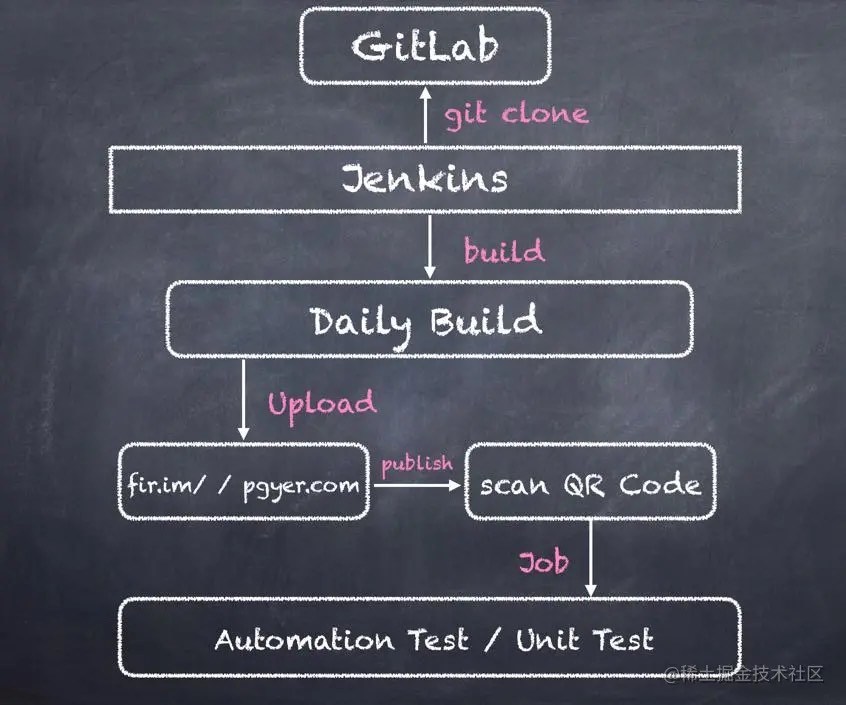
3.4 大致流程

大致流程:

  1. 开发者提交代码到 gitlab
  2. 可在 gitlab 配置相应的触发条件,如 pushtag 等,满足触发条件会发送 webhook 消息到 jenkinswebhook地址是提前在 jenkins 中配置好的);
  3. jenkins 收到通知后,就会执行配置好的构建任务;
  4. 构建任务内部拉取最新代码,进行一系列操作,如根据 jenkins 任务参数修改代码中的一些参数等,最后进行打包
  5. 打包成功后,将安装包上传到分发平台(蒲公英等外部平台或者自研的内部平台),上传成功后便可以将下载链接等相关信息通过 webhook 发送到企业微信群、钉钉群等团队沟通工具中,通知相关人员打包成功。

四、补充两个很全面的链接

Author:Tenloy

原文链接:https://tenloy.github.io/2021/04/27/iOS-CI.html

发表日期:2021.04.27 , 10:09 AM

更新日期:2024.04.07 , 8:02 PM

版权声明:本文采用Crative Commons 4.0 许可协议进行许可

CATALOG
  1. 一、自动化打包/构建
    1. 1.1 xcodebuild
      1. 1.1.1 project构建
      2. 1.1.2 workspace构建
      3. 1.1.3 证书、描述文件
      4. 1.1.4 常用子命令、选项
        1. 1. clean
        2. 2. build
        3. 3. test
        4. 4. archive
        5. 5. -exportArchive
      5. 1.1.5 脚本示例
    2. 1.2 fastlane
      1. 1.2.1 Fastlane是什么
      2. 1.2.2 Fastlane能干什么
      3. 1.2.3 安装与配置
        1. 1. 安装
        2. 2. 初始化
        3. 3. 简单的Fastlane书写
        4. 4. .env文件
      4. 1.2.4 块、lane、action
        1. 1. 块类型
        2. 2. lane与platform
        3. 3. action
      5. 1.2.5 Fastfile调用shell
      6. 1.2.6 初始的Fastfile解读
      7. 1.2.7 第三方插件、action
        1. 1. 查找插件
        2. 2. 安装插件
      8. 1.2.8 Fastfile案例
        1. 案例一:打包+钉钉
        2. 案例二:多渠道打包
        3. 案例三:UI模块实现交互
  2. 二、CI CD
    1. 2.1 CI CD是什么
      1. 2.1.1 持续集成
      2. 2.1.2 持续交付
      3. 2.1.3 持续部署
    2. 2.2 CI/CD的两种分类
  3. 三、Fastlane + Jenkins
    1. 3.1 思维导图
    2. 3.2 安装
    3. 3.3 构建方案的选择
    4. 3.4 大致流程
  4. 四、补充两个很全面的链接