内容骨架来自戴铭老师文章Objc Runtime 总结 ,因为发布有些久远,一些内容已经过时,修正了一下,并填充了一些自己的知识总结。
更新:以下源码来自objc4-756.2,2019年下半年随着macOS 10.15发布了objc4-779.1,其后陆续对cache_t、class_rw_t等结构进行了一些调整。
一、Runtime概述 1.1 Runtime做了什么? Objective-C跟C、C++等语言有着很大的不同,是一门动态性比较强的编程语言。允许很多操作推迟到程序运行时再进行,其可以在运行过程中修改之前编译好的行为,比如程序运行时创建,检查,修改类、对象和它们的方法。
维基:动态编程语言 是高级编程语言的一个类别,是一类在运行时可以改变其结构的语言,或者说可以在运行时执行静态编程语言在编译期间执行的许多常见编程行为。例如:程序的扩展、添加新代码,已有的函数可以被删除或修改、扩展对象、定义或修改类型系统等。
而Objective-C的动态性是由Runtime来支撑和实现的。
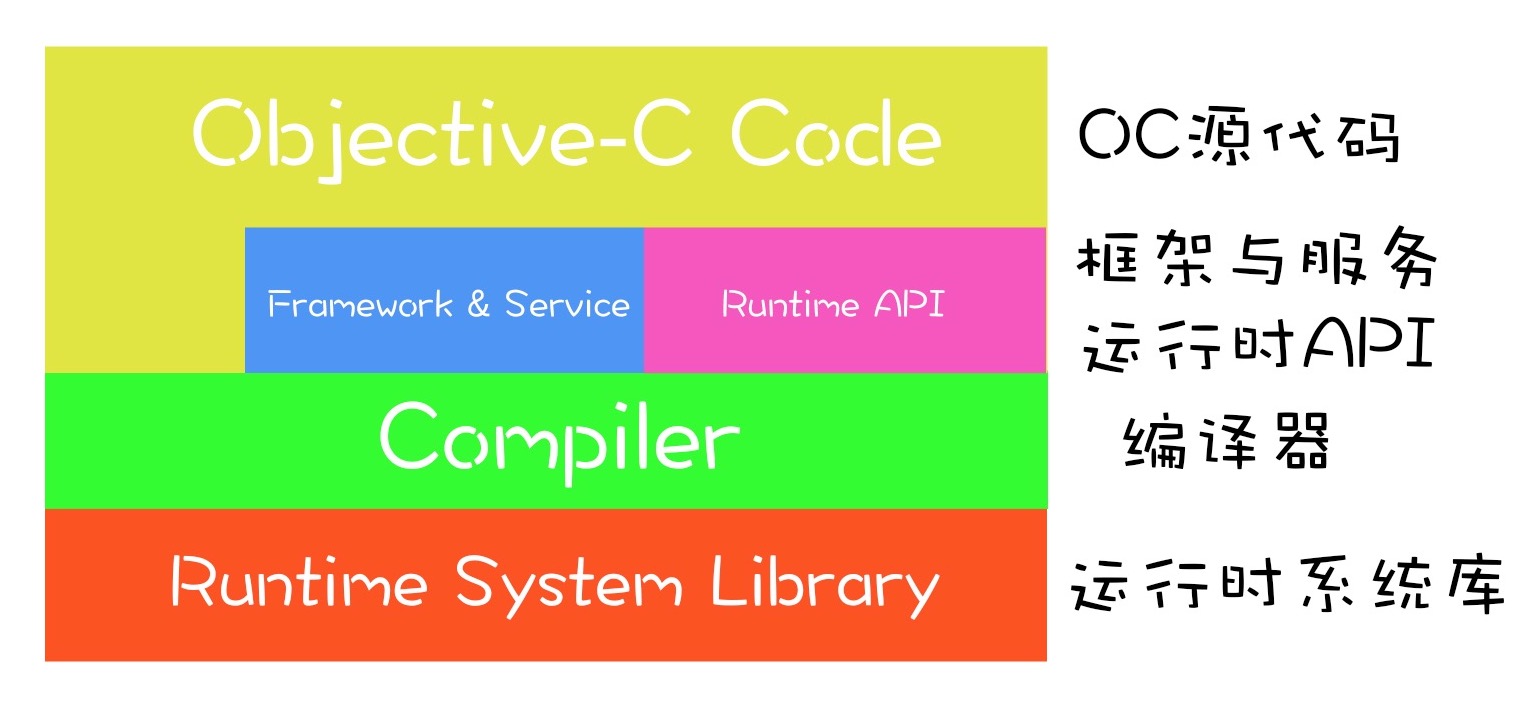
很久之前孙源老师的一篇文章中说道:objc = C + objc编译器 + runtime
Runtime做了什么:
建立了支持objc语言的数据结构。使得C具有了面向对象能力
建立了消息机制
1.2 学习链接
Runtime是C和汇编编写的,是开源的,下载地址 ;
GNU也有一个开源的runtime版本,他们都努力的保持一致。
苹果官方的Objective-C Runtime Programming Guide 。
Runtime系统是由一系列的函数和数据结构组成的公共接口动态共享库,在/usr/include/objc目录下可以看到头文件,可以用其中一些函数通过C语言实现objectivec中一样的功能。可以在苹果官方文档Objective-C Runtime Reference 中查看 Runtime 库函数的详细解释。
当我们导入了objc/Runtime.h和objc/message.h两个头文件之后,如果发现没有代码提示,函数里面的参数和描述也没有了。可以在 Build Setting 中设置 Enable Strict Checking of objc_msgSend Calls 为 NO。
写在前面:
后缀 _t 意味着 type/typedef(类型) ,是一种命名规范,类似于全局变量加前缀 g_。
_np表示不可移植(np意指non portable, 不可移植)。
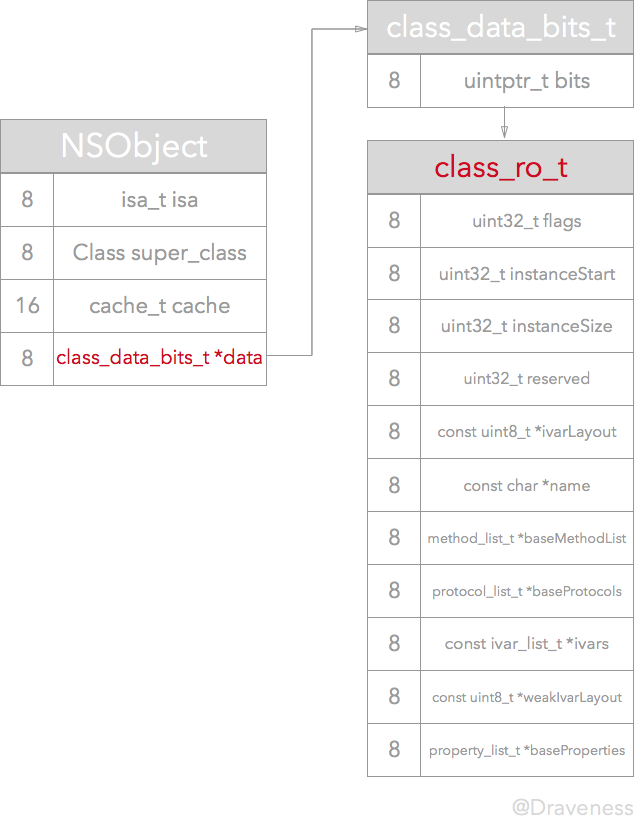
关系简图 class_ro_t里面的baseMethodList、baseProtocols、ivars、baseProperties是一维数组,是只读的,包含了类的初始内容。
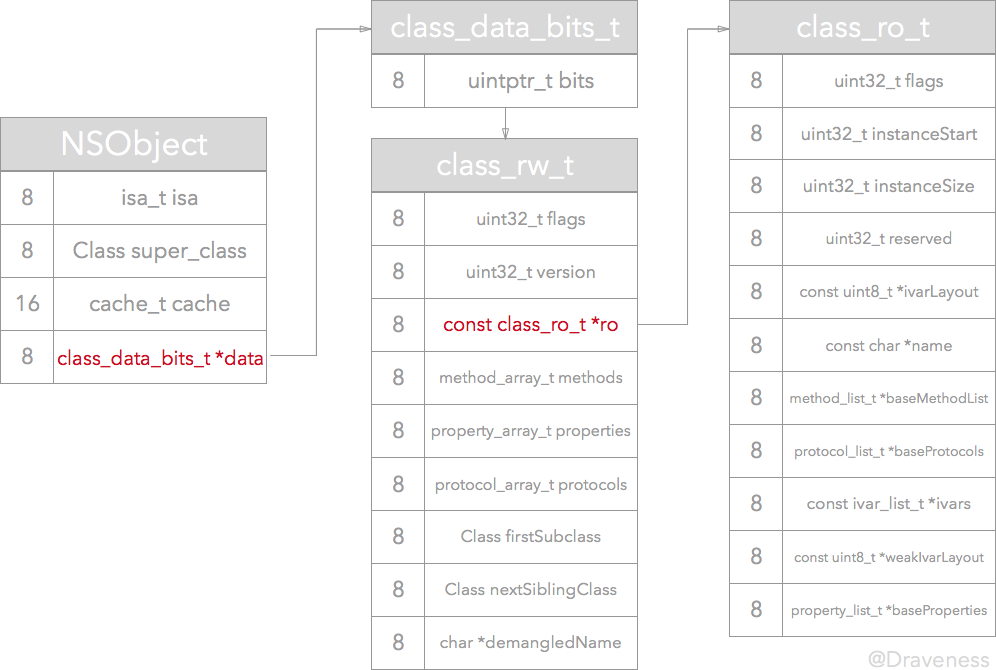
class_rw_t里面的methods、properties、protocols是二维数组,是可读可写的,包含了类的初始内容、分类的内容。
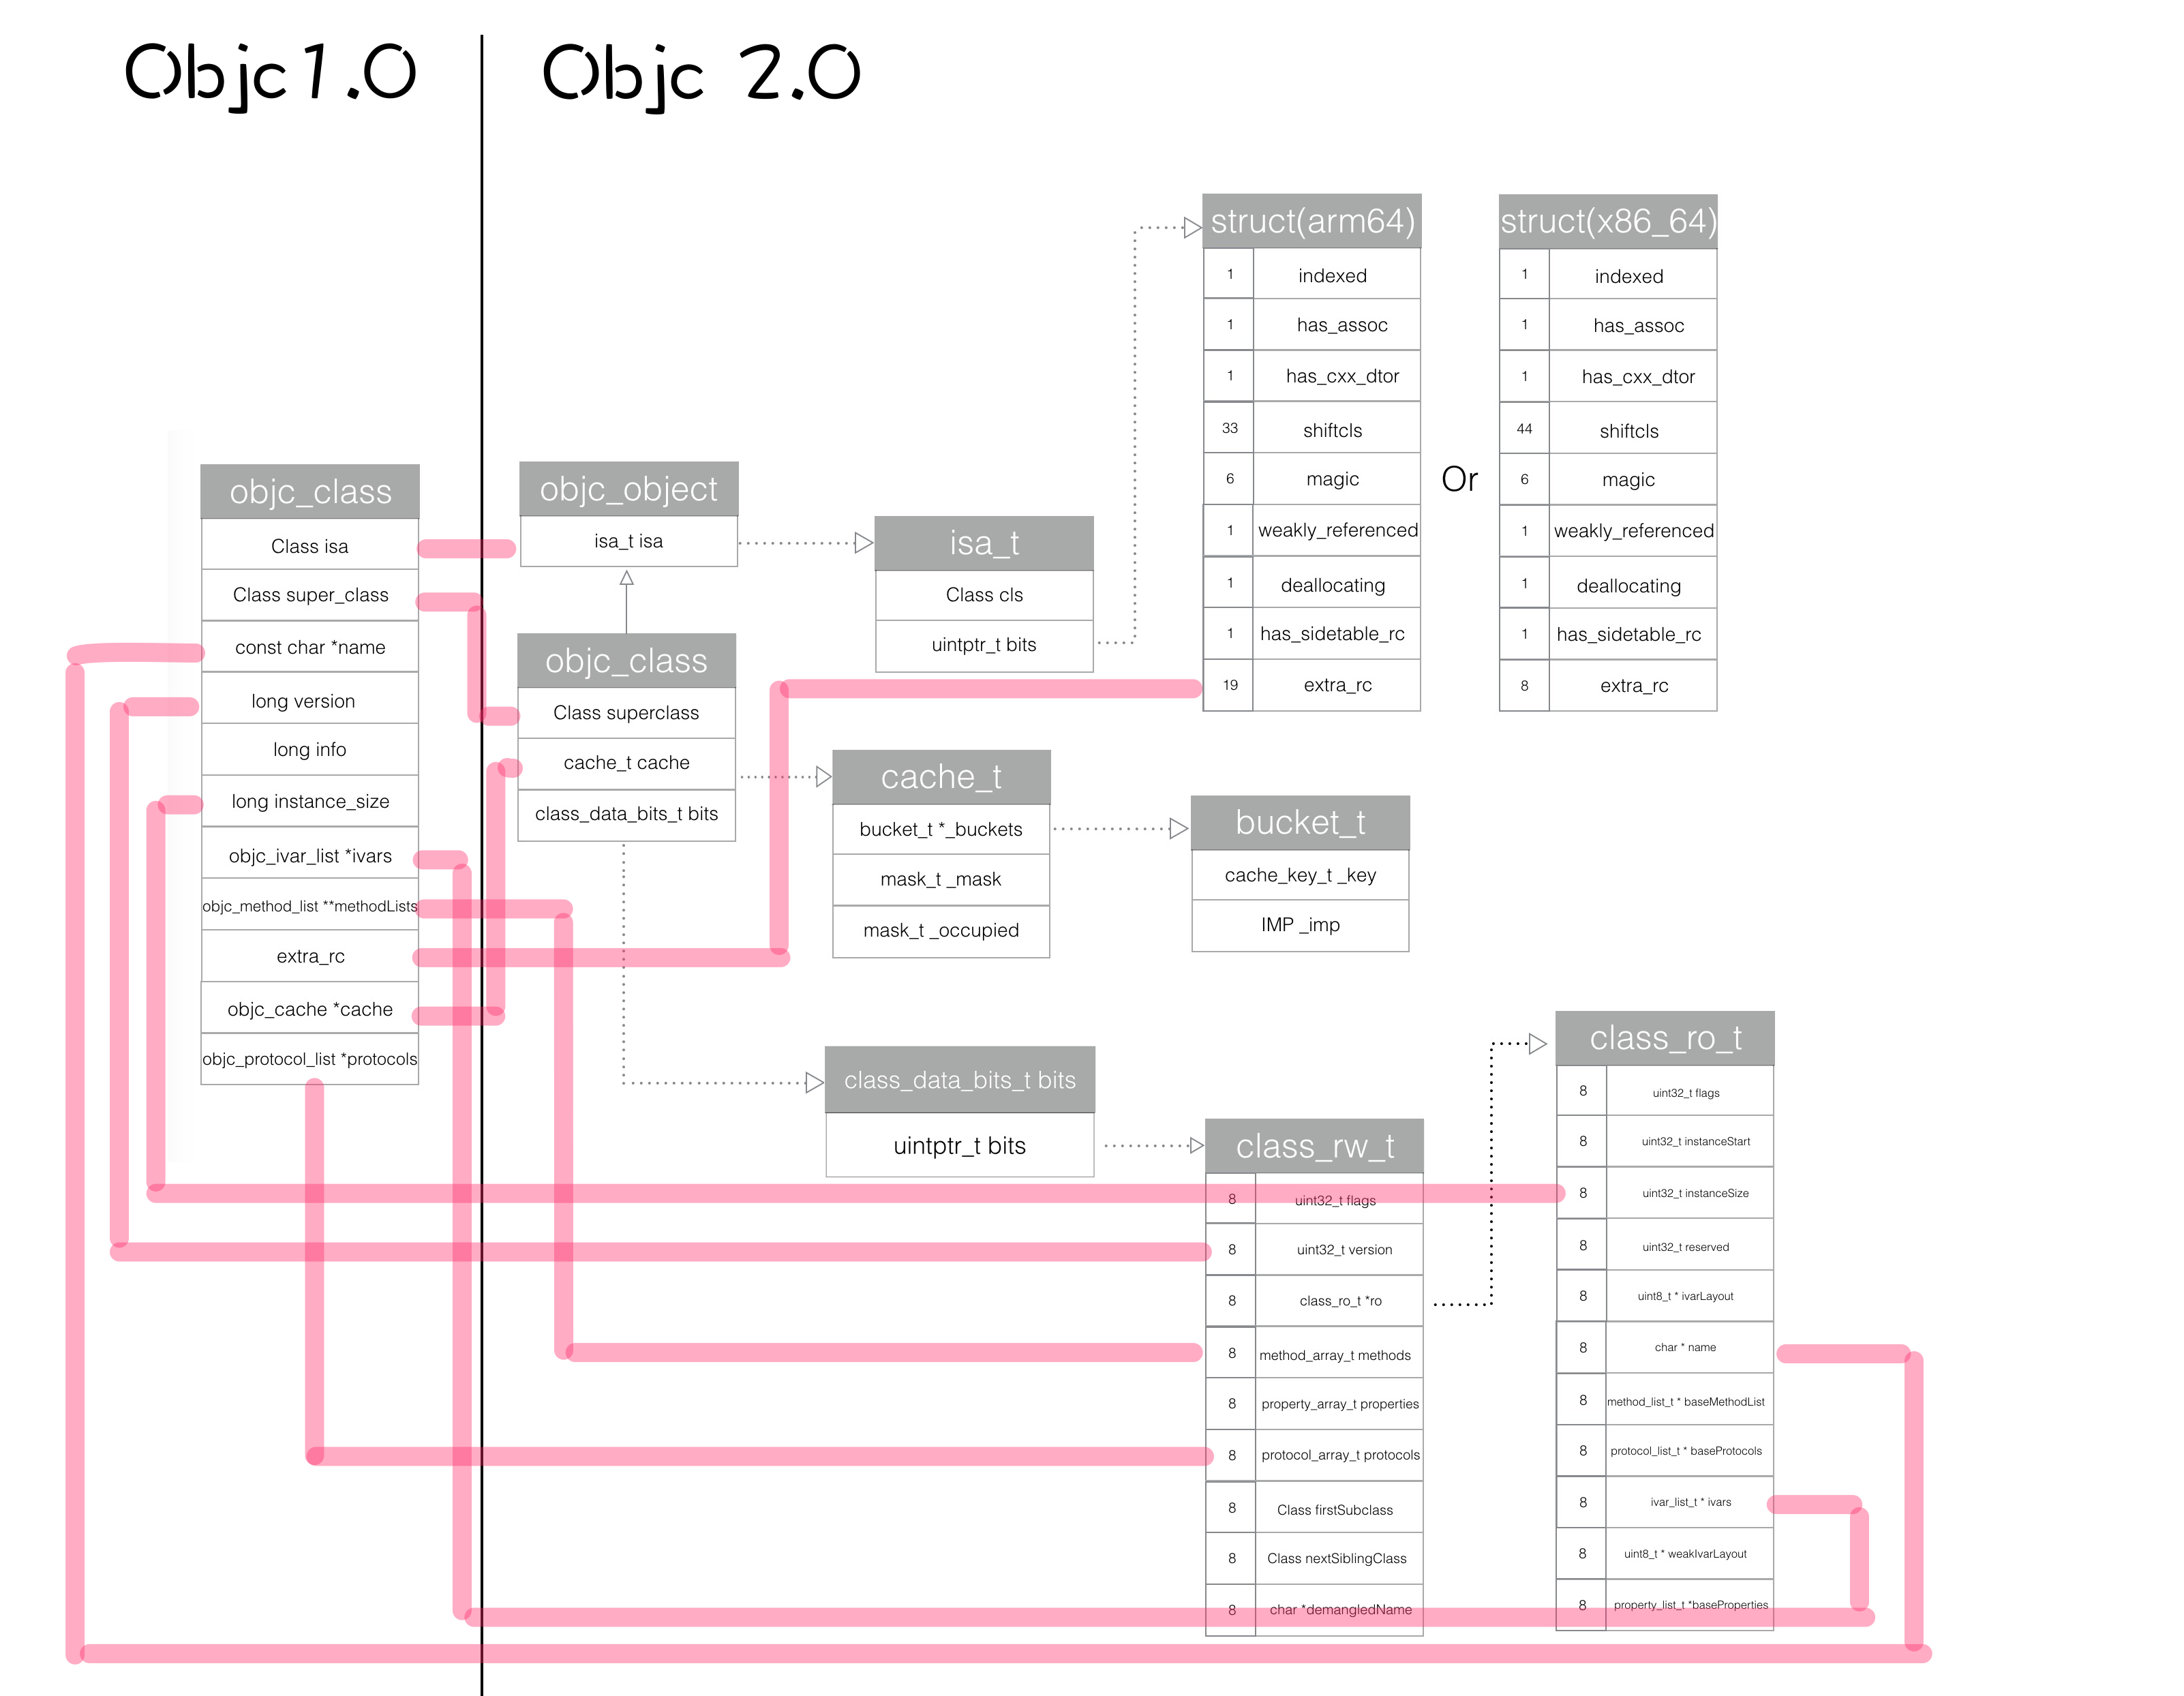
objc_class 1.0和2.0的差别示意图:
2.1 objc_object与id 1 2 3 4 5 6 7 8 struct objc_object { isa_t isa; } typedef struct objc_object *id ;
对象是什么? 看到 objc_object 的结构后,此处有个结论:任何结构体,只要以一个指向 Class 结构体的指针开始,都可以视为一个 objc_object (对象)。
32位中,只要一个数据结构的前4个字节,是个指针(Class isa),就是个对象。 64位中,只要一个数据结构的前8个字节,是个isa_t类型的变量(isa_t isa),就是个对象。
反之,Objc中的对象是一个指向ClassObject地址的变量,即 id obj = &ClassObject , 而对象的实例变量 void *ivar = &obj + offset(N)
1 2 3 4 5 6 7 8 9 10 11 12 13 14 15 16 17 18 19 20 21 @interface Sark : NSObject @property (nonatomic , copy ) NSString *name;- (void )speak; @end @implementation Sark - (void )speak { NSLog (@"my name's %@" , self .name); } @end @implementation ViewController - (void )viewDidLoad { [super viewDidLoad]; id cls = [Sark class ]; void *obj = &cls; [(__bridge id )obj speak]; } @end
2.2 objc_class 1 2 3 4 5 6 7 8 9 10 11 12 13 14 15 16 17 struct objc_class : Class superclass; cache_t cache; class_data_bits_t bits; class_rw_t *data () return bits.data (); } void setData (class_rw_t *newData) bits.setData (newData); }
2.2.1 成员: isa_t isa 在arm64架构之前,isa就是一个普通的指针(Class _Nonnull isa),存储着Class、Meta-Class对象的内存地址
1 2 3 struct objc_class { Class isa OBJC_ISA_AVAILABILITY; } OBJC2_UNAVAILABLE;
从arm64架构开始:
明确的将objc_class定义为一个Object,继承自struct objc_object。
对isa进行了优化,变成了一个共用体(union)结构,使用位域来存储了更多的信息。1 2 3 4 5 6 7 8 9 10 11 12 13 14 15 16 17 18 19 20 21 22 23 24 25 26 27 struct objc_object { isa_t isa; } struct objc_class : } #define ISA_MASK 0x0000000ffffffff8ULL 取类指针值的掩码 #define ISA_MAGIC_MASK 0x000003f000000001ULL 取MAGIC值的掩码 union isa_t { isa_t () { } isa_t (uintptr_t value) : bits (value) { } Class cls; uintptr_t bits; struct { uintptr_t nonpointer : 1 ; uintptr_t has_assoc : 1 ; uintptr_t has_cxx_dtor : 1 ; uintptr_t shiftcls : 33 ; uintptr_t magic : 6 ; uintptr_t weakly_referenced : 1 ; uintptr_t deallocating : 1 ; uintptr_t has_sidetable_rc : 1 ; uintptr_t extra_rc : 19 }; }
关于Tagged Pointer 在2013年9月,苹果推出了iPhone5s ,与此同时,iPhone5s配备了首个采用64位架构的A7双核处理器 ,为了节省内存和提高执行效率,苹果提出了Tagged Pointer的概念。对于64位程序,引入Tagged Pointer后,相关逻辑能减少一半的内存占用,以及3倍的访问速度提升,100倍的创建、销毁速度提升。
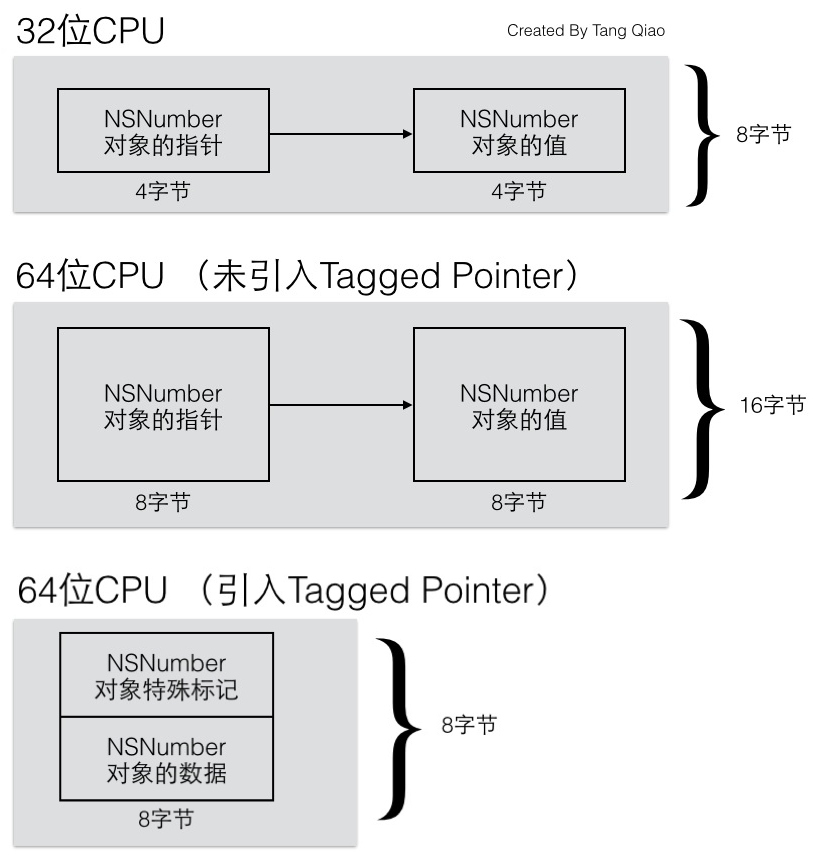
在WWDC2013的《Session 404 Advanced in Objective-C》视频中,苹果介绍了 Tagged Pointer。 Tagged Pointer用于优化NSNumber、NSDate、NSString等小对象的存储,其存在主要是为了节省内存。我们知道,对象的指针大小一般是与机器字长有关,在32位系统中,一个指针的大小是32位(4字节),而在64位系统中,一个指针的大小将是64位(8字节)。
假设我们要存储一个NSNumber对象,其值是一个整数。正常情况下,如果这个整数只是一个NSInteger的普通变量,那么它所占用的内存是与CPU的位数有关,在32位CPU下占4个字节,在64位CPU下是占8个字节的。而指针类型的大小通常也是与CPU位数相关,一个指针所占用的内存在32位CPU下为4个字节,在64位CPU下也是8个字节。如果没有Tagged Pointer对象,从32位机器迁移到64位机器中后,虽然逻辑没有任何变化,但这种NSNumber、NSDate一类的对象所占用的内存会翻倍。
苹果提出了Tagged Pointer对象。由于NSNumber、NSDate一类的变量本身的值需要占用的内存大小常常不需要8个字节,拿整数来说,4个字节所能表示的有符号整数就可以达到20多亿(注:2^31=2147483648,另外1位作为符号位),对于绝大多数情况都是可以处理的。如下图所示:
2.2.2 成员: cache_t cache
cache: 用于缓存调用过的method
Cache的作用主要是为了优化方法调用的性能。
假如,当对象receiver调用方法message时:
首先根据对象receiver的isa指针查找到它对应的类,然后在类的methodLists中搜索方法;
如果没有找到,就使用super_class指针到父类中的methodLists查找,一旦找到就调用方法。如果没有找到,有可能消息转发,也可能忽略它。
这样查找方式效率就太低了,因为往往一个类大概只有20%的方法经常被调用,占总调用次数的80%。所以使用Cache来缓存经常调用的方法,当调用方法时,优先在Cache查找,如果没有找到,再到methodLists查找。
1 2 3 4 5 6 7 8 9 10 11 12 13 14 15 16 17 18 19 20 21 22 23 struct cache_t { struct bucket_t *_buckets ; mask_t _mask; mask_t _occupied; } typedef unsigned int uint32_t ;typedef uint32_t mask_t ; typedef unsigned long uintptr_t ;typedef uintptr_t cache_key_t ;struct bucket_t {private : uintptr_t _imp; SEL _sel; } static inline mask_t cache_hash (SEL sel, mask_t mask) return (mask_t )(uintptr_t )sel & mask; }
要点:
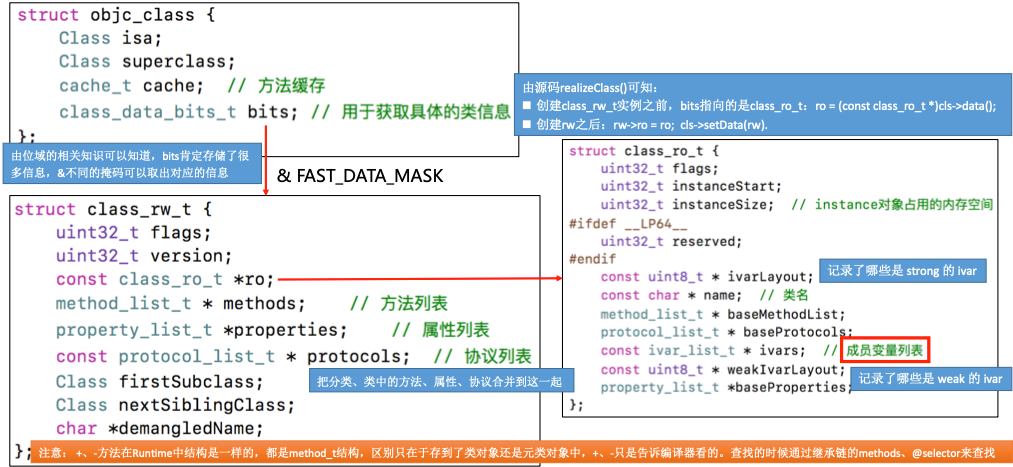
2.2.3 成员: class_data_bits_t bits 1. 数据结构
bits:class_data_bits_t结构体类型,该结构体主要用于记录,保存类的数据的class_rw_t结构体的内存地址。
1 2 3 4 5 6 7 8 9 10 11 12 13 14 15 16 17 18 19 20 21 22 23 24 25 26 27 28 29 30 #if !__LP64__ #define FAST_DATA_MASK 0xfffffffcUL #elif 1 #define FAST_DATA_MASK 0x00007ffffffffff8UL #endif struct class_data_bits_t { uintptr_t bits; private : bool getBit (uintptr_t bit) return bits & bit; } public : class_rw_t * data () return (class_rw_t *)(bits & FAST_DATA_MASK); } void setData (class_rw_t *newData) { assert (!data () || (newData->flags & (RW_REALIZING | RW_FUTURE))); uintptr_t newBits = (bits & ~FAST_DATA_MASK) | (uintptr_t )newData; atomic_thread_fence (memory_order_release); bits = newBits; } };
2. class_rw_t与class_ro_t简介 class_rw_t、class_ro_t结构体名中,rw是 read write 的缩写,ro是 read only 的缩写,可见class_ro_t的保存类的只读信息,这些信息在类完成注册后不可改变。
即分类等运行期添加的数据保存在class_rw_t结构体中,编译时期就能确定的部分保存在ro指针指向的class_ro_t结构体中。
以类的成员变量列表为例(成员变量列表保存在class_ro_t结构体中)。若应用类注册到内存后,使用类构建了若干实例,此时若能够添加成员变量,那必然需要对内存中的这些类重新分配内存,这个操作的花销是相当大的。若考虑再极端一些,为根类NSObject添加成员变量,则内存中基本所有 Objective-C 对象都需要重新分配内存,如此庞大的计算量在运行时是不可接受的。
3. bits在编译、运行期间值的改变 注意:在编译期,类的结构中的 class_data_bits_t的 class_rw_t *data() 取出的是一个指向 class_ro_t 的指针。
在运行时调用 realizeClass方法,会做以下3件事情:
从 class_data_bits_t调用 data方法,将结果从 class_rw_t强制转换为 class_ro_t指针;
初始化一个 class_rw_t结构体;
设置结构体 ro的值以及 flag;
最后设置正确的 data
1 2 3 4 5 6 auto ro = (const class_ro_t *)cls->data ();auto isMeta = ro->flags & RO_META;rw = objc::zalloc<class_rw_t >(); rw->set_ro (ro); rw->flags = RW_REALIZED|RW_REALIZING|isMeta; cls->setData (rw);
但是,在这段代码运行之后 class_rw_t 中的方法,属性以及协议列表均为空。这时需要 realizeClass 调用 methodizeClass 方法来将类自己实现的方法(包括分类)、属性和遵循的协议加载到 methods、 properties 和 protocols 列表中 。
更加详细的分析,请看@Draveness 的这篇文章深入解析 ObjC 中方法的结构 。
2.2.4 方法: 类加载过程中,状态读写 1 2 3 4 5 6 7 8 9 10 11 12 13 14 15 16 17 18 19 20 21 22 23 24 25 26 27 28 29 30 31 32 33 34 35 36 37 38 39 40 41 42 43 44 45 46 47 48 49 50 51 52 53 54 55 56 57 58 59 60 61 62 63 64 65 66 67 68 69 70 71 bool isInitializing () return getMeta ()->data ()->flags & RW_INITIALIZING; } void setInitializing () assert (!isMetaClass ()); ISA ()->setInfo (RW_INITIALIZING); } bool isInitialized () return getMeta ()->data ()->flags & RW_INITIALIZED; } void setInitialized () Class metacls; Class cls; assert (!isMetaClass ()); cls = (Class)this ; metacls = cls->ISA (); metacls->changeInfo (RW_INITIALIZED, RW_INITIALIZING); } bool isLoadable () assert (isRealized ()); return true ; } IMP objc_class::getLoadMethod () runtimeLock.assertLocked (); const method_list_t *mlist; assert (isRealized ()); assert (ISA ()->isRealized ()); assert (!isMetaClass ()); assert (ISA ()->isMetaClass ()); mlist = ISA ()->data ()->ro->baseMethods (); if (mlist) { for (const auto & meth : *mlist) { const char *name = sel_cname (meth.name); if (0 == strcmp (name, "load" )) { return meth.imp; } } } return nil; } bool isRealized () return data ()->flags & RW_REALIZED; } bool isFuture () return data ()->flags & RW_FUTURE; }
2.2.5 方法: 类状态获取 objc_class结构体中类的基本状态查询的函数代码如下。注意Class getMeta()获取元类时:对于元类,getMeta()返回的结果与ISA()返回的结果不相同,对于非元类,两者则是相同的。
1 2 3 4 5 6 7 8 9 10 11 12 13 14 15 16 17 18 19 20 21 22 23 24 25 26 27 28 29 30 31 32 33 34 35 36 37 38 bool isARC () return data ()->ro->flags & RO_IS_ARC; } bool isMetaClass () assert (this ); assert (isRealized ()); return data ()->ro->flags & RO_META; } bool isMetaClassMaybeUnrealized () return bits.safe_ro ()->flags & RO_META; } Class getMeta () { if (isMetaClass ()) return (Class)this ; else return this ->ISA (); } bool isRootClass () return superclass == nil; } bool isRootMetaclass () return ISA () == (Class)this ; } const char *mangledName () assert (this ); if (isRealized () || isFuture ()) { return data ()->ro->name; } else { return const class_ro_t *)data ())->name; } } const char *demangledName () const char *nameForLogging ()
2.2.6 方法: 内存分配 根据类的信息构建对象时,需要根据类的继承链上的所有成员变量的内存布局为成员变量数据分配内存空间,分配内存空间的大小固定的,并按 WORD 对齐,调用size_t class_getInstanceSize(Class cls)实际是调用了objc_class结构体的uint32_t alignedInstanceSize()函数。
成员变量在实例内存空间中偏移量同样也是固定的,同样也是按 WORD 对齐。实例的第一个成员变量内存空间的在实例空间中的偏移量,实际是通过调用objc_class结构体的uint32_t alignedInstanceStart()函数获取。
objc_class结构体中涉及内存分配的函数代码如下:
1 2 3 4 5 6 7 8 9 10 11 12 13 14 15 16 17 18 19 20 21 22 23 24 25 26 27 28 29 30 31 32 33 34 35 36 37 38 39 40 uint32_t unalignedInstanceStart () assert (isRealized ()); return data ()->ro->instanceStart; } uint32_t alignedInstanceStart () return word_align (unalignedInstanceStart ()); } uint32_t unalignedInstanceSize () assert (isRealized ()); return data ()->ro->instanceSize; } uint32_t alignedInstanceSize () return word_align (unalignedInstanceSize ()); } size_t instanceSize (size_t extraBytes) size_t size = alignedInstanceSize () + extraBytes; if (size < 16 ) size = 16 ; return size; } void setInstanceSize (uint32_t newSize) assert (isRealized ()); if (newSize != data ()->ro->instanceSize) { assert (data ()->flags & RW_COPIED_RO); *const_cast <uint32_t *>(&data ()->ro->instanceSize) = newSize; } bits.setFastInstanceSize (newSize); } };
2.3 class_rw_t 类的主要数据保存在bits中,bits以位图保存class_rw_t结构体,用于记录类的关键数据,如成员变量列表、方法列表、属性列表、协议列表等等,class_rw_t仅包含三个基本的位操作方法。
1 2 3 4 5 6 7 8 9 10 11 12 13 14 15 16 17 18 19 20 21 22 23 24 25 26 27 28 29 30 31 32 33 34 35 36 37 38 39 40 41 42 43 44 45 46 47 48 49 #if __ARM_ARCH_7K__ >= 2 || (__arm64__ && !__LP64__) # define SUPPORT_INDEXED_ISA 1 #else # define SUPPORT_INDEXED_ISA 0 #endif struct class_rw_t { uint32_t flags; uint32_t version; const class_ro_t *ro; method_array_t methods; property_array_t properties; protocol_array_t protocols; Class firstSubclass; Class nextSiblingClass; char *demangledName; #if SUPPORT_INDEXED_ISA uint32_t index; #endif void setFlags (uint32_t set) { OSAtomicOr32Barrier (set, &flags); } void clearFlags (uint32_t clear) { OSAtomicXor32Barrier (clear, &flags); } void changeFlags (uint32_t set, uint32_t clear) { assert ((set & clear) == 0 ); uint32_t oldf, newf; do { oldf = flags; newf = (oldf | set) & ~clear; } while (!OSAtomicCompareAndSwap32Barrier (oldf, newf, (volatile int32_t *)&flags)); } };
2.4 class_ro_t 1 2 3 4 5 6 7 8 9 10 11 12 13 14 15 16 17 18 19 20 21 22 23 24 25 26 27 28 29 30 31 32 33 34 35 36 37 struct class_ro_t { uint32_t flags; uint32_t instanceStart; uint32_t instanceSize; #ifdef __LP64__ uint32_t reserved; #endif const uint8_t * ivarLayout; const char * name; method_list_t * baseMethodList; protocol_list_t * baseProtocols; const ivar_list_t * ivars; const uint8_t * weakIvarLayout; property_list_t *baseProperties; ... method_list_t *baseMethods () const return baseMethodList; } class_ro_t *duplicate () const if (flags & RO_HAS_SWIFT_INITIALIZER) { size_t size = sizeof this ) + sizeof 0 ]); class_ro_t *ro = (class_ro_t *)memdup (this , size); ro->_swiftMetadataInitializer_NEVER_USE[0 ] = this ->_swiftMetadataInitializer_NEVER_USE[0 ]; return ro; } else { size_t size = sizeof this ); class_ro_t *ro = (class_ro_t *)memdup (this , size); return ro; } } };
2.4.1 ivarLayout与weakIvarLayout 1. 值的存储格式 ivarLayout 和 weakIvarLayout 这两个编码值,结合起来,就可以确定自上而下 ,哪些 ivar 是strong、weak,确定了这两种之后,剩余的就都是基本类型和 __unsafe_unretained 的对象类型。
这两者都是 const uint8_t * 类型,但读取值的时候,需要注意,不是以char(1字节)为单位来读取的,而是:
4bit为一位,1字节为一对 ,即从两者首地址开始,1字节分为一对 来读取以两位 00 为结束符,就像 cstring 的 \0 一样
ivarLayout 的每1位(4bit)依次表示:成员变量自上而下,多少个 非 strong 成员变量、多少个 strong 成员变量…(循环 )…直到最后一个strong出现的位置(后面的就不记录了)。
weakIvarLayout 的每1位(4bit)依次表示:成员变量自上而下,多少个 非 weak 成员变量、多少个 weak 成员变量…(循环 )…直到最后一个weak出现的位置(后面的就不记录了)。
2. 操作函数 这两个值可以通过 runtime 提供的几个 API 来访问:
1 2 3 4 5 6 typedef unsigned char uint8_t ;const uint8_t *class_getIvarLayout (Class cls) const uint8_t *class_getWeakIvarLayout (Class cls) void class_setIvarLayout (Class cls, const uint8_t *layout) void class_setWeakIvarLayout (Class cls, const uint8_t *layout)
3. 示例 1 2 3 4 5 6 7 8 9 10 11 12 13 14 15 16 17 18 19 20 21 22 23 24 25 26 27 28 29 30 31 32 33 34 35 36 37 38 39 40 41 @interface Foo : NSObject __weak id ivar0; __strong id ivar1; __unsafe_unretained id ivar2; __weak id ivar3; __strong id ivar4; __weak id ivar5; __weak id ivar6; __strong id ivar7; __strong id ivar8; } @property (nonatomic , strong ) id ivv;@property (nonatomic , weak ) id ivv1;@end const uint8_t * strongLayout = class_getIvarLayout(Foo.class);const uint8_t * weakLayout = class_getWeakIvarLayout(Foo.class);(lldb) p strongLayout (const uint8_t *) $0 = 0x000000010d6c1246 "\U00000011!#" (lldb) p weakLayout (const uint8_t *) $1 = 0x000000010d6c124a "\U00000001!\U000000121" (lldb) x/4 xb $0 0x10d6c1246 : 0x11 0x21 0x23 0x00 (lldb) x/5 xb $1 0x10d6c124a : 0x01 0x21 0x12 0x31 0x00
4. 使用场景 原文链接:Objective-C Class Ivar Layout 探索
当我们定义一个类的实例变量的时候,可以指定其修饰符:
1 2 3 4 5 6 @interface Sark : NSObject __strong id _gayFriend; __weak id _girlFriend; __unsafe_unretained id _company; } @end
这使得 ivar (instance variable) 可以像属性一样在 ARC 下进行正确的引用计数管理。
那么问题来了,假如这个类是动态生成的:
1 2 3 4 5 Class class = objc_allocateClassPair(NSObject .class, "Sark" , 0 ); class_addIvar(class , "_gayFriend" , sizeof (id ), log2(sizeof (id )), @encode (id )); class_addIvar(class , "_girlFriend" , sizeof (id ), log2(sizeof (id )), @encode (id )); class_addIvar(class , "_company" , sizeof (id ), log2(sizeof (id )), @encode (id )); objc_registerClassPair(class );
该如何像上面一样来添加 ivar 的属性修饰符呢?假如依次设置strong、weak、strong修饰符
第一步:
1 2 3 class_setIvarLayout(class , (const uint8_t *)"\x01\x11\x00" ); class_setWeakIvarLayout(class , (const uint8_t *)"\x11\x10\x00" );
第二步:
此时,strong 和 weak 的内存管理并没有生效,继续研究发现, class 的 flags 中有一个标记位记录这个类是否 ARC,正常编译的类,且标识了 -fobjc-arc flag 时,这个标记位为 1,而动态创建的类并没有设置它。所以只能继续黑魔法,运行时把这个标记位设置上,探索过程不赘述了,实现如下:
1 2 3 4 5 6 7 8 9 10 11 12 13 14 15 16 17 18 19 20 21 22 23 24 25 26 27 28 29 30 31 static void fixup_class_arc (Class class) struct { Class isa; Class superclass; struct { void *_buckets; #if __LP64__ uint32_t _mask; uint32_t _occupied; #else uint16_t _mask; uint16_t _occupied; #endif } cache; uintptr_t bits; } *objcClass = (__bridge typeof (objcClass))class; #if !__LP64__ #define FAST_DATA_MASK 0xfffffffcUL #else #define FAST_DATA_MASK 0x00007ffffffffff8UL #endif struct { uint32_t flags; uint32_t version; struct { uint32_t flags; } *ro; } *objcRWClass = (typeof (objcRWClass))(objcClass->bits & FAST_DATA_MASK); #define RO_IS_ARR 1<<7 objcRWClass->ro->flags |= RO_IS_ARR; }
把这个 fixup 放在 objc_registerClassPair(class); 之后,这个动态的类终于可以像静态编译的类一样操作 ivar 了。
完整的示例:
1 2 3 4 5 6 7 8 9 10 11 12 13 14 15 16 17 18 19 20 21 22 23 24 25 26 Class class = objc_allocateClassPair(NSObject .class, "Sark" , 0 ); class_addIvar(class , "_gayFriend" , sizeof (id ), log2(sizeof (id )), @encode (id )); class_addIvar(class , "_girlFriend" , sizeof (id ), log2(sizeof (id )), @encode (id )); class_addIvar(class , "_company" , sizeof (id ), log2(sizeof (id )), @encode (id )); class_setIvarLayout(class , (const uint8_t *)"\x01\x11\x00" ); class_setWeakIvarLayout(class , (const uint8_t *)"\x11\x10\x00" ); objc_registerClassPair(class ); fixup_class_arc(class ); id sark = [class new];Ivar strongIvar = class_getInstanceVariable(class , "_gayFriend" ); Ivar weakIvar = class_getInstanceVariable(class , "_girlFriend" ); Ivar strongIvar2 = class_getInstanceVariable(class , "_company" ); { id boy = [NSObject new]; id girl = [NSObject new]; id boy2 = [NSObject new]; object_setIvar(sark, strongIvar, boy); object_setIvar(sark, weakIvar, girl); object_setIvar(sark, strongIvar2, boy2); } NSLog (@"%@, %@, %@" , object_getIvar(sark, strongIvar), object_getIvar(sark, weakIvar), object_getIvar(sark, strongIvar2));
2.4.2 几点总结
property在编译期会生成 _propertyName 的ivar,和相应的get/set方法。
ivars在编译期确定,但不完全确定,offset属性在运行时会修改。
对象的大小是由ivars决定的,当有继承体系时,父类的ivars永远放在子类之前。
class_ro_t 的 instanceStart 和 instanceSize 会在运行时调整。
class_ro_t 的 ivarLayout 和 weakIvarLayout 存放的是强ivar和弱ivar的存储规则。
2.5.1 为什么存在元类? 在调用类方法的时候,为了和对象查找方法的机制一致,遂引入了元类(meta-class)的概念。
对象的实例方法调用时,通过对象的 isa 在类中获取方法的实现。
类对象的类方法调用时,通过类的 isa 在元类中获取方法的实现。
meta-class之所以重要,是因为它存储着一个类的所有类方法。每个类都会有自己独一无二的meta-class,因为每个类的类方法基本不可能完全相同。
以下元类的相关内容,都来自 What is a meta-class in Objective-C? 这篇文章。
2.5.2 元类的isa — 类 元类,和类的结构是一样的 objc_class,所以也是一个对象。这表示你能够对元类调用方法。自然的,这表示它必须也有一个类指针。
类创建对象,调用的是实例方法
元类创建类对象,调用的是类方法。
所有元类使用基类的元类(即继承链顶端的类的元类)作为它们的类,而所有类的基类都是 NSObject(大多数类是这样的),所以大多数元类使用 NSObject 的元类作为它的类。
根据规则所有元类使用基类的元类作为它们的类,那么基类的元类就是它自己的类(它们的isa指针指向了自己)。这表明NSObject的元类的指针指向的是它自己(它是一个它自己的实例)。
2.5.3 元类的superclass — 父类 同样的,类使用 super_class 指针指向他们的 superclass,元类也有 super_class 指针来指向 superclass。
这里又有一个奇怪的地方,基类的元类设置的 superclass 是基类自己 (NSObject->isa->superclass = NSObject )。
这种继承结构导致的结果是所有结构中的实例、类以及元类都继承自结构中的基类。
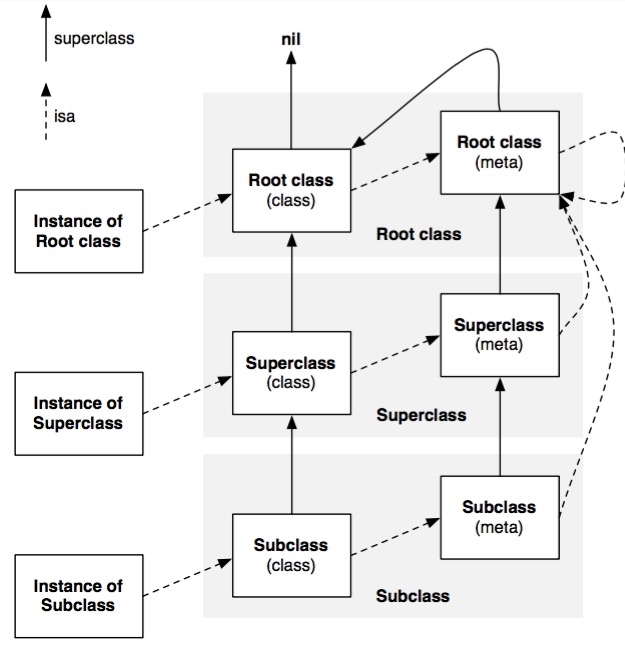
2.5.4 总结 所有这些用文字描述起来可能比较容易让人困惑。Greg Parker的文章 中有一张附图描述了实例、类和元类以及他们的super class是如何完美的共存的。
可以看到,所有的meta class 与 Root class 的 isa 都指向 Root class 的meta class,这样能够形成一个闭环。
实现了:
所有 NSObject 的实例方法,都能够被 任何实例、类、元类 来使用;
所有 NSObject 的类方法,都能够被 任何类、元类 来使用。
即实现了Objc中的任意 objc_object 对象,都继承自NSObject。NSObject为所有的对象定义了一些相同的特性 。
2.6 类与对象操作函数 runtime有很多的函数可以操作类和对象。通常,操作类的是class为前缀,操作对象的是objc或object_为前缀(因为class也是一种Object,所以有的objc或object为前缀的函数也可以操作类对象)。
2.6.1 类型获取和判断函数 1. 类型获取 1 2 3 4 5 6 7 8 9 10 11 12 13 14 15 16 17 18 19 20 21 22 23 24 25 26 27 28 29 30 31 32 Class objc_getClass (const char *aClassName) if (!aClassName) return Nil; return look_up_class (aClassName, NO, YES); } Class object_getClass (id obj) if (obj) return obj->getIsa (); else return Nil; } - (Class)class { return object_getClass (self); } + (Class)class { return self; }
2. 类型判断 1 2 3 4 5 6 7 8 9 10 11 12 13 14 15 16 17 18 19 20 21 22 23 24 25 26 27 28 29 30 31 32 33 34 35 36 37 38 39 40 41 - (BOOL)isMemberOfClass:(Class)cls { return [self class] == cls; } + (BOOL)isMemberOfClass:(Class)cls { return object_getClass ((id)self) == cls; } - (BOOL)isKindOfClass:(Class)cls { for (Class tcls = [self class]; tcls; tcls = tcls.superclass) { if (tcls == cls) return YES; } return NO; } + (BOOL)isKindOfClass:(Class)cls { for (Class tcls = object_getClass ((id)self); tcls; tcls = tcls.superclass) { if (tcls == cls) return YES; } return NO; }
3. 判断是否是元类 1 2 3 4 5 6 BOOL class_isMetaClass (Class cls) if (!cls) return NO; return cls->isMetaClass (); }
2.6.2 类相关操作函数 1. 获取name 1 2 3 4 5 6 7 8 const char *class_getName (Class cls) if (!cls) return "nil" ; return cls->demangledName (true ); }
名字修饰 (name decoration),也称为名字重整 、名字改编 (name mangling),是现代计算机程序设计语言的编译器用于解决由于程序实体的名字必须唯一而导致的问题的一种技术。
demangledName: 去除修饰的名称。
2. 获取super_class 1 2 3 4 5 6 Class class_getSuperclass (Class cls) if (!cls) return nil; return cls->superclass; }
3. 获取instance_size 1 2 3 4 5 6 size_t class_getInstanceSize (Class cls) if (!cls) return 0 ; return cls->alignedInstanceSize (); }
4. 成员变量(ivars)操作 1 2 3 4 5 6 7 8 9 10 11 12 13 14 15 16 17 18 19 20 21 22 23 24 25 26 27 28 29 30 31 32 33 34 struct ivar_t { int32_t *offset; const char *name; const char *type; uint32_t alignment_raw; uint32_t size; }; typedef struct ivar_t *Ivar ;Ivar class_getInstanceVariable (Class cls, const char *name) if (!cls || !name) return nil; return _class_getVariable(cls, name); } Ivar class_getClassVariable (Class cls, const char *name) if (!cls) return nil; return class_getInstanceVariable (cls->ISA (), name); } BOOL class_addIvar (Class cls, const char *name, size_t size, uint8_t alignment, const char *type) Ivar * class_copyIvarList (Class cls, unsigned int *outCount)
5. 方法操作 1 2 3 4 5 6 7 8 9 10 11 12 13 14 15 16 17 18 19 20 21 22 23 24 25 26 27 28 29 30 31 32 33 typedef struct method_t *Method ;Method class_getInstanceMethod (Class cls, SEL name) ;Method class_getClassMethod (Class cls, SEL name) ;Method * class_copyMethodList (Class cls, unsigned int *outCount) ;BOOL class_addMethod (Class cls, SEL name, IMP imp, const char *types) IMP class_replaceMethod (Class cls, SEL name, IMP imp, const char *types) IMP class_getMethodImplementation (Class cls, SEL name) ;IMP class_getMethodImplementation_stret (Class cls, SEL name) ;BOOL class_respondsToSelector (Class cls, SEL sel) ;
6. 协议操作 1 2 3 4 5 6 7 8 BOOL class_addProtocol (Class cls, Protocol *protocol_gen) ;BOOL class_conformsToProtocol (Class cls, Protocol *proto_gen) ;Protocol * class_copyProtocolList (Class cls, unsigned int *outCount) ;
7. 获取版本号 1 2 3 4 5 6 7 8 9 10 int class_getVersion (Class cls) if (!cls) return 0 ; assert (cls->isRealized ()); return cls->data ()->version; } void class_setVersion ( Class cls, int version )
8. 示例 通过示例来消化下上面的那些函数
1 2 3 4 5 6 7 8 9 10 11 12 13 14 15 16 17 18 19 20 21 22 23 24 25 26 27 28 29 30 31 32 33 34 35 36 37 38 39 40 41 42 43 44 45 46 47 48 49 50 51 52 53 54 55 56 57 58 59 60 61 62 63 64 65 66 67 68 69 70 71 72 73 74 75 76 77 78 79 80 81 82 83 84 85 86 87 88 89 90 91 92 93 94 95 96 97 98 99 100 101 102 103 104 105 106 107 108 109 110 111 112 113 114 115 116 117 118 119 120 121 122 123 124 125 126 127 128 129 130 131 132 133 134 135 136 137 138 @interface MyClass : NSObject <NSCopying , NSCoding >@property (nonatomic , strong ) NSArray *array;@property (nonatomic , copy ) NSString *string;- (void )method1; - (void )method2; + (void )classMethod1; @end #import "MyClass.h" @interface MyClass () NSInteger _instance1;NSString * _instance2;} @property (nonatomic , assign ) NSUInteger integer;- (void )method3WithArg1:(NSInteger )arg1 arg2:(NSString *)arg2; @end @implementation MyClass + (void )classMethod1 {} - (void )method1 { NSLog (@"call method method1" ); } - (void )method2 { } - (void )method3WithArg1:(NSInteger )arg1 arg2:(NSString *)arg2 { NSLog (@"arg1 : %ld, arg2 : %@" , arg1, arg2); } @end #import "MyClass.h" #import "MySubClass.h" #import <objc/runtime.h> int main(int argc, const char * argv[]) { @autoreleasepool { MyClass *myClass = [[MyClass alloc] init]; unsigned int outCount = 0 ; Class cls = myClass.class; NSLog (@"class name: %s" , class_getName(cls)); NSLog (@"==========================================================" ); NSLog (@"super class name: %s" , class_getName(class_getSuperclass(cls))); NSLog (@"==========================================================" ); NSLog (@"MyClass is %@ a meta-class" , (class_isMetaClass(cls) ? @"" : @"not" )); NSLog (@"==========================================================" ); Class meta_class = objc_getMetaClass(class_getName(cls)); NSLog (@"%s's meta-class is %s" , class_getName(cls), class_getName(meta_class)); NSLog (@"==========================================================" ); NSLog (@"instance size: %zu" , class_getInstanceSize(cls)); NSLog (@"==========================================================" ); Ivar *ivars = class_copyIvarList(cls, &outCount); for (int i = 0 ; i < outCount; i++) { Ivar ivar = ivars[i]; NSLog (@"instance variable's name: %s at index: %d" , ivar_getName(ivar), i); } free(ivars); Ivar string = class_getInstanceVariable(cls, "_string" ); if (string != NULL ) { NSLog (@"instace variable %s" , ivar_getName(string)); } NSLog (@"==========================================================" ); objc_property_t * properties = class_copyPropertyList(cls, &outCount); for (int i = 0 ; i < outCount; i++) { objc_property_t property = properties[i]; NSLog (@"property's name: %s" , property_getName(property)); } free(properties); objc_property_t array = class_getProperty(cls, "array" ); if (array != NULL ) { NSLog (@"property %s" , property_getName(array)); } NSLog (@"==========================================================" ); Method *methods = class_copyMethodList(cls, &outCount); for (int i = 0 ; i < outCount; i++) { Method method = methods[i]; NSLog (@"method's signature: %s" , method_getName(method)); } free(methods); Method method1 = class_getInstanceMethod(cls, @selector (method1)); if (method1 != NULL ) { NSLog (@"method %s" , method_getName(method1)); } Method classMethod = class_getClassMethod(cls, @selector (classMethod1)); if (classMethod != NULL ) { NSLog (@"class method : %s" , method_getName(classMethod)); } NSLog (@"MyClass is%@ responsd to selector: method3WithArg1:arg2:" , class_respondsToSelector(cls, @selector (method3WithArg1:arg2:)) ? @"" : @" not" ); IMP imp = class_getMethodImplementation(cls, @selector (method1)); imp(); NSLog (@"==========================================================" ); Protocol * __unsafe_unretained * protocols = class_copyProtocolList(cls, &outCount); Protocol * protocol; for (int i = 0 ; i < outCount; i++) { protocol = protocols[i]; NSLog (@"protocol name: %s" , protocol_getName(protocol)); } NSLog (@"MyClass is%@ responsed to protocol %s" , class_conformsToProtocol(cls, protocol) ? @"" : @" not" , protocol_getName(protocol)); NSLog (@"==========================================================" ); } return 0 ; }
输出结果
1 2 3 4 5 6 7 8 9 10 11 12 13 14 15 16 17 18 19 20 21 22 23 24 25 26 27 28 29 30 31 32 33 34 35 36 37 38 39 40 41 19 :41 :37.452 RuntimeTest class name: MyClass19 :41 :37.453 RuntimeTest ====================================================19 :41 :37.454 RuntimeTest super class name: NSObject 19 :41 :37.454 RuntimeTest ====================================================19 :41 :37.454 RuntimeTest MyClass is not a meta-class 19 :41 :37.454 RuntimeTest ====================================================19 :41 :37.454 RuntimeTest MyClass's meta-class is MyClass 19:41:37.455 RuntimeTest ==================================================== 19:41:37.455 RuntimeTest instance size: 48 19:41:37.455 RuntimeTest ==================================================== 19:41:37.455 RuntimeTest instance variable' s name: _instance1 at index: 0 19 :41 :37.455 RuntimeTest instance variable's name: _instance2 at index: 1 19:41:37.455 RuntimeTest instance variable' s name: _array at index: 2 19 :41 :37.455 RuntimeTest instance variable's name: _string at index: 3 19:41:37.463 RuntimeTest instance variable' s name: _integer at index: 4 19 :41 :37.463 RuntimeTest instace variable _string19 :41 :37.463 RuntimeTest ====================================================19 :41 :37.463 RuntimeTest property's name: array 19:41:37.463 RuntimeTest property' s name: string19 :41 :37.464 RuntimeTest property's name: integer 19:41:37.464 RuntimeTest property array 19:41:37.464 RuntimeTest ==================================================== 19:41:37.464 RuntimeTest method' s signature: method119 :41 :37.464 RuntimeTest method's signature: method2 19:41:37.464 RuntimeTest method' s signature: method3WithArg1:arg2:19 :41 :37.465 RuntimeTest method's signature: integer 19:41:37.465 RuntimeTest method' s signature: setInteger:19 :41 :37.465 RuntimeTest method's signature: array 19:41:37.465 RuntimeTest method' s signature: string19 :41 :37.465 RuntimeTest method's signature: setString: 19:41:37.465 RuntimeTest method' s signature: setArray:19 :41 :37.466 RuntimeTest method's signature: .cxx_destruct 19:41:37.466 RuntimeTest method method1 19:41:37.466 RuntimeTest class method : classMethod1 19:41:37.466 RuntimeTest MyClass is responsd to selector: method3WithArg1:arg2: 19:41:37.467 RuntimeTest call method method1 19:41:37.467 RuntimeTest ===================================================== 19:41:37.467 RuntimeTest protocol name: NSCopying 19:41:37.467 RuntimeTest protocol name: NSCoding 19:41:37.467 RuntimeTest MyClass is responsed to protocol NSCoding 19:41:37.468 RuntimeTest ======================================
2.6.3 动态创建类和对象 1. 动态创建类 1 2 3 4 5 6 7 8 9 10 11 12 13 14 Class objc_allocateClassPair (Class superclass, const char *name, size_t extraBytes) ;void objc_registerClassPair (Class cls) void objc_disposeClassPair (Class cls)
问题:什么是”class pair(类对)”?函数 objc_allocateClassPair 只返回一个值:类。那么这个”class pair(类对)”的另一半呢?从方法注释可以看出来,是元类。
使用示例
1 2 3 4 5 6 7 8 9 10 11 12 13 14 15 16 Class cls = objc_allocateClassPair(MyClass.class, "MySubClass" , 0 ); class_addMethod(cls, @selector (submethod1), (IMP)imp_submethod1, "v@:" ); class_replaceMethod(cls, @selector (method1), (IMP)imp_submethod1, "v@:" ); class_addIvar(cls, "_ivar1" , sizeof (NSString *), log(sizeof (NSString *)), "i" ); objc_property_attribute_t type = {"T" , "@\"NSString\"" }; objc_property_attribute_t ownership = { "C" , "" }; objc_property_attribute_t backingivar = { "V" , "_ivar1" }; objc_property_attribute_t attrs[] = {type, ownership, backingivar}; class_addProperty(cls, "property2" , attrs, 3 ); objc_registerClassPair(cls); id instance = [[cls alloc] init];[instance performSelector:@selector (submethod1)]; [instance performSelector:@selector (method1)];
输出
1 2 11 :35 :31.006 RuntimeTest[3800 :66152 ] run sub method 1 11 :35 :31.006 RuntimeTest[3800 :66152 ] run sub method 1
2. 动态创建对象 1 2 3 4 5 6 7 8 9 10 11 12 13 14 15 16 17 18 19 20 21 22 id class_createInstance (Class cls, size_t extraBytes) id objc_constructInstance (Class cls, void *bytes) void *objc_destructInstance (id obj)
测试下效果
1 2 3 4 5 6 id theObject = class_createInstance(NSString .class, sizeof (unsigned ));id str1 = [theObject init];NSLog (@"%@" , [str1 class ]);id str2 = [[NSString alloc] initWithString:@"test" ];NSLog (@"%@" , [str2 class ]);
输出结果
1 2 12 :46 :50.781 RuntimeTest[4039 :89088 ] NSString 12 :46 :50.781 RuntimeTest[4039 :89088 ] __NSCFConstantString
2.6.4 实例对象相关操作函数 这些函数是针对创建的实例对象的一系列操作函数。
1. 操作 整个对象 的函数 1 2 3 4 id object_copy (id oldObj, size_t extraBytes) ;id object_dispose (id obj) ;
应用场景
1 2 3 4 5 NSObject *a = [[NSObject alloc] init];id newB = object_copy(a, class_getInstanceSize(MyClass.class));object_setClass(newB, MyClass.class); object_dispose(a);
2. 操作 对象的类 的函数 1 2 3 4 5 6 const char *object_getClassName (id obj) Class object_getClass (id obj) ;Class object_setClass (id obj, Class cls) ;
2.6.5 获取类定义 1 2 3 4 5 6 7 8 9 10 11 12 13 int objc_getClassList (Class *buffer, int bufferLen) Class *objc_copyClassList (unsigned int *outCount) Class objc_lookUpClass (const char *aClassName) ;Class objc_getClass (const char *aClassName) ;Class objc_getRequiredClass (const char *aClassName) ; Class objc_getMetaClass (const char *aClassName) ;
演示如何使用
1 2 3 4 5 6 7 8 9 10 11 12 13 14 15 int numClasses;Class * classes = NULL ; numClasses = objc_getClassList(NULL , 0 ); if (numClasses > 0 ) { classes = malloc(sizeof (Class) * numClasses); numClasses = objc_getClassList(classes, numClasses); NSLog (@"number of classes: %d" , numClasses); for (int i = 0 ; i < numClasses; i++) { Class cls = classes[i]; NSLog (@"class name: %s" , class_getName(cls)); } free(classes); }
结果如下:
1 2 3 4 5 6 7 8 9 10 11 12 16 :20 :52.589 RuntimeTest[81 ] number of classes: 1282 16 :20 :52.589 RuntimeTest[81 ] class name: DDTokenRegexp16 :20 :52.590 RuntimeTest[81 ] class name: _NSMostCommonKoreanCharsKeySet16 :20 :52.590 RuntimeTest[81 ] class name: OS_xpc_dictionary16 :20 :52.590 RuntimeTest[81 ] class name: NSFileCoordinator 16 :20 :52.590 RuntimeTest[81 ] class name: NSAssertionHandler 16 :20 :52.590 RuntimeTest[81 ] class name: PFUbiquityTransactionLogMigrator16 :20 :52.591 RuntimeTest[81 ] class name: NSNotification 16 :20 :52.591 RuntimeTest[81 ] class name: NSKeyValueNilSetEnumerator 16 :20 :52.591 RuntimeTest[81 ] class name: OS_tcp_connection_tls_session16 :20 :52.591 RuntimeTest[81 ] class name: _PFRoutines......还有大量输出
三、成员变量、属性与关联对象 3.1 实例变量类型Ivar
实例变量是指在类的声明中,属性是用变量来表示的。 这种变量就称为实例变量,也叫对象变量、类成员变量;
3.1.1 Ivar结构 Ivar是指向 ivar_t 结构体的指针,ivar指针地址是根据class结构体的地址加上基地址偏移字节得到的。
1 2 3 4 5 6 7 8 9 10 struct ivar_t { int32_t *offset; const char *name; const char *type; uint32_t alignment_raw; uint32_t size; }; typedef struct ivar_t *Ivar ;
1 2 3 4 5 6 7 8 ptrdiff_t ivar_getOffset (Ivar ivar) const char *ivar_getName (Ivar ivar) const char *ivar_getTypeEncoding (Ivar ivar)
3.1.2 Ivar的获取 1 Ivar *class_copyIvarList (Class cls, unsigned int *outCount)
3.1.3 实例变量操作函数 1 2 3 4 5 6 7 8 9 10 Ivar object_setInstanceVariable (id obj, const char *name, void *value) ;Ivar object_getInstanceVariable (id obj, const char *name, void **value) ;void *object_getIndexedIvars (id obj) id object_getIvar (id obj, Ivar ivar) ;void object_setIvar (id obj, Ivar ivar, id value)
3.2 属性类型property_t 3.2.1 property_t结构和objc_property_t 1 2 3 4 5 6 struct property_t { const char *name; const char *attributes; }; typedef struct property_t *objc_property_t ;
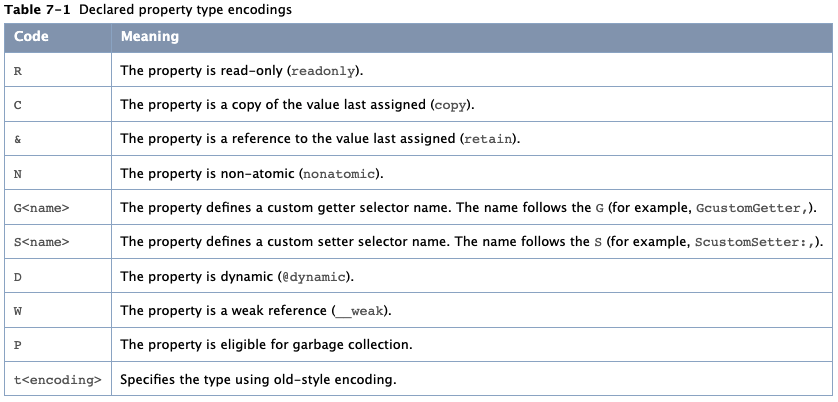
属性attributes是一个字符串:该字符串以T开头,后面跟着@encode类型和一个逗号,以V结尾,后面跟着后台实例变量的名称。在这些属性之间,由以下描述符指定,以逗号分隔。官方文档 Declared Properties 。
获取name、attributes的方法:
1 2 3 4 5 const char *property_getName (objc_property_t prop) const char *property_getAttributes (objc_property_t prop)
3.2.2 property的获取 获取类和协议的属性列表
1 2 3 4 5 6 7 objc_property_t *class_copyPropertyList (Class cls, unsigned int *outCount) objc_property_t *protocol_copyPropertyList (Protocol *proto, unsigned int *outCount)
通过给出的名称来在类和协议中获取属性的引用:
1 2 3 objc_property_t class_getProperty (Class cls, const char *name) objc_property_t protocol_getProperty (Protocol *proto, const char *name, BOOL isRequiredProperty, BOOL isInstanceProperty)
3.2.3 property的特性attributes objc_property_attribute_t也是结构体,定义属性的attribute
1 2 3 4 5 6 7 8 9 10 typedef struct { const char *name; const char *value; } objc_property_attribute_t ; char * property_copyAttributeValue (objc_property_t property, const char *attributeName) objc_property_attribute_t *property_copyAttributeList (objc_property_t prop, unsigned int *outCount)
3.2.4 示例 1 2 3 4 5 6 7 8 9 10 11 12 13 14 15 16 17 18 19 20 21 22 23 24 25 26 27 28 29 @interface Lender : NSObject { float alone; } @property float alone; @end id LenderClass = objc_getClass ("Lender" ); unsigned int outCount, i;objc_property_t *properties = class_copyPropertyList (LenderClass, &outCount);for (i = 0 ; i < outCount; i++) { objc_property_t property = properties[i]; fprintf (stdout, "%s %s\n" , property_getName (property), property_getAttributes (property)); unsigned int outCount2, j; objc_property_attribute_t * attries = property_copyAttributeList (property, &outCount2); for (j = 0 ; j < outCount2; j++) { objc_property_attribute_t attr = attries[j]; fprintf (stdout, "%s %s\n" , attr.name, attr.value); } } log: ======= alone Tf,V_alone log: ======= T f log: ======= V _alone
3.3 关联对象 关联对象是在运行时添加的类似成员。
1 2 3 4 5 6 7 8 9 10 11 12 13 14 15 16 17 18 void objc_setAssociatedObject (id object, const void *key, id value, objc_AssociationPolicy policy) id objc_getAssociatedObject (id object, const void *key) ; void objc_removeAssociatedObjects (id object) enum { OBJC_ASSOCIATION_ASSIGN = 0 , OBJC_ASSOCIATION_RETAIN_NONATOMIC = 1 , OBJC_ASSOCIATION_COPY_NONATOMIC = 3 , OBJC_ASSOCIATION_RETAIN = 01401 , OBJC_ASSOCIATION_COPY = 01403 };
示例:
1 2 3 4 5 6 7 8 9 10 11 12 13 14 15 16 17 18 19 20 21 22 23 24 25 26 27 28 29 - (void )setTapActionWithBlock:(void void ))block { UITapGestureRecognizer *gesture = objc_getAssociatedObject (self, &kDTActionHandlerTapGestureKey); if (!gesture) { gesture = [[UITapGestureRecognizer alloc] initWithTarget:self action:@selector (__handleActionForTapGesture:)]; [self addGestureRecognizer:gesture]; objc_setAssociatedObject (self, &kDTActionHandlerTapGestureKey, gesture, OBJC_ASSOCIATION_RETAIN); } objc_setAssociatedObject (self, &kDTActionHandlerTapBlockKey, block, OBJC_ASSOCIATION_COPY); } - (void )__handleActionForTapGesture:(UITapGestureRecognizer *)gesture { if (gesture.state == UIGestureRecognizerStateRecognized) { void void ) = objc_getAssociatedObject (self, &kDTActionHandlerTapBlockKey); if (action) { action (); } } }
四、Method和消息 4.1 method_t、SEL和IMP 4.1.1 method_t结构和Method method_t结构,用于表示类定义中的方法
1 2 3 4 5 6 7 struct method_t { SEL name; const char *types; IMP imp; }; typedef struct method_t *Method ;
iOS中提供了一个叫做@encode的指令,可以将具体的类型表示成字符串编码。
1 2 3 4 5 6 7 8 9 10 11 12 13 14 15 16 17 18 19 - (void )test; - (int )test:(int )age height:(float )height;
4.1.2 SEL 1 2 3 4 5 typedef struct objc_selector *SEL ;
1 2 3 4 5 6 SEL sel1 = @selector (load); NSLog (@"sel : %p" , sel1);18 :40 :07.518 RuntimeTest[52 :46 ] sel : 0x7fff606203c3
4.1.3 IMP 是函数指针,指向方法的首地址,得到了IMP,就可以跳过Runtime消息传递机制直接执行函数,比直接向对象发消息高效。定义如下
1 2 typedef id _Nullable (*IMP)(id _Nonnull, SEL _Nonnull, ...);
4.2 Method相关操作函数 4.2.1 获取Method的信息 1 2 3 4 5 6 7 8 9 10 11 12 13 14 15 16 17 18 19 20 21 22 23 24 25 SEL method_getName (Method m) ;IMP method_getImplementation (Method m) ;const char *method_getTypeEncoding (Method m) char * method_copyReturnType (Method m) void method_getReturnType (Method m, char *dst, size_t dst_len) unsigned int method_getNumberOfArguments (Method m) char * method_copyArgumentType (Method m, unsigned int index) void method_getArgumentType (Method m, unsigned int index, char *dst, size_t dst_len) struct objc_method_description { SEL _Nullable name; char * _Nullable types; }; struct objc_method_description *method_getDescription (Method m) ;
4.2.2 获取和设置Method的IMP 1 2 3 4 5 IMP method_setImplementation (Method m, IMP imp) ;void method_exchangeImplementations (Method m1, Method m2)
NSObject提供了一个methodForSelector:方法可以获得Method的IMP指针,通过指针调用实现代码。
1 2 3 + (IMP)instanceMethodForSelector:(SEL)sel; + (IMP)methodForSelector:(SEL)sel; - (IMP)methodForSelector:(SEL)sel;
示例:
1 2 3 4 5 void (*setter )(id , SEL, BOOL );int i;setter = (void (*)(id , SEL, BOOL ))[target methodForSelector:@selector (setFilled:)];for (i = 0 ; i < 1000 ; i++) setter (targetList[i], @selector (setFilled:), YES );
4.2.3 直接调用Method 1 2 3 4 id method_invoke (id receiver, Method m, ... ) ;void method_invoke_stret (id receiver, Method m, ...)
4.2.4 SEL的操作函数 1 2 3 4 5 6 7 8 const char *sel_getName (SEL sel) SEL sel_registerName (const char *name) ;SEL sel_getUid (const char *name) ;BOOL sel_isEqual (SEL lhs, SEL rhs) ;
4.3 Method调用流程objc_msgSend 消息函数,Objc中发送消息是用中括号把接收者和消息括起来,只到运行时才会把消息和方法实现绑定。
OC中的方法调用,其实都是转换为下面几个函数的调用。编译器会根据情况在objc_msgSend,objc_msgSend_stret,objc_msgSendSuper,或objc_msgSendSuper_stret四个方法中选一个调用。
如果是传递给超类就会调用带super的函数;
如果返回是数据结构而不是一个值就会调用带stret的函数;
在i386平台返回类型为浮点消息会调用objc_msgSend_fpret函数。1 2 3 4 id objc_msgSend (id _Nullable self, SEL _Nonnull op, ...)
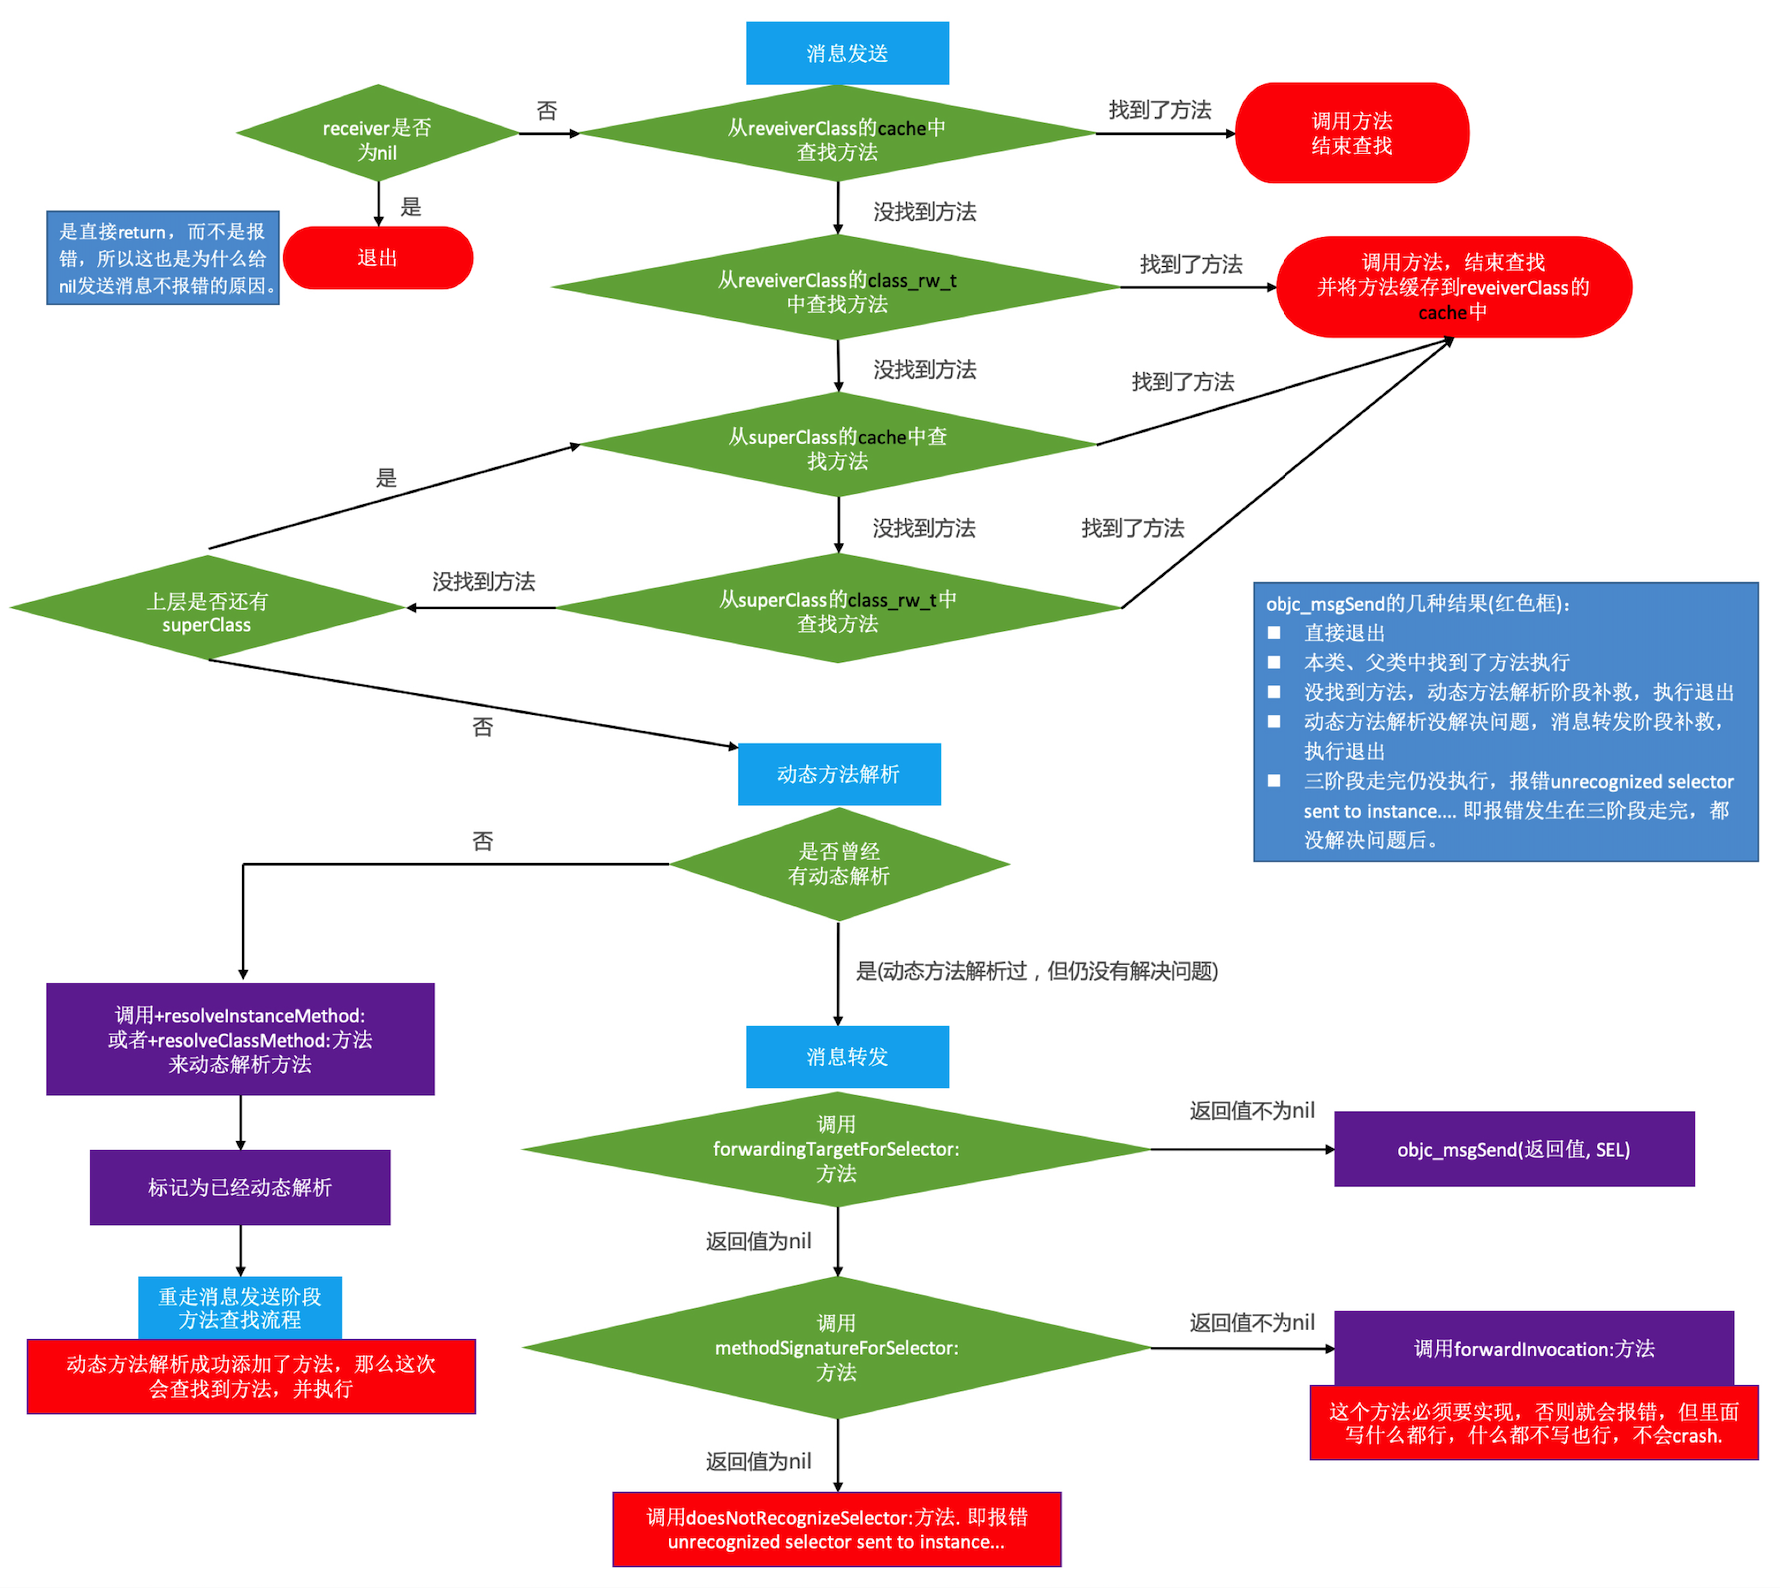
流程概述 objc_msgSend的执行流程可以分为3大阶段:消息发送、动态方法解析、消息转发
1 2 3 4 5 6 7 8 9 10 11 12 13 14 15 16 17 18 19 20 21 22 23 24 25 26 27 28 29 30 31 32 33 34 35 36 37 38 #pragma mark -- 消息发送阶段 ▼ _objc_msgSend ▼ CacheLookup ▼ CheckMiss ▼ __objc_msgSend_uncached ▼ MethodTableLookup ▼ _class_lookupMethodAndLoadCache3 ▼ lookUpImpOrForward ▶ cache_getImp ▶ getMethodNoSuper_nolock ▶ cache_getImp ▶ getMethodNoSuper_nolock ▼ search_method_list ▶ findMethodInSortedMethodList ▶ ▼ log_and_fill_cache ▼ cache_fill ▶ cache_fill_nolock #pragma mark -- 动态方法解析 ▼ _class_resolveMethod ▶ _class_resolveClassMethod ▶ _class_resolveInstanceMethod #pragma mark -- 消息转发 ▶ _objc_msgForward_impcache
大致流程图如下:
4.3.1 消息发送
消息发送给一个对象时,objc_msgSend通过对象的isa指针获得类的结构体,先在Cache里找,找到就执行
没找到就在分发列表里查找方法的selector
没找到就通过objc_class结构体中指向父类的指针找到父类,然后在父类分发列表找
直到root class(NSObject)
如果root class仍然找不到方法,不会直接报错,会进入以下两个补救阶段。不过安全起见,一些场景中,可以先添加方法能否响应的判断:
1 2 3 4 if ([self respondsToSelector:@selector (method)]) { [self performSelector:@selector (method)]; }
4.3.2 动态方法解析 1 2 3 4 5 6 7 8 9 10 11 void functionForMethod1(id self , SEL _cmd) { NSLog (@"%@, %p" , self , _cmd); } + (BOOL )resolveInstanceMethod:(SEL)sel { NSString *selectorString = NSStringFromSelector (sel); if ([selectorString isEqualToString:@"method1" ]) { class_addMethod(self .class, @selector (method1), (IMP)functionForMethod1, "@:" ); } return [super resolveInstanceMethod:sel]; }
可以动态的提供一个方法的实现。例如可以用@dynamic关键字在类的实现文件中写个属性
1 2 3 4 5 6 7 8 9 10 11 12 13 14 15 16 17 18 19 20 21 22 23 24 25 @dynamic propertyName;void dynamicMethodIMP(id self , SEL _cmd) { } @implementation MyClass + (BOOL )resolveInstanceMethod:(SEL)sel{} + (BOOL )resolveClassMethod:(SEL)sel { if (sel == @selector (resolveThisMethodDynamically)) { class_addMethod([self class ], sel, (IMP)dynamicMethodIMP, "v@:" ); return YES ; } return [super resolveInstanceMethod:sel]; } @end
4.3.3 消息转发 1. 重定向接收者 如果无法处理消息会继续调用下面的方法,同时在这里Runtime系统实际上是给了一个替换消息接收者的机会,但是替换的对象千万不要是self,那样会进入死循环。
1 2 3 4 5 6 7 8 9 10 11 12 13 14 15 16 17 - (id )forwardingTargetForSelector:(SEL)aSelector { if (aSelector == @selector (mysteriousMethod:)){ return alternateObject; } return [super forwardingTargetForSelector:aSelector]; } + (id )forwardingTargetForSelector:(SEL)aSelector{ return obj; }
2. 最后进行转发 如果以上两种都没法处理未知消息就需要完整消息转发了。调用如下方法
1 2 3 4 5 6 7 8 9 - (NSMethodSignature *)methodSignatureForSelector:(SEL)aSelector; - (void )forwardInvocation:(NSInvocation *)anInvocation; + (NSMethodSignature *)methodSignatureForSelector:(SEL)aSelector; + (void )forwardInvocation:(NSInvocation *)anInvocation;
范例
1 2 3 4 5 6 7 8 9 10 11 12 13 14 15 16 - (NSMethodSignature *)methodSignatureForSelector:(SEL)aSelector { NSMethodSignature *signature = [super methodSignatureForSelector:aSelector]; if (!signature) { if ([SUTRuntimeMethodHelper instancesRespondToSelector:aSelector]) { signature = [SUTRuntimeMethodHelper instanceMethodSignatureForSelector:aSelector]; } } return signature; } - (void )forwardInvocation:(NSInvocation *)anInvocation { if ([SUTRuntimeMethodHelper instancesRespondToSelector:anInvocation.selector]) { [anInvocation invokeWithTarget:_helper]; } }
4.3.4 消息转发和多继承 OC是否支持多继承?有没有模拟多继承特性的办法?
转发和继承相似,一个Object把消息转发出去就好像它继承了另一个Object的方法一样。
消息转发弥补了objc不支持多继承的性质,也避免了因为多继承导致单个类变得臃肿复杂。
虽然转发可以实现继承功能,但是NSObject还是必须表面上很严谨,像respondsToSelector:和isKindOfClass:这类方法只会考虑继承体系,不会考虑转发链。
4.3.5 Message消息的参考文章
4.4 super和objc_msgSendSuper NSStringFromClass([self class]) 和 NSStringFromClass([super class]) 输出都是self的类名。原因如下:
1 2 3 4 5 6 7 struct objc_super2 { id receiver; Class current_class; }; SEL
1 2 3 4 5 6 7 8 9 10 11 12 13 14 15 16 id objc_msgSendSuper (struct objc_super * _Nonnull super, SEL _Nonnull op, ...) ;id objc_msgSendSuper2 (struct objc_super * _Nonnull super, SEL _Nonnull op, ...) ;
结论:super只是改变了方法查找链的起始位置,调用者是不变的。
4.5 Method Swizzling 是改变一个selector实际实现的技术,可以在运行时修改selector对应的函数来修改Method的实现。前面的消息转发很强大,但是需要能够修改对应类的源码,但是对于有些类无法修改其源码时又要更改其方法实现时可以使用Method Swizzling,通过重新映射方法来达到目的,但是跟消息转发比起来调试会困难。
4.5.1 使用method swizzling需要注意的问题
Swizzling应该总在+load中执行 :objectivec在运行时会自动调用类的两个方法+load和+initialize。+load会在类初始加载时调用,和+initialize比较+load能保证在类的初始化过程中被加载。
Swizzling在+load中执行时,不要调用[super load]。原因同下面一条,如果是多继承,并且对同一个方法都进行了Swizzling(没有在dispatch_once中执行 ),那么调用[super load]以后,父类的Swizzling就失效了。
Swizzling应该总是在dispatch_once中执行 :swizzling会改变全局状态,所以在运行时采取一些预防措施,使用dispatch_once就能够确保代码不管有多少线程都只被执行一次。这将成为method swizzling的最佳实践。
如果不写dispatch_once,偶数次交换以后,相当于没有交换,Swizzling失效!
Swizzling时,需要注意class_getInstanceMethod的特性 :该方法的实现中,如果这个类中没有实现selector这个方法,那么它会沿着继承链找到为止,即其可能返回的是它某父类的Method对象。所以提前判断很重要,避免错误的交换了父类中的方法。交换的分类方法应尽量调用原实现。
很多情况我们不清楚被交换的的方法具体做了什么内部逻辑,而且很多被交换的方法都是系统封装的方法,所以为了保证其逻辑性都应该在分类的交换方法中去调用原被交换方法。
注意:调用时方法交换已经完成,在分类方法中应该调用分类方法本身才正确。
作用:比如之前a应该和b互换了方法,c方法在不知情的状况下和a互换了方法。只有在交换的方法中调用原实现,才能保证c→b→a中的代码都能得到执行。
4.5.2 实现一 举例说明如何使用Method Swizzling对一个类中注入一些我们的新的操作。
1 2 3 4 5 6 7 8 9 10 11 12 13 14 15 16 17 18 19 20 21 22 23 24 25 26 27 28 29 30 31 32 33 34 35 36 37 38 39 40 41 42 #import <objc/runtime.h> @implementation UIViewController (Tracking )+ (void )load { static dispatch_once_t onceToken; dispatch_once (&onceToken, ^{ Class class = [self class ]; SEL originalSelector = @selector (viewWillAppear:); SEL swizzledSelector = @selector (xxx_viewWillAppear:); Method originalMethod = class_getInstanceMethod(class , originalSelector); Method swizzledMethod = class_getInstanceMethod(class , swizzledSelector); BOOL didAddMethod = class_addMethod(class , originalSelector, method_getImplementation(swizzledMethod), method_getTypeEncoding(swizzledMethod)); if (didAddMethod) { class_replaceMethod(class , swizzledSelector, method_getImplementation(originalMethod), method_getTypeEncoding(originalMethod)); } else { method_exchangeImplementations(originalMethod, swizzledMethod); } }); } #pragma mark - Method Swizzling - (void )xxx_viewWillAppear:(BOOL )animated { [self xxx_viewWillAppear:animated]; NSLog (@"viewWillAppear: %@" , self ); } @end
method_exchangeImplementations做的事情和如下代码是一样的
1 2 3 4 IMP imp1 = method_getImplementation (m1); IMP imp2 = method_getImplementation (m2); method_setImplementation (m1, imp2);method_setImplementation (m2, imp1);
4.5.3 实现二 1 2 3 4 5 6 7 8 9 10 11 12 13 14 + (void ) load{ static dispatch_once_t onceToken; dispatch_once (&onceToken, ^{ Method originalMethod = class_getInstanceMethod([self class ], @selector (xxxx)); Method swizzledMethod = class_getInstanceMethod([self class ], @selector (x_xxxxx)); if (!originalMethod || !swizzledMethod) return ; class_addMethod([self class ], method_getName(originalMethod), method_getImplementation(originalMethod), method_getTypeEncoding(originalMethod)); class_addMethod([self class ], method_getName(swizzledMethod), method_getImplementation(swizzledMethod), method_getTypeEncoding(swizzledMethod)); method_exchangeImplementations(originalMethod, swizzledMethod); }); }
4.5.4 错误实现 1. 不加判断直接exchange 1 2 3 4 5 6 7 8 9 10 11 12 13 14 15 16 17 18 19 20 21 22 23 24 25 26 27 28 29 @interface Base : NSObject - (void )basePrint; @end @implementation Base - (void )basePrint{ NSLog (@"%s" ,__func__); } @end @interface B : Base @end @implementation B @end @interface A : NSObject - (void )APrint; @end @implementation A + (void )load{ Class cls = [B class ]; Method originalMethod = class_getInstanceMethod(cls, @selector (basePrint)); Method swizzledMethod = class_getInstanceMethod([self class ], @selector (APrint)); method_exchangeImplementations(originalMethod, swizzledMethod); } - (void )APrint{ NSLog (@"%s" ,__func__); } @end
2. 错误使用class_replaceMethod 1 2 3 4 5 6 7 8 9 10 11 12 13 14 15 16 17 18 19 20 21 22 23 24 25 26 27 28 + (void ) load{ static dispatch_once_t onceToken; dispatch_once (&onceToken, ^{ Method originalMethod = class_getInstanceMethod([self class ], @selector (xxxx)); Method swizzledMethod = class_getInstanceMethod([self class ], @selector (x_xxxxx)); class_replaceMethod([self class ], method_getName(originalMethod), method_getImplementation(swizzledMethod), method_getTypeEncoding(swizzledMethod)); class_replaceMethod([self class ], method_getName(swizzledMethod), method_getImplementation(originalMethod), method_getTypeEncoding(originalMethod)); IMP previousIMP = class_replaceMethod([self class ], method_getName(originalMethod),, method_getImplementation(swizzledMethod), method_getTypeEncoding(swizzledMethod)); class_replaceMethod([self class ], method_getName(swizzledMethod),, previousIMP, method_getTypeEncoding(originalMethod)); }); }
这里有几个关于Method Swizzling的资源可以参考
五、Category和Protocol 5.1 分类Category 5.1.1 分类概述 category是Objective-C 2.0之后添加的语言特性,category的主要作用是为已经存在的类添加方法。除此之外,apple还推荐了category的另外两个使用场景1
可以把类的实现分开在几个不同的文件里面。这样做有几个显而易见的好处,a)可以减少单个文件的体积 b)可以把不同的功能组织到不同的category里 c)可以由多个开发者共同完成一个类 d)可以按需加载想要的category 等等。
声明私有方法
不过除了apple推荐的使用场景,广大开发者脑洞大开,还衍生出了category的其他几个使用场景:
Objective-C的这个语言特性对于纯动态语言来说可能不算什么,比如javascript,你可以随时为一个“类”或者对象添加任意方法和实例变量。但是对于不是那么“动态”的语言而言,这确实是一个了不起的特性。
5.1.2 category_t结构和Category 指向分类的结构体的指针
1 2 3 4 5 6 7 8 9 10 11 12 struct category_t { const char *name; classref_t cls; struct method_list_t *instanceMethods ; struct method_list_t *classMethods ; struct protocol_list_t *protocols ; struct property_list_t *instanceProperties ; struct property_list_t *_classProperties ; }; typedef struct category_t *Category ;
从category的定义也可以看出category的:
可为 (可以添加实例方法,类方法,甚至可以实现协议,添加属性(属性添加、使用,编译是能通过的,运行会crash))
不可为 (无法添加实例变量)
编译后的类已经注册在runtime中,类结构体中的 ivars (实例变量的链表) 和 instance_size (实例变量的内存大小) 已经确定。
category_t 中并没有空间来存放类的成员变量Ivar。
Category里面的方法加载过程,objc源码中找到objc-os.mm,函数_objc_init就是runtime的加载入口由libSystem调用,开始初始化,之后objc-runtime-new.mm里的map_images会加载map到内存,_read_images开始初始化这个map,这时会load所有Class,Protocol和Category,NSObject的+load方法就是这个时候调用的。
5.1.3 示例:分类的编译 Lender+TT.h
1 2 3 4 5 6 7 8 #import "Lender.h" NS_ASSUME_NONNULL_BEGIN @interface Lender (TT )@property (nonatomic , strong ) NSString * lxyname;- (void )test; @end
Lender+TT.m
1 2 3 4 5 6 7 8 #import "Lender+TT.h" @implementation Lender (TT )- (void )test{ NSLog (@"xxxxxxxx" ); } @end
使用clang的命令去看看category到底会变成什么(主要是看一下分类中的属性底层是什么):
1 2 3 4 5 6 7 8 9 10 11 12 13 14 15 16 17 18 19 20 21 22 23 24 25 26 27 28 29 30 31 32 33 34 35 36 37 38 39 40 41 42 43 44 45 46 47 48 static struct /*_method_list_t */ { unsigned int entsize; unsigned int method_count; struct _objc_method method_list [1]; } _OBJC_$_CATEGORY_INSTANCE_METHODS_Lender_$_TT __attribute__ ((used, section ("__DATA,__objc_const" ))) = { sizeof 1 , {{(struct objc_selector *)"test" , "v16@0:8" , (void *)_I_Lender_TT_test}} }; static struct /*_prop_list_t */ { unsigned int entsize; unsigned int count_of_properties; struct _prop_t prop_list [1]; } _OBJC_$_PROP_LIST_Lender_$_TT __attribute__ ((used, section ("__DATA,__objc_const" ))) = { sizeof _prop_t ), 1 , {{"lxyname" ,"T@\"NSString\",&,N" }} }; extern "C" __declspec(dllimport) struct _class_t OBJC_CLASS_ $_Lender ;static struct _category_t _OBJC_ $_CATEGORY_Lender_ $_TT __attribute__ ((used , section ("__DATA ,__objc_const "))) ={ "Lender" , 0 , (const struct _method_list_t *)&_OBJC_$_CATEGORY_INSTANCE_METHODS_Lender_$_TT, 0 , 0 , (const struct _prop_list_t *)&_OBJC_$_PROP_LIST_Lender_$_TT, }; static void OBJC_CATEGORY_SETUP_$_Lender_$_TT(void ) { _OBJC_$_CATEGORY_Lender_$_TT.cls = &OBJC_CLASS_$_Lender; } #pragma section(".objc_inithooks$B" , long, read, write) __declspec(allocate (".objc_inithooks$B" )) static void *OBJC_CATEGORY_SETUP[] = { (void *)&OBJC_CATEGORY_SETUP_$_Lender_$_TT, }; static struct _category_t *L_OBJC_LABEL_CATEGORY_ $ [1] __attribute__ ((used , section ("__DATA , __objc_catlist ,regular ,no_dead_strip ")))= &_OBJC_$_CATEGORY_Lender_$_TT, }; static struct IMAGE_INFO {unsigned version; unsigned flag; } _OBJC_IMAGE_INFO = { 0 , 2 };
我们可以看到:
首先编译器生成了实例方法列表 _OBJC_$_CATEGORY_INSTANCE_METHODS_Lender_$_TT 和属性列表 _OBJC_$_PROP_LIST_Lender_$_TT,两者的命名都遵循了公共前缀+类名+category名字的命名方式,而且实例方法列表里面填充的正是我们在 TT 这个category里面写的方法 test,而属性列表里面填充的也正是我们在 TT 里添加的 lxyname 属性。还有一个需要注意到的事实就是category的名字用来给各种列表以及后面的category结构体本身命名,而且有static来修饰,所以在同一个编译单元里我们的category名不能重复,否则会出现编译错误。
其次,编译器生成了category本身 _OBJC_$_CATEGORY_Lender_$_TT,并用前面生成的列表来初始化category本身。
最后,编译器在DATA segment(段)下的objc_catlist section(节) 里保存了一个大小为1的category_t的数组L_OBJC_LABEL_CATEGORY_$(当然,如果有多个category,会生成对应长度的数组^_^),用于运行期category的加载。
5.1.4 分类的运行时处理 见dyld与Objc—_objc_init、map_images、load_images的4.2小节:分类的加载
5.2 类扩展(Extension) extension看起来很像一个匿名的category,但是extension和有名字的category几乎完全是两个东西。 extension在编译期决议,它就是类的一部分,在编译期和头文件里的@interface以及实现文件里的@implement一起形成一个完整的类,它伴随类的产生而产生,亦随之一起消亡。extension一般用来隐藏类的私有信息,你必须有一个类的源码才能为一个类添加extension,所以你无法为系统的类比如NSString添加extension。(详见官方文档Customizing Existing Classes )
但是category则完全不一样,它是在运行期决议的。 就category和extension的区别来看,我们可以推导出一个明显的事实,extension可以添加实例变量,而category是无法添加实例变量的(因为在运行期,对象的内存布局已经确定,如果添加实例变量就会破坏类的内部布局,这对编译型语言来说是灾难性的)。
5.3 Protocol Protocol其实就是一个对象结构体
1 typedef struct objc_object Protocol ;
5.4 操作函数 5.4.1 Category操作函数 Category操作函数信息都包含在objc_class中,我们可以通过objc_class的操作函数来获取分类的操作函数信息。
1 2 3 4 5 6 7 8 9 10 11 12 13 14 15 16 17 18 19 20 21 22 23 24 25 26 27 28 29 30 31 32 33 34 35 36 37 38 @interface RuntimeCategoryClass : NSObject - (void )method1; @end @interface RuntimeCategoryClass (Category )- (void )method2; @end @implementation RuntimeCategoryClass - (void )method1 {} @end @implementation RuntimeCategoryClass (Category )- (void )method2 {} @end #pragma mark - NSLog (@"测试objc_class中的方法列表是否包含分类中的方法" );unsigned int outCount = 0 ;Method *methodList = class_copyMethodList(RuntimeCategoryClass.class, &outCount); for (int i = 0 ; i < outCount; i++) { Method method = methodList[i]; const char *name = sel_getName(method_getName(method)); NSLog (@"RuntimeCategoryClass's method: %s" , name); if (strcmp(name, sel_getName(@selector (method2)))) { NSLog (@"分类方法method2在objc_class的方法列表中" ); } } 2014 -11 -08 10 :36 :39.213 [561 :151847 ] 测试objc_class中的方法列表是否包含分类中的方法2014 -11 -08 10 :36 :39.215 [561 :151847 ] RuntimeCategoryClass's method: method2 2014-11-08 10:36:39.215 [561:151847] RuntimeCategoryClass' s method: method12014 -11 -08 10 :36 :39.215 [561 :151847 ] 分类方法method2在objc_class的方法列表中
5.4.2 Protocol操作函数 Runtime提供了Protocol的一系列函数操作,函数包括:
1. 获取协议 1 2 3 4 5 Protocol *objc_getProtocol (const char *name) ;Protocol **objc_copyProtocolList (unsigned int *outCount) ;
2. 查询协议的信息 1 2 3 4 5 6 7 8 9 10 11 12 13 14 15 16 17 18 19 20 21 22 23 24 25 26 const char *protocol_getName (Protocol *proto) BOOL protocol_isEqual (Protocol *self, Protocol *other) ;struct objc_method_description *protocol_copyMethodDescriptionList (Protocol *p, BOOL isRequiredMethod,BOOL isInstanceMethod, unsigned int *outCount) struct objc_method_description protocol_getMethodDescription (Protocol *p, SEL aSel, BOOL isRequiredMethod, BOOL isInstanceMethod) objc_property_t *protocol_copyPropertyList (Protocol *proto, unsigned int *outCount) objc_property_t protocol_getProperty (Protocol *p, const char *name, BOOL isRequiredProperty, BOOL isInstanceProperty) Protocol ** protocol_copyProtocolList (Protocol *p, unsigned int *outCount) ;BOOL protocol_conformsToProtocol (Protocol *self, Protocol *other) ;
3. 动态创建协议 1 2 3 4 5 6 7 8 9 10 11 12 13 14 15 16 17 18 19 Protocol *objc_allocateProtocol (const char *name) ;void protocol_addMethodDescription (Protocol *proto_gen, SEL name, const char *types, BOOL isRequiredMethod, BOOL isInstanceMethod) void protocol_addProperty (Protocol *proto_gen, const char *name, const objc_property_attribute_t *attrs, unsigned int count, BOOL isRequiredProperty, BOOL isInstanceProperty) void protocol_addProtocol (Protocol *proto, Protocol *addition) void objc_registerProtocol (Protocol *proto_gen)
六、Block runtime中一些支持block操作的函数
1 2 3 4 5 6 7 8 IMP imp_implementationWithBlock (id block) ;id imp_getBlock (IMP anImp) ;BOOL imp_removeBlock (IMP anImp) ;
测试代码
1 2 3 4 5 6 7 8 9 10 11 12 13 14 15 16 17 @interface MyRuntimeBlock : NSObject @end @implementation MyRuntimeBlock @end IMP imp = imp_implementationWithBlock(^(id obj, NSString *str) { NSLog (@"%@" , str); }); class_addMethod(MyRuntimeBlock.class, @selector (testBlock:), imp, "v@:@" ); MyRuntimeBlock *runtime = [[MyRuntimeBlock alloc] init]; [runtime performSelector:@selector (testBlock:) withObject:@"hello world!" ]; 14 :03 :19.779 [1172 :395446 ] hello world!
七、Runtime的应用 7.1 获取系统提供的库相关信息 主要函数
1 2 3 4 5 6 7 8 const char **objc_copyImageNames (unsigned int *outCount) const char *class_getImageName (Class cls) const char **objc_copyClassNamesForImage (const char *image, unsigned int *outCount)
示例:通过这些函数获取某个类所在的库,以及某个库中包含哪些类:
1 2 3 4 5 6 7 8 9 10 11 12 13 14 15 16 17 18 19 20 NSLog (@"获取指定类所在动态库" );NSLog (@"UIView's Framework: %s" , class_getImageName (NSClassFromString (@"UIView" )));NSLog (@"获取指定库或框架中所有类的类名" );const char ** classes = objc_copyClassNamesForImage (class_getImageName (NSClassFromString (@"UIView" )), &outCount);for (int i = 0 ; i < outCount; i++) { NSLog (@"class name: %s" , classes[i]); } 12 :57 :32.689 [7 :1 ] 获取指定类所在动态库12 :57 :32.690 [7 :1 ] UIView' s Framework: /System/Library/Frameworks/UIKit.framework/UIKit12 :57 :32.690 [7 :1 ] 获取指定库或框架中所有类的类名12 :57 :32.691 [7 :1 ] class name :12 :57 :32.691 [7 :1 ] class name :12 :57 :32.691 [7 :1 ] class name :12 :57 :32.692 [7 :1 ] class name :12 :57 :32.692 [7 :1 ] class name :12 :57 :32.692 [7 :1 ] class name :
7.2 对App的用户行为进行追踪 就是用户点击时把事件记录下来。一般比较做法就是在viewDidAppear里记录事件,这样会让这样记录事件的代码遍布整个项目中。继承或类别也会有问题。这时利用Method Swizzling把一个方法的实现和另一个方法的实现进行替换。
1 2 3 4 5 6 7 8 9 10 11 12 13 14 15 16 17 18 19 20 21 22 23 24 25 26 @implementation UIViewController (Logging )- (void )swizzled_viewDidAppear:(BOOL )animated { [self swizzled_viewDidAppear:animated]; [Logging logWithEventName:NSStringFromClass ([self class ])]; } void swizzleMethod(Class class , SEL originalSelector, SEL swizzledSelector) { Method originalMethod = class_getInstanceMethod(class , originalSelector); Method swizzledMethod = class_getInstanceMethod(class , swizzledSelector); BOOL didAddMethod = class_addMethod(class , originalSelector, method_getImplementation(swizzledMethod), method_getTypeEncoding(swizzledMethod)); if (didAddMethod) { class_replaceMethod(class , swizzledSelector, method_getImplementation(originalMethod), method_getTypeEncoding(originalMethod)); } else { method_exchangeImplementations(originalMethod, swizzledMethod); } } + (void )load { swizzleMethod([self class ], @selector (viewDidAppear:), @selector (swizzled_viewDidAppear:)); }
更简化直接用新的IMP取代原IMP,不是替换,只需要有全局的函数指针指向原IMP即可。
1 2 3 4 5 6 7 8 9 10 11 12 13 14 15 16 void void newViewDidAppear (UIViewController *self, SEL _cmd, BOOL animated) gOriginalViewDidAppear (self, _cmd, animated); [Logging logWithEventName:NSStringFromClass ([self class])]; } + (void )load { Method originalMethod = class_getInstanceMethod (self, @selector (viewDidAppear:)); gOriginalViewDidAppear = (void *)method_getImplementation (originalMethod); if (!class_addMethod (self, @selector (viewDidAppear:), (IMP) newViewDidAppear, method_getTypeEncoding (originalMethod))) { method_setImplementation (originalMethod, (IMP) newViewDidAppear); } }
通过Method Swizzling可以把事件代码或Logging,Authentication,Caching等跟主要业务逻辑代码解耦。这种处理方式叫做Cross Cutting Concerns 。
用Method Swizzling动态给指定的方法添加代码解决Cross Cutting Concerns的编程方式叫Aspect Oriented Programming 。
目前有些第三方库可以很方便的使用AOP,比如Aspects 。这里是使用Aspects的范例 。